If you planned home repair and intend to update the wallpaper, for conducting such finishing works will be required to prepare the walls. In order to get rid of the irregularities and get a smooth surface under the wake-up surface, it will be necessary to produce wall alignment. It is possible to do this with a variety of putty materials. After reading the technology of applying putty, such works is easy to produce on their own.
Content
What do you need putty the walls under the wallpaper
Refresh the interior of the room is easy by choosing and placing suitable wallpapers using high-quality glue. Before proceeding to perform these works, it is necessary to produce some preparatory operations of the draft finish in the form of a putty of walls, which allows to avoid difficulties with further wallpaper pasting. To do this, clean the surfaces from the residues of old wallpaper and the falling plaster, and then primed for a better clutch with finishing materials and to avoid the appearance of mold and fungus, and then align with applying putty on the walls. Careful alignment is especially important for further use in the interior of the premises of subtle or tissue wallpaper, for the gloveting of which will require a perfectly level basis.

To neglect the finishing of walls with a putty in any case - only applying a layer of a putty mixture will allow to provide the necessary smooth surface of the walls without defects (irregularities in the form of plastering, recesses and cracks), from the presence of which largely depends on the repair. After drying, the putty and the further opening of the walls can be stuck to stagnation in the room of new wallpaper.
Choosing materials for spatleing walls
To perform high-quality alignment of walls with the help of putty walls, it is important to prepare suitable construction and finishing materials.
The following types of putty mixtures are presented:
- gypsum - such a putty is characterized by low resistance to moisture and is intended for internal work, while it allows to obtain a qualitatively aligned surface of white, which will not shine through the wallpaper. The gypsum mixture does not give a shrinkage and is distinguished by a low cost, it is such a building finishing material most often used to putty inland walls. It is not recommended to use it in rooms with a high humidity regime - in kitchens, bathrooms;
- cement - Such mixtures are characterized by high moisture resistance, but give a tangible shrinkage, and also differ in the final gray color, which can be shifted through thin wallpaper;
- polymeric - these mixtures are characterized by a fairly high price, excellent moisture resistance, practically do not give shrinkage, allow you to get a perfectly smooth surface.
To apply the starting layer, a large-dispersed putty is usually used, it is possible to achieve a qualitative final alignment with a fine powdery mixture. The consumption of putty on the wall largely depends on the state of the treated surface, as well as its material. Experts argue that with an accuracy of a kilogram, calculate the consumption of the putty mixture is almost impossible. Thus, to plan the acquisition of the required amount of material, it is initially stupid from the information specified by the manufacturer on the package, with the addition of some stock.

According to the appointment, the following types of putty are issued:
- starting - leveling coarse-grained mixtures characterized by high adhesive and strength characteristics. Such a putty layer with a thickness of 3-12 mm is applied to the plaster for aligning the surface of the walls;
- finishing - These fine-grained mixtures are characterized by less durability compared to starting putties, convenient to process and allow you to get a perfectly smooth and smooth surface without any disadvantages;
- universal - combine the properties of the starting and finishing putty, differing higher costs compared to them and often yielding as a cover. Such mixtures are recommended to be used to put the wall surfaces without special flaws.
The modern market of construction and finishing materials offers dry powdered mixtures that are immediately reduced in a certain proportion to water and mix the drill with a special nozzle mixer to a homogeneous state. The advantages of dry putty can include relatively low cost and quite a long shelf life.

In addition, you can purchase convenient to use finished water-dispersion putty mixtures packed in the plastic container. Such a putty of walls under the wallpaper is suitable for beginner masters, as it is characterized by a balanced composition, it does not need to be kneaded - in this way you can save time, there is no dust. It is worth considering that ready-made putty mixtures are much more expensive than dry, they give a significant shrinkage, and they can not be stored for a long time.
How to put the walls under the wallpaper
To carry out the putty of the walls under the wallpaper on its own is not too difficult even for a novice master - it will be necessary only to practic a little to understand how to put a putty on the wall. This process is not too complex and requires not so much the presence of special skills, how much labor and time costs. Walls under the wallpaper are processed as follows - for sticking thin wallpaper it is recommended to apply three aligning layers of putty, dense wallpaper can partially hide some irregularities and surfaces of the surface, therefore there will be enough two layers. Such processing will contribute to the labeling of the finish without the appearance of non-psychic folds and bubbles.
Stages of performance:
- first, with the help of a spatula, the initial aligning layer of putty is applied;
- in the presence of significant irregularities of the walls of the walls, another 2-3 layers are added;
- after complete grazing, the putty is caused by the final finishing layer, which allows to obtain the optimal result of alignment;
- affected swept walls need to be treated with sandpaper to obtain a smooth surface.
Preparation of the surface of the walls under putty
Before starting applying putty on the walls, some preparatory work is required. First, it is necessary to clean the walls from the old coating, the residues of old wallpaper - if they are tightly glued, it is recommended to moisten them and remove after softening with a thin flexible spatula. In addition, it is necessary to check the strength of the old layer of putty and plaster, remove hopping pieces. It is required to get a clean wall without sticking garbage and formwork. Fat stains, paint and soot should also be removed.

Check the relief using the building rule and flashlight, highlighting them casual to the wall. Carefully run down the protrusions with a plaster with a plaster spatula, mark the revealed hole with a marker.
To facilitate further work, the walls prepared in this way require a layer of primer fluid. With it, it is possible to achieve optimal absorption and clutch with the surface of plaster, putty and the wallpaper glue with the further decoration of walls with wallpaper.

The optimal clutch of materials can be achieved, picking up the primer according to the existing surface type. For porous and loose surface, the primer of high penetration is suitable. For subsequent putty concrete walls, it is recommended to pre-treat primer fluid with high adhesive properties. The primer liquid is evenly applied to the walls with a brush or roller onto the walls, you can also use the paintopult or a special primer gun.
Required materials and tools
To carry out putty work, it is required to prepare a basic and finishing putty (it is recommended to use a plaster powder mixture), as well as the following tools and devices:
- a narrow spatula (with a width of 10-15 cm);
- wide spatula (with a width of 25-30 cm);
- angular spatula - to process wall joints and ceiling;
- drill, as well as a plug-in mixer-mixer for kneading a putty mixture;
- emery paper for stripping the surface of the walls;
- roller, brush;
- capacity 10-25 liters (for example, plastic business bucket).

The entire tool must be prepared to prepare - thoroughly wash and wipe dry with a clean rare or microfiber wipes.

Preparation of putty mix
In the case of the use of a dry putty mixture, it is important to prepare (knead) it is properly - the quality of the result obtained will largely depend on the consistency of the applied putty. Carefully read the instructions and familiarize yourself with the proportions of the addition to the water mixture, also refer to the specified life of the solution.
The patch mixture is mixed as follows:
- a quarter of either a third of the volume of clean water is added to the prepared pure capacity;
- to it gradually add powder powder, until the mixture appears above the water, and stirred slightly with a spatula;
- the resulting mixture is quickly mixed (optimally - with a drill with a special nozzle-mixer), as necessary, pouring water until a homogeneous consistency is achieved. It is necessary to ensure that the mixture becomes elastic and slightly adhered to the spatula. If the putty flows freely, it means that it is necessary to add some more dry powder. The linen mixture should be additionally diluted with water and mix thoroughly.

It is important to note that the starting putty is recommended to prepare in small portions, since dried particles appear in the process of drying the prepared mixture, affecting the quality of the coating.
Sequence of action by spit

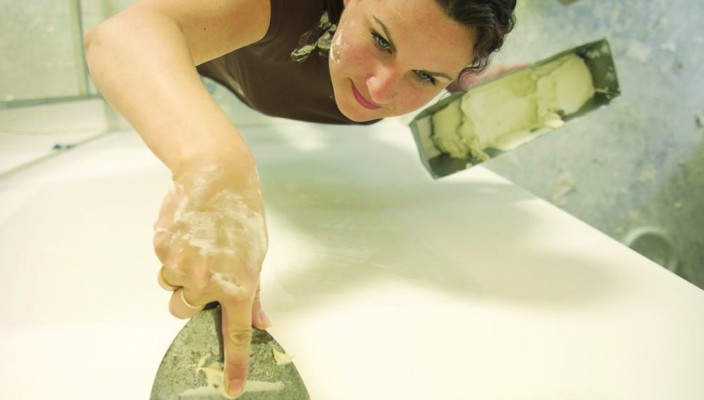
To apply wall putty, with their own hands, the following sequence of actions will be required for the wallpaper:
- On previously prepared (purified from the old coating and primed walls), you must first apply starting putty. It is convenient to perform work with a wide spatula - with its help with squeezed movements horizontally either diagonally apply small portions of putty, achieving its uniform distribution on the surface by a layer of 2-4 mm. The spatula should be kept at an angle of about 30 °, trying to evenly distribute the wrath mixture from the first movement. Excess the mixture required to be removed using a pure spatula. In order to avoid the emergence of noticeable transitions and bugrov, it is recommended to impose a mixture of a slightly brand of 10-25%. The wells and cracks are rapped by a narrow or wide spatula, depending on their size. Visible traces from the spatula will subsequently hob the finish putty.
- It is recommended to use the angular spatula to align the corners. First, using a narrow spatula, you must apply a small layer of putty on the processed area of \u200b\u200bslopes, then thoroughly align the surface of this wall area using an angular spatula.
- Next, the putty should be left for graze during the day. When drying the walls, do not allow the appearance of drafts from open windows or a balcony - should be ensured in the room soft internal ventilation through adjacent rooms.
- Waving to dry the surface of the walls of the walls, you can proceed to the final alignment. The applied layer of putty should be checked using the construction rule and flashlight. The discovered glances should be considered abrasive, lifting grooves. Next, it will be necessary to consistently and evenly process the room, overlapping a layer of 1.5-2 mm finish putty of the walls. With the help of a narrow spatula, it is convenient to impose on a wide minor portions of the putty mixture.
- After complete grazing of the putty, the surface of the walls will be required to be a fine-grained emery paper. It is possible to achieve the effect of a smoother surface, moving it first with circular motions, and then with light movements into the dispersion. After a day, after the work performed, you can proceed to sticking wallpaper.

Paying the necessary attention to the shit of the walls, you can achieve an excellent result that you will undoubtedly please.
Putty wall - Photo


