Warm floor systems consist of different components: each of which is its destination. The control of the heating mode corresponds to the thermostat for the warm floor. It comes to him about the ambient temperature and gender. Analyzing it, the electronics decides on the inclusion or disconnection of the heating elements.
Content
Connecting a warm floor to the thermostat when using an electrical heating system is mandatory. Another thing is a water heat: the thermostat in this case is not required, but it can be useful if the temperature of the coolant used exceeds 50 ° C at the input to the system. Automation will prevent the room overheating and excessive energy consumption.
Features and classification of thermostators
Temperature regulators (thermostats) are two species.
- Programmable (designed to perceive and execute complex programs). They establish a different floor heating temperature at different times of the day or, depending on the air temperature in the room. Managing such electronically digital thermostats is carried out using the touch buttons. Integration to the Smart Home system is possible.
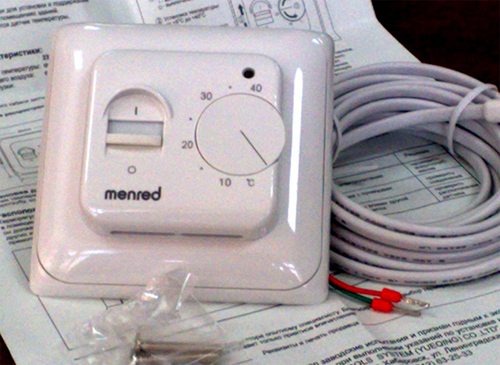
- Not programmable: The temperature is manually installed using a rotary regulator. It is an easy-to-use and reliable thermostat for a warm floor, its price is lower than that of the programmable, but also less.
Installing the heat-map thermostat of a programmable type allows saving energy. A relatively large cost of the device will quickly pay off.
The installation of thermostat is carried out:
- in a hidden way - in the recess on the wall (only the control panel remains outside);
- in the open way: the thermostat case is mounted with screws to the wall.
The installation method does not affect the functionality of the device.
The principle of action of the thermal catcher
The thermostat for a warm floor is simple. The main part of the heat-load temperature control system is the thermal sensor. This device is a thermocouple consisting of two wires. When changing the temperature of the floor, the chain resistance is also varied, as a result of which a signal changes to the thermostator. There is an inclusion or disconnection of heating.
There are remote-type sensors and embedded.
- Remote sensors are mounted in the grooves made in the floor and walls. It is important that the thermal sensor does not close with furniture or tight curtains.
- Embedded sensors perform the same function, but are located in the thermostat body.
Thermal controller for a warm floor: Connection Instructions
Consider the process using an example of an electrical heating system. It can be implemented using infrared film, heating mats or heating cables.
How to connect a heap thermostat: a phased description of the process.
- Using the design design project, you should set the optimal location of the thermostat. It should be on a free wall, not forced furniture.
- Diagram of connecting the thermal controller of the heating floor involves the installation of wiring from a separately installed circuit breaker.
- If remote thermal sensors are used, it is necessary to choose a place to install them.
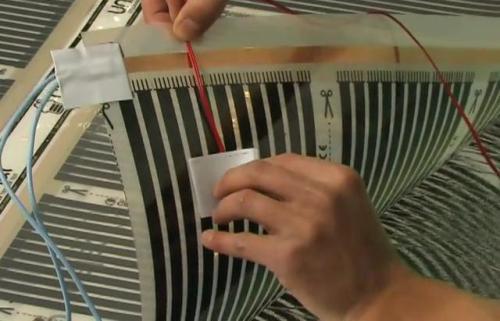
- Thermal sensors of infrared heating systems are placed under the film and connect soldering to the wires paved to the thermostat.

- Installation of the thermostat of the heated floor of the cable type requires the protection of the thermal sensor from the fill with cement. To do this, in the selected place under the tie, the metal corrugated pipe is placed in which the sensor with the wire is placed. The end of the pipe goes to the thermostat. In case of failure of the sensor, it will not be difficult to replace it.
- After installing cables or heating mats, the project is installed according to the project. For the built-in type of device with the help of a grinder and perforator prepares the deepening sizes in the wall. Coming and outgoing cables must be connected to it and hidden in the strokes.
- Thermostat front panel is removed, after which access to the rear wall and holes for screws are available.

- It is necessary to coordinate the switching power of the contacts of the device with the power of the heating system: it should not be less. If this condition is violated, the magnetic starter is connected to 220 V. If the switching power of the contacts allows you to do without a starter - the wires of heating cables or mats are connected to the corresponding terminals of the thermostat.
- The feed cable is connected to the corresponding thermostat contacts, observing polarity. Phase contact is denoted by the Latin letter "F" (brown or red cable wire), zero - "n" (blue, blue or white). Phase can be determined using the indicator.
After that, the following actions are performed:
- check the correctness of the wires and the thermostat's performance;
- connect the power cable 220 V;
- set the minimum heating temperature with buttons or regulator;
- include the heating mode to the toggle switch;
- the movement of the rotary handle or the buttons set the mode of the maximum temperature of the heating: the characteristic click of the circuit closer should be heard.
Thermostat for water heat
To control the servo drive (needed to adjust the supply of heated water into the heating system), a thermostat for a warm floor is installed. Reviews of the operation of a warm water supply provided by such a device indicate its effectiveness.
Thermostators can be with manual control and electronic. In this case, the sensors measure and transmit information about air temperature. Such a feature is associated with the large inertia of water warm floor.

Mounting the thermostat is performed according to such rules.
- Height installation of the sensor - within 1.0-1.2 m (on any wall, you can close with the thermostat). It is important that there are no other heat sources nearby.
- Perform the installation of wires connecting the thermal controller with the thermostat.

- In the event that the thermostat device allows you to adjust the servo drives, the circuit of the electrical connection between them is mounted.
- If the thermostat is used with radio control - it is set to configure it.
- Check the correct operation of the entire system using a thermometer: measure the temperature near the thermal sensors and compare with readings on the thermostat panel.
Finally - connect the thermal controller of the warm floor (video).


