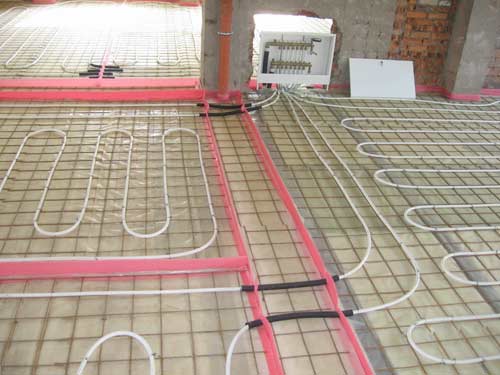
Warm floor - a unique heating technology, in which the source of heating is electricity or hot water.
Content
Advantages of water warm floors
- Evenly distribute heat across the entire square of the room.
- Do not overcame air.
- Exclude the occurrence of drafts.
- On such a surface, children can be played without a risk for a long time.
- Have a long service life.
- Reliable in use.
- Support the optimal temperature mode.
The only disadvantage of such floors is that they are expensive. but
It is possible to close the eyes, because, unlike the electrical, which require further global electricity costs and are able to heat only a small part of the room, water warm the entire surface.
Recommendations before the fill of the warm floor
Initially, it should be solved as a role it will be performed - to be used as an additional or fixed heating. In the event that it becomes the only equipment for heat intake, it is necessary to take care of the isolation of the house. Otherwise, to maintain the optimal temperature will have to overheat the floor.
Warm Pouring Technology
Preparation of the room
Before proceeding with the fill of the warm water floor, it is necessary to prepare the room, namely to dismantle:
- old floor covering;
- old tie;
- located under it filler.
If the latter, waterproofing layer, normal, then you can immediately begin the pouring of the roughing version of the screed.
In the event that the water floor must be connected to a central heating rink, then the latter should not be changed. If to hot water supply, it is better to dismantle it and install a polypropylene analogue.
Then in the riser, the balls of special cranes are soldered, so that when the pipes are turned off, the radiator can be connected to this site.
Waterproofing
The next step in front of the filling of water underground is waterproofing, which will help prevent various leaks from pipes that are included in the heating system.
In this case, it is recommended to use film building materials: linocur, isophlex, etc.
Progress:
- the lower part of the walls of the walls with a universal composition at a height of 10-15 cm;
- then the flasure is laid with a film with a lapse of 10-15 cm;
- the seams and the occasion of the walls are paled by a soldering lamp.
Blackspreadmill
Further before the fill of the warm floor, with your own hands, the stage of the flooring of a rough screed.
Recommendations:
- mandatory installation of beacons;
- there is no need to pour the draft floor if the initial coating was laid on concrete overlap;
- no need to fill the draft version if your gender is up to 10 cm from the level of overlapping.
Progress:
1. Using the level, we reveal the highest point of the base of the concrete and make the marking of the screed.
2. Fix the level of the future floor by 5-7 cm above the draft screed.
Recommendations:
- the height of the floor in relation to the roughing version of the screed depends on the diameter of the pipes. If the latter are 16 mm, then the thickness of the filling of the warm floor should be from 5 cm, if 25 mm is from 7 cm;
- to determine the height of the roughing version of the screed on the base of concrete, lighthouses are set - the hills of the thick solution of cement, which subsequently with the help of rail-level racks are mounted;
- if the screed thickness is large enough, the lighthouses are stacked on bricks;
- if the room has a small quadrature, then the beacons can not be used, but only perform markup on the walls.
3. Installation of a draft screed:
- i fall asleep and recall the ceramzite below the level of beacons by 7 cm;
- on it, fill the masonry welded grid or the chain grid;
- fresh sheets to slabs and walls, as well as fixed with a knitting wire.
4. Fill the composition.
A warm-aluminum pouring solution can be distributed using a hose. Then, using the rack rule, should be aligned the surface of the lighthouses. In the process of drying, the floor must be cleaned regularly.
Installation of pipes
Progress:
- we put the foil insulation with the mandatory occasion of the wall;
- we sink the joints aluminum scotch;
- mount the pipes according to a specific scheme;
- fix them with plastic fasteners.
Next, the pipes are attached to the ball cranes, soldered in the riser using silicone sealant.
Run the system exclusively after drying the latter. So it should work under pressure about 2 days.
After a certain period, water supply is terminated. Pipes need to give time to cooling. Next, start laying the first screed option.
Clean screed
The mixture for pouring the warm floor in the piston version is distributed similarly to the draft:
- lay out the reinforcing grid;
- mount Lighthouses-Reiki;
- pour the composition;
- align the solution by the rule, laying the ends of the latter to the adjacent lighthouses-rail;
- for the next day, a partially frozen surface, we proceed with a construction grater that aligns the screed and eliminates irregularities;
- we give the screed to dry to light gray.
At the end of all works, we fill a new flooring.
Filling a warm water floor video:


