When arranging the greenhouse, it is very important to correctly arrange the irrigation system. Today there are many options, but most often preference is given to a drip device. Such a pattern is easily explained by a number of advantages. Carefully read the advantages of applying such technology and the assembly principle to make sure your decision is correct.
Content
The advantages of drip irrigation in the greenhouse
Since the list is quite long, we note only the most weighty moments that are beneficially distinguished by this type of irrigation equipment:
- Full moistening of the root system of each plant.
- The rational distribution of the entire volume of water.
- Convenience and ease of operation.
- Lack of water overpower.
- The spread of a jet on the leaves and stem above the Earth is excluded.
- The ability to simultaneously perform and moisturizing the soil, and its fertilizer.
- A significant reduction in the amount of soil washed from under plants.
- Ease of assembly.
- Affordable price.
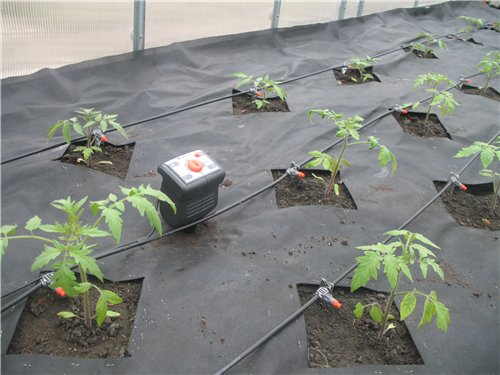
Important! Separately, we note the fact that the use of drip irrigation in the greenhouse helps to increase yield with small financial and labor costs.
Ways to arrange irrigation system in a greenhouse
To easily cope with the task, select one of the more suitable options:
- purchase of a finished set;

- independent assembly from purchased individual components.

Important! In the first case, you need to choose a suitable model of one of the well-proven manufacturers, focusing on the following criteria:
In the second - to choose one of the ideas of gardeners or to show his fantasy, reinforcing it with technical knowledge, and design your personal system from affordable handy materials.

If possible, prefer the installation of the finished kit, since in this case it will take less time to perform all the work, and the quality of the formed irrigation system, with the correct choice of the brand, will be high. This approach will exclude frequent emergency situations and warn regular additional costs of repair work. 
How to mount the drip watering system of the finished set?
To correctly perform installation with minor efforts and time costs, make all the work sequentially in several stages, clearly following the recommendations:
- Design the line wiring.
- Prepare tools.
- Check the accuracy of the completion of the finished drip irrigation system.
- Perform mounting.

What to take into account when designing?
The preparation of the work plan and the layout of the system is not complicated, but do not forget to pay attention to the following nuances:
- Make a greenhouse plan on scale with accurate location of the beds and their parameters.
- Perform all measurements with a roulette.
Important! Plan the gasket of hoses for watering with such a calculation so that it passes through all the ranks of the beds.

- Be sure to determine the water source more suitable for the conditions of your greenhouse.
- Mark the place of its installation in the diagram.
Important! Use the following options as a water source:
What tools to prepare for work?
When preparing materials suitable for the project of automatic watering of the greenhouse, follow the following list:
- Set of finished irrigation installation.
- Polyethylene pipes.
- Drill.
- Tool for cutting pipes.
- Scissors.
- Marker.
- Roulette.

What parts are the prepared kit?
Be sure to check the integrity of the parts and the presence in the set of all necessary components in the kit.
The standard set consists of:
- Drip ribbons.
- Disk filter.
- Connectors for connecting hoses to filters.
- Start connectors without cranes.
- Start connectors with cranes.
- Rubber seals for sealing all connections.
- Splitters and fittings for repair.
Important! Review the video overview of one of the sets of the automatic drip irrigation system.
Recommendations for assembling a greenhouse watering system
Before you begin installing a finished drip watering kit, read the manufacturer's instructions carefully. The scheme attached to the set will help more clearly present the sequence of operation and the possibility of connecting parts.
Check out the standard rules for assembling the irrigation system:
- Position the filter on the site between the source of water supply and the main pipeline.
- Install water supply tank.
Important! If you use a bottle or barrel, set the water tank at an altitude of 1-1,5m. In this case, prepare the support in advance.

- Drip tape so far so that it comes in exactly the territory of the bed.
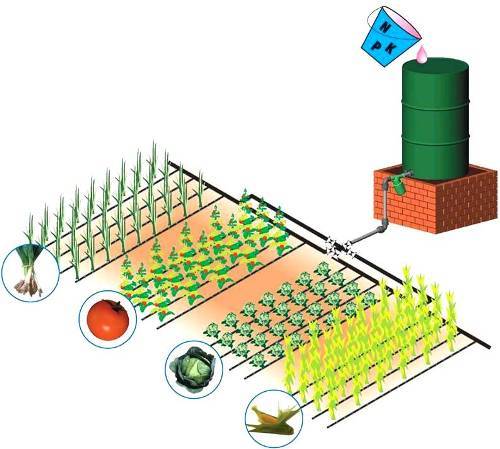
- Install the main pipeline.

- Apply a marker on the backbone of the mark in places of fastening drip ribbons.
- Drill holes strictly by marks.
Important! Diameter Select in such a way as to apply a slight force when installing seals.
- Insert rubber seals into the formed holes.
- Rubber seals secure start-connectors with cranes.
- Adjust the position of the nut in such a way that the taps are securely secured, but do not drag, otherwise it will be quick to flow.

Important! The use of cranes will allow in the future to independently control the intensity of watering for each bed and individual plants.
- Attach all hoses to the trunk pipeline using fittings and splitters.

- Mock the opposite ends of drip hoses.

- Connect the system to the filter.
- Filter Connect with a water supply capacity or centralized water supply network.
- Check that the system is valid.

How to make watering in a greenhouse with your own hands from girlfriend?
The principle of the device will be the same as when using the finished set of one of the manufacturers of equipment for the care of vegetable garden in the greenhouse. The assembly technology will also have a similar sequence. The only distinguishing nuance is an independent choice of all components. 
Important! Below is one of the most popular solutions that you can easily use as a guide to create a drip irrigation system.
What materials and tools to prepare?
Check out the list of materials necessary to create an irrigation system on your own project:
- Garden lightproof hose, the length of which will correspond to the length of the line laid in all the beds.
- Piecol for puncture holes under the dropper.
- Dropper.
- A variety of connecting details for the joints of the joints.
- Barrel or other water supply tank.
- Water filter.
- Cranes and valves.

Montaja technology
Perform work as follows:
- Install water supply tank.
- Set the selected type of filter.
- Make cutting the hose segments, the length of which will correspond to the bed lines.
- Crerate separate elements with fittings.

Important! If possible, give preference to compression products. Their installation is simple, and the degree of tightness of the connection is extremely high.
- Make the layout of the holes on the hose, focusing on the distance between the plants of the bed.
- Jump holes with hole punch.

Important! Tool Take a smaller diameter than the thickness of the drip tubes to insert them into the hose with a little effort.
- Insert into the holes of the dropper.
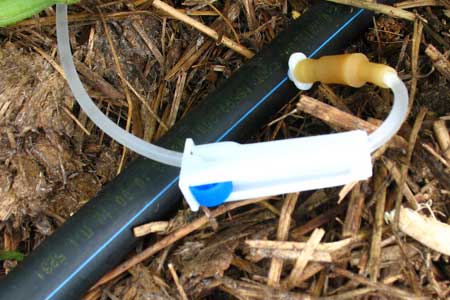
- In the installation site cranes, cut the hose.
- Install the cranes.
- Carefully check the degree of sealing during the sealing of the joints.
- Connect the hose with the filter.
- Check the efficiency of the system and adjust the jet pressure with a crane, and the frequency of dripping drops to the root system by the drop-down device.
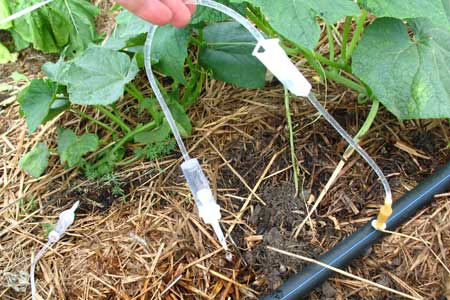
Important! Pay attention to the following nuances:
- Pressure stability after the opening of the crane.
- Uniformity of water distribution.
- The quality of the tightness of all joints.

Video
View the video in which another method is shown - the principle of the device of the drip watering system for the greenhouse with the PND pipes.
Conclusion
Regardless of how exactly you preferred, it is responsible to accomplish all installation work. Only with this approach the formed irrigation system will serve for a long time without the need for additional investments on repair.


