
The decoration of the roof of the metal tile is a fairly favorable solution, since this material provides high reliability at relatively acceptable cost. A unique appearance of this material will embellish any type of building and will definitely cause the delight of others, because it is simply impossible to notice the facade refined in this way.
Content
- The advantages of the roof of metal tile
- How to overlap the roof with metal tile with your own hands?
- How to choose metal tile?
- What installation technology is applied when laying?
- How to calculate the amount of material correctly?
- What tools to prepare?
- How to do the installation of the rafted system?
- Metal tile training technique
- How to install metal tile?
- Rules for behavior when installing a metal tile roof
- Video
- Conclusion
Installation of the roof of metal tiles itself implies a thorough knowledge of technology. Therefore, we suggest familiarizing yourself with all sorts of rules and recommendations for roofing with the use of this material.
The advantages of the roof of metal tile
Installation of the roof from metal tile, the instruction of which is proposed below, has a lot of advantages. That is why this material is distinguished against the background of other analogues.

The main advantages include:
- relatively small weight sheets - 4-7 kg in comparison, for example, with ceramic tiles or slate;
- ease of performing all installation work;
- a variety of color solutions reaching for some manufacturers up to 45 shades;
- the high strength of the material is achieved at the expense of the rigid rigidity created by profiling;
- environmental purity of tile material;
- universal use, allowing both a new roof and put the material on the finished base;
- acceptable pricing policy in comparison with other materials;
- durability due to the decay of the tiles of several layers of zinc and polymer additives, preventing the processes of metal corrosive;
- high levels of deformation stability due to sudden temperature drops inherent in our climate.

Important! The only disadvantage of the installation of the roof from the metal tile, the price of which largely depends on the scale of the project, is distinguished by numerous waste, which are formed during the material cutting process.

How to overlap the roof with metal tile with your own hands?
The procedure for mounting the roof of metal tile is not so difficult in execution, so you can safely perform work yourself, after reading the principles of technology and a certain sequence of actions. When deciding to equip the roof with such material, be sure to consider the permissible angle of inclination - at least 15 degrees.

Important! Note that it determines the value of the installation of the roof from the metal tile not only adherence to all rules of direct laying of the material, but also a competent preliminary choice of sheet type, principle of their laying and prepare all other consumables required to perform work. 
Progress
If you decide to improve the roof of your home with metal tile, certainly follow the sequence of the actions below, so that the forces to perform the installation of the roof are not in vain:
- Decide with the choice of material.
- Select the laying method.
- Calculate the optimal number of sheets and other consumables.
- Check the entire set of tools.
- Select the type of construction of the rafter and form the system according to the rules.
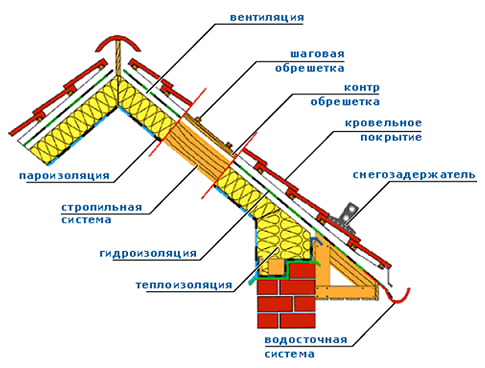
- Put the moisture-repellent layer.
- Arrange the ventilation system.
- Mount the hooks for the drainage system.
- Lock the bar on the cornice.
- Side Sve.
- Make the installation of a suitable crate.
- Squeeze and secure sheet metal sheets.
Important! Do not miss a single stage of the installation technology of the roof from metal tile. Only, in this case, you will be able to achieve a good result, and accordingly, and ensure the long-term operation of the roof and the whole house.


How to choose metal tile?
Today in wide-profile construction stores presents a considerable range of sheet material of this type. Select the appropriate option among such a variety will help you 2 principles:
- Waveform:
- asymmetric - metal tile of such a form is easy to buy in any construction supermarket, since most manufacturers make this type of sheets;
- symmetric - is present only in the range of larger manufacturers, so it is more difficult to purchase material, but perhaps.

- Wave height:
- small - up to 5 cm, is very popular due to low cost;
- big - 5-7 cm, due to its presentable appearance, the cost of such products is much higher.


What installation technology is applied when laying?
Depending on personal preferences, the skills and design of the roof, select the optimal laying option from the methods offered below. 
Method 1
This method implies styling as follows:
- On the end and the eaves, align the initial list towards right left.
- On top of it, put the top of the next sheet.
- Temporarily secure it in the center of the self-tapping screw.
- Align the first 2 sheets and secure them with self-draws.
- On the left side of the 1st sheet, set and fix the third one.
- Similar to 1 and 2 sheets, on the 3rd mock the fourth sheet.
- Finished block Align on the eternity and end.
- Fully secure the finished design on the crate.
Important! Further details are established by the same principle.

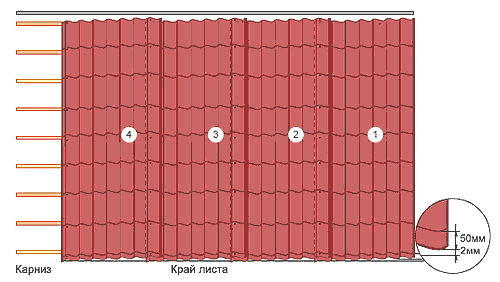
Method 2.
- 1st leaf Align relative to the end and temporarily secure the self-tapping screw.
- The 2nd sheet put, capturing on top of one wave of the previous sheet, and flatter relative to the first.
- Crerate them with each other with the help of self-tapping screws.
- In the same way, mount no more than 4 sheets by connecting them in turn.
- Check out the smooth laying of the resulting block on the eaves, leaving an indent.
- The resulting design securely fasten to the crate.
- The last sheet is not fixed until the next block is completely aligned.
Important! Such an approach reduces the presence of direct seams, and accordingly, and increase the strength and reliability of the roof, reducing the risk of fast destruction. But the consumption of the material will be a little more.


How to calculate the amount of material correctly?
To calculate the material being purchased most accurately, do the following:
- Divide the length of the sheet to the width of its working surface.
- The figure of the result obtained is rounded to the biggest.
Important! The dimensions of sheet details vary from 0.7 m to 12 m, but the ideal solution is considered to use elements of 4-4.5 m.

To calculate the total length of sheets and their quantity, follow these measurements:
- The length of the distance from the roof of the roof is up to the skate, given the indentation from the cornice 5 cm.
- Vertical leaf of material sheets per row 15 cm.
- After removing the measurements, the resulting numbers plus - this will be released.

Important! If the manufacturer cuts material according to individual parameters, then the calculation is performed by the manufacturer's employees. This option is quite acceptable due to the fact that the number of waste is significantly reduced.


What tools to prepare?

To create a metal roof, you will need the following tools:
- screwdriver;
- saw;
- hammer;
- electrolovik;
- roulette;
- knife;
- spray;
- metal scissors;
- drill;
- screwdriver;
- antiseptic and fire-fighting emulsion for the impregnation of wooden rafters;
- galvanized selflessness and nails;
- anti-condensate film;
- bars for crate cross section 10x3 cm;
- bars for rafted cross section 15x5 cm;
- moisture meter;
- metal tile sheets;
- building stapler and brackets.

Important! Choose high-quality primitive lumber without deformations and with a high level of drying.

How to do the installation of the rafted system?

To properly assemble the construction of the rafter, initially read the main installation rules:
- Purchase the rafter wooden bars with a cross section 5x15 cm.
Important! Wood moisture level of no more than 22%, ideally - 14-15%. - Seeing the bars if the indicators are higher.
- Perform antiseptic and fire prevention of beams using a special impregnation.
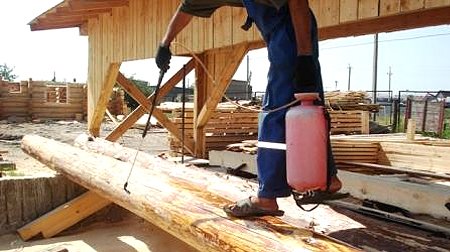
- Let the wood dry.
- Follow the right distance between the mounted rapid bars 0.6-0.9m.

- Put the rafted beams into target places.
- Secure the design with the help of screws and nails.

- Over laying a layer of waterproofing using an antioxidant film.
- Line it horizontally in terms of rafters so that the bands turn out to be a mustache, and the next row overlap the previous one towards the Sails.

Important! This technology will not allow moisture to get involved in the design. - Hold the distance of the adolescent 100-150 mm.
- The film between the beams rafters should slightly sag, about 2 cm so that in the process of operation it does not stretch and did not break.
- At the places of the allen, as insulating fastening apply the adhesive tape.
- Check the film around the edges at least 20 cm per line of swelling and cornice.

- Expand the edges of the waterproofer under the cornice and fix the construction brackets from the stapler or the mounting adhesive tape.
- In the process of installing rafters and at the end of work on their installation using a level, check whether the parameters of the structure are constructed.
- Secure the hooks under the drains on the rafters either on the cornice board with self-draws.
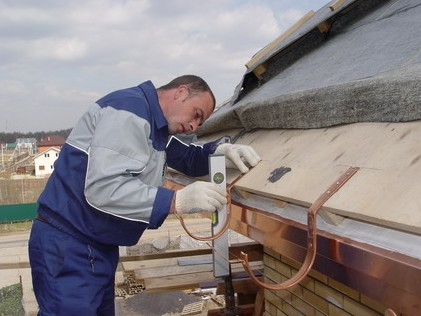
- Attach the cornice bar of the mustache from 5 to 10 cm on the frontal and cornice chalkboard with self-draws so that its tension is maximum.


Installation of crates
After executing the first block of work, proceed to the installation of the crate, applying the bars with a cross section of 3x10 cm.

The sequence of actions is as follows:
- Make the installation of bars along the rafters on top of the moisture-repellent film.
- Install the first board of the counterclaim strictly horizontally the edge of the cornice.
Important! As the first part, pick up a bar with a large cross section by 1-1.5 cm. - Schematically define the size of the laying of the rest of the bars.
Important! Depending on the type of metal tileage, the step interval must be 30-40 cm.
- Between the first and second element, take a step 28 cm.
- Mount the following bars of crates.
- In the fields of the junction of the skates, around chimneys and auditory windows make a solid design of the crate.
- Fix the entire design by sequentially roofing self-processes and nails.


Metal tile training technique
The preparatory work includes the process of cutting and transporting metal tires in accordance with the safety regulations. 
Transport and cutting rules
- Do not allow sheets of mechanical damage to sheets.
- Relieve metal tile from atmospheric precipitation from entering it.
- For the convenience of transporting sheets on the roof, use special lags.
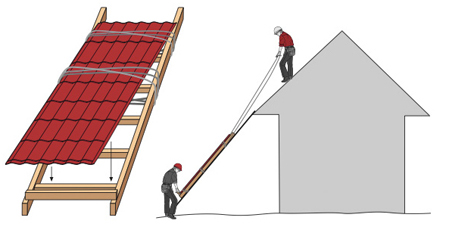
- Temporary storage of sheets should be strictly in a horizontal position.
- Remove the protective film only after making mounting.
- For the cutting of the material, use the metal hacksaw, an electrolovik or electronics.

Important! Do not carry out cutting sheets with a grinder. This tool may burn sheets and cause corrosion. If in the process of the status, there are still damage, treat them with protective acrylic paint.


How to install metal tile?
- Prepare all the necessary materials.
- Place the sheets in advance of the selected technology.
- Fix the sheets by self-assembly in such a way that there is a touch between the waves of metal tile and the crate.

- Lower sheets of material lay on the initial element of the crate through the wave above the step.
Important! Strictly keep one direction of the allen sheets aside, given the most frequent wind direction. - The subsequent rows of sheets are secure, given the smallest distance to the step.
- From the end plank of the cladding sheets to secure into each wave.
- In the places of the allen on the vertical lines of the sheets, fix with the help of self-samples of 19x5.5 mm in the decline in the wave.


How to perform installation in complex places?
- To improve the skate, make a separate status of metal tiles from individual waves or apply metallic special profiles.
- Attach the tile elements to a solid cake on both sides of the skate.
- Make the iron canvas around chimneys, fire and ventilation openings.

- Place and secure metal tile over the metal apron.
- All gaps treat mastic.


Rules for behavior when installing a metal tile roof
In order not to damage the sheets of metal tiles and not to be injured by itself, in the process of the installation, follow the following rules:
- To work, purchase shoes with a soft sole.
- In no case, do not step on the crest of the wave.
- Put the legs between the waves parallel to the skate.
- In the process of cutting material, it is desirable to wear a respiratory mask.


Video
Check out the video installation of the roof from a metal tile, which will help you quickly cope with the task.
Conclusion
Performing work on the design of the roof with metal tile is a rather time-consuming, but not a complex process. The main thing is to carefully read the rules and recommendations of the roof. This is not just an attractive roof, but comfort and comfort in the house.


