
The pavement or paving slabs are practical and durable material that is used everywhere to create a solid road pedestrian coating. It turns out beautiful sidewalks, squares, neat garden tracks and scenes around the house. Lowned seating area in the garden will remain clean and comfortable at any time of the year. A wide range of forms and colors allows you to choose the material for every taste and for any needs. As for the laying of paving slaves with their own hands, there is nothing supernatural and with due diligence any hardworking owner will be able to cope with this work.
Product specifications
First of all, we propose a closer to get acquainted with the object of discussion and find out what constitutes a paving. This building material created specifically for road coverage is still at the beginning of the 19th century. Initially, the blocking was used not only for sidewalks, but also for the roadway, since there was no better alternative, but with the advent of asphalt, the situation has changed. Today, in some cities in Europe, it is possible to meet the very old blocking of natural stone, but in rare cases it was made of durable painted wood. So, in Lviv still preserved an unusual wooden paving. The modern industry offers a lot of variants of materials for the production of blocks, however, to this day the highest quality and expensive are products from natural stone.

Initially, the pavement had a strictly rectangular shape, but today it is possible to meet rounded and even curly products. As for coloring, it may vary depending on the natural pigment added to the raw material. Of course, elements from natural stone have the appropriate color. They are made of particularly dense rocks: granite, basalt or marble. Granite is considered the most popular due to the availability and relative ease of processing of the feedstock. Laming, depending on the processing method, it can be a brushing, sawn or bean-saw.

But most often on the streets of the city you can meet a concrete paving, because it is the most economical and practical material. It is made of a high-density concrete, which is after kneading, the vibropressing is subjected to, resulting in a paving a paving the same forms and sizes. Elements are clearly adjusted to each other, resistant to temperature drops and strong loads.
There is also a clinker paving, for the manufacture of which special high-strength clay varieties use. Such products are very reminiscent of red bricks, as made from the same material. From clinker paversing, very beautiful paved compositions are obtained, it can withstand serious loads and can serve a very long time, keeping color and shape.

What advantages will give laying paving slats with their own hands:
- The most important advantage of the material is strength and reliability, so if you built a stone house, which will not have less than a century, wisely to improve the plot and garden tracks from the stone paving.
- Laming does not carry hazards for human health, animal or environment. This is a completely natural material that does not emit harmful substances during operation.
- Comfortable use - in the case of garden tracks, the main problem is the formation of puddles and pollution after the rain. In the case of a paving water, water will be seamless through the intercutric seams into the ground through the drainage pillow, preventing the formation of puddle.
- This is extremely durable material - artificial stone products will serve at least 30 years, not to mention a paving stone from a natural stone or clinker clay, which, as practice shows, is perfect for several centuries.
- High wear resistance makes a paving the perfect coating in the regions with especially frosty winters.
- This is an absolutely universal material, which in the case of which can be reused.
- In case of damage to any element, it is not necessary to dismantle all the coating - just to replace this item new.
- High aesthetics and natural appearance allow a blocking that is easy to fit into any landscape or become an original binding element of the exterior of the house with a plot.
- The laying technology of the paving slaves with their own hands is quite simple, you just have to get acquainted with the theory, prepare the necessary tools and materials and clearly follow the instructions.

Unfortunately, this wonderful material also has its drawbacks, but they will not be seriously called seriously. For example, the cost of certain types of pavers will force themselves even the wealthy owners, but it is fully justified by the comfort of use and the durability of the coating. If you still acquire a paving stone from a natural stone, prepare for the processing it will take special equipment. Also, the installation of any paving requires the creation of a drainage pillow, and this work occupies almost as much time as the styling itself.
How to lay a blocking
When laying a paving slabs in the country, it is extremely important to comply with technology, since it depends not only by the appearance of the coating, but also its durability. And the main condition for high-quality laying is to create an even and dense base. To do this, it is necessary to align the land, removing all the roots and plants, falling asleep all the pits and cutting off the bumps, and then process the surface of electrical or pneumatic bands. If it is not possible to get such a tool, the trimmer can be made of a thick log.

It is also necessary to prepare special tools that will help you produce smooth and tight laying of items:
- master OK;
- kiyanka (tree or rubber);
- pegs;
- vibrotrambovka;
- cord;
- building level;
- small river sophisticated sand;
- cement is not lower than M400;
- metal pipe arbitrary diameter;
- watering can or hose with spray nozzle;
- rake;
- makeup or broom.

To determine the required amount of tiles, thoroughly consider the layout of the site, given the location of all paved sectors.
Useful advice: All paved surfaces must be under a slight slope of 5 mm / 1 m². This is a prerequisite for the independent drive of rainwater from the surface. Otherwise, the moisture will be stamped and over time will wash the drainage under the tile, as a result of which the coating collapses. And, of course, the slope must be directed toward the sewer plum or simply from the house on the club, lawn or garden.
Step-by-step instructions for laying a paving slaves with their own hands:
- Any construction should start on paper, and working with a paving factor is no exception. Made in the most detailed in detail the scheme of your site with all the buildings and the direction of garden tracks. Then transfer this plan to the millimeter and designate the sectors that are planned to be cluttered. Based on the area of \u200b\u200bwork, calculate the required volume of the blocking (for this you need to decide on the type and size of the material) and add 10% about the reserve. Even if after work you will have extra elements, fold them into a dry ventilated storage room - in the future they may need to repair. In accordance with these data, determine the amount of sand and cement. The pegs to which the cord will be tied must be at a distance of at least 1 m, but not more than 1.5 m from each other.
- After marking, you can proceed to land. Remove the top layer of the soil to such a depth so that drainage and storage itself can be placed in the trench. At the same time, the surface of the paving can be slightly higher than the level of the Earth or in a heaven with it, but in no case below, otherwise it will be sleeped with water. Having taken out the earth, do not forget to create a minimum bias for water drain. If it still failed, it can be done with the help of drainage.
- The bottom of the trench of the trench as you follow by a typewriter or a log, then pour with a layer of river sand or gravel. The thickness of the layer depends on the density of the soil: if it is sufficiently dense, 5-15 cm is sufficient, if the ground is loose and scattering, it will take a thicker drainage at 15-20 cm.
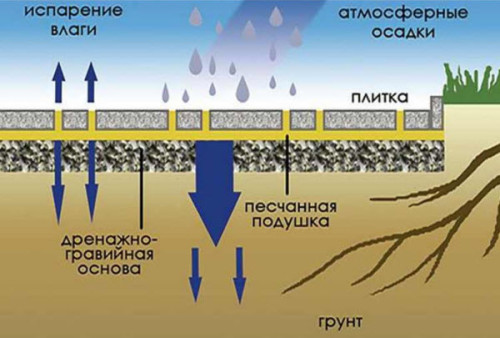
- Abundantly water sand with water from a watering can or the hose with a sprayer and confuse again. On complex relief, experts recommend to resort to concreting. To create a cement "pillow", mix the solution of fine river sand and cement M400 or M500 in a 3: 1 ratio. The thickness of the casting layer should be about 5 cm. To increase the strength, you can combine the drainage and cement pillow, laying the gravel at the bottom of the trench, then the sand, then geotextile and cement.
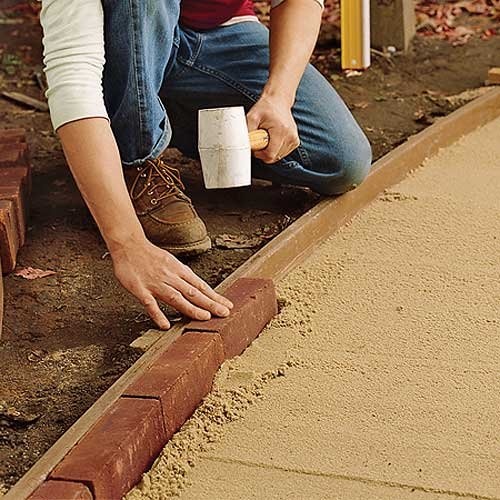
- Any paved surface without a border will seem unfinished, but first you need to put the curb, and then it is then to host the main area. To do this, you can use the same parallery, to purchase elements of a larger or buy special border elements. For laying along the track, you need to break through a separate trench, to the bottom and eliminate it with polyethylene or geotextile. Installation is made on a concrete base, therefore prepare the solution, but do not pour the entire trench immediately, and pour the solution during the installation of the border. Join the elements as close as possible to each other, pulling the upper face to the flush with a strained piping cord. For fitting horizontally and vertical, use the Cyanka. To make a border more durable, fasten into the trench cutting board, put the tile close to it.
- When, with the base for laying a paving stones, it is possible to finally move to work with a tile, but it is necessary to do this at least one day after the edge of the border - it should be captured. If the base is a sand pillow, it should be ridiched with water. Fly a wooden frame size 100x70 cm, set them close to each other and start laying the tile. These frames will help you do everything smoothly and carefully, and for beginners they are even indispensable.
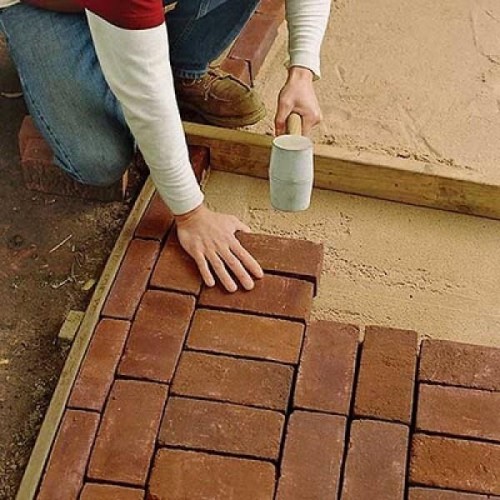
- Place the tile as much as possible to each other, creating a pre-selected pattern. Balamaster laying options can be the most different. If necessary, cut the tile with a grinder.

- After laying, process the surface of vibration with a special rubberized base so that it is not for the lacquer to split the tile.
- Put the surface with small sifted with moisture sand so that it gets in all the joints between the elements. After that, it is advisable to go to the vibrotambovka again or resort to the old attorney, but a longer way - to lift the sand in the seams with rigid bristles. It is very important to use for the grout only a clean sophisticated and very small sand, and if there are plant seeds or weed seeds, they will quickly warm and deform the tile.


Useful advice: Start laying the tile from the most noticeable area that adjoins the threshold. Each tile customize with Cyanka so that it is to be closed with adjacent elements. Control the horizontal surface of the surface every 1.5-2 m, the tolerance of the differences are not more than 5 mm. Pre-stretched between the pegs, the pavement cord will help you carry out the paving smoothly and neatly.
Let us summarize the above information video about laying paving slaves with your own hands:
Staying blocks: photo


