Ensuring the electricity of far apart - a problem that has long and is sharply before developers and owners of housing. Quite often, the buildings in the plots occur much earlier than there are the benefits of civilization. It is possible to solve this problem by alternative energy sources: the sun or wind.
Content
Advantages and disadvantages of wind generators

There are many opinions that alternative energy is ineffective but, despite this, such devices like: wind generators, solar panels and manifold can already be found in some villages. But the use of such devices is not possible everywhere, because their work is very dependent on natural factors. So, solar panels cannot provide a fully need for home in energy, as they require a huge area to generate 1 kW. Yes, and solar activity in medium latitudes for the year is not the same. In winter, the efficiency of solar panels will be minimal. Wind generators for home have sufficient power to ensure a small structure of electricity. At the same time, in some places, for example, in seaside areas, the magnitude of the wind is almost constant, which allows the use of windmill, as the main source of energy.
The disadvantage of production of electricity from the wind is the big cost of equipment. Factory models are from 1000 thousand dollars and 1 kW power, which makes them out of the reach of a wide range of users. However, this problem can be solved by making it yourself. About how to make a wind generator with your own hands - let's tell further.
Varieties of wind generators

Currently, a large number of different models of wind generators are used, which differ both on the principle of operation and by the number of blades and the material of their manufacture.
On the axis of rotation, the windmills are divided into:
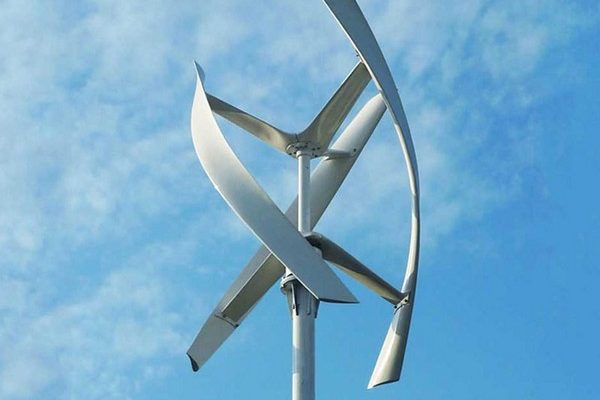
- Vertical. The axis of rotation of the generator in such a design perpendicular to the Earth. Due to the fact that all the details of the generator are at the bottom, it is easy to mount and maintain it. However, the effectiveness of such a design is not too high.
- Horizontal. In them, the axis of rotation of the generator is parallel to the Earth. Such installations are more popular for both households and electricity production on an industrial scale.
By the number of blades, wind generators are:
- Two-blade.
- Three-blade (most popular models).
- Multiboble. Multiborable wind generators are rarely used to generate electricity. The most commonly used as a drive of water pumps.

By material of the blades:
- Sailing generators.
- Generators with rigid blades. Sailing wind generators are simpler performed, but are not durable and have low efficiency than models with metal blades or fiberglass.
Consider the characteristics of the wind generator. So, the principle of operation of this device is quite simple. Wind stream, which is directed to the blade, raises them, forcing the rotor shaft rotate. Thanks to the magnets on the rotor when it rotates around the coils of the copper wire, an electric current is created that enters the battery. The latter, in turn, nourishes a home network if necessary.
Device of a wind generator

The wind generator consists of several main parts:
- Mast. It is a support of the whole design. Its height depends on where the wind generator will be installed. The higher the barriers that prevent the free passage of air, the higher the mast must be. For the domestic wind generator, masts are made of steel pipes or welded design.
- Generator. A device that converts the kinetic wind energy into electrical energy. The generator can be used as standard, and to wind it yourself.
- Blades. Thanks to the blades that are raised from the wind stream, the wind generator rotates.
Making a vertical wind generator of rotary type

The power of such a wind generator is enough to provide with electricity a small country house. The design will consist of 3 vertical blades, a shaft that will transmit rotation, generator, and beds.
To produce such a device, you will need:
- Voltage generator 12V. You can take a used device from the car. It's inexpensive, it is enough to go to any disassembly.
- Battery. Since the wind power is a non-permanent value, and it may turn out that the energy is needed, but there is no wind and, on the contrary, you need a battery for accumulating. An ordinary acid starter battery does not fit. It is better to buy a special high-capacity helium battery, since acidic does not like a full discharge (banks can simply fall).
- 12V direct current inverter on alternating current 220V. Power 600 - 700W will be quite enough for lighting, television and laptop. Of course, it is not enough for air conditioner or refrigerator.
- Car relay. Used to control the battery charge.
- Voltmeter.
- Copper wire section 4 square meters. mm.
- Clamps for fastening the generator to the mast design.
- Sheet steel for the manufacture of blades.
- Corner or profile tube for the manufacture of bed.

Order order:
- The first thing is cut the windmill blades. For this, the galvanized leaf is cut into stripes. After that, the latter are bend at a certain radius.
- The shaft can be used as steel pipe. He's joined by blades. In order to rotate the shaft, bearings in the frame set. They need 2 pcs. - top and bottom.
- At the lower end of the shaft mounted pulley, through which the V-belt transmits the rotation generator. The drive pulley can be taken from the same car (it is attached to the crankshaft auto). In this case, the belt is well suited to the generator.
- Digested from a frame profile pipe.
- After assembling the mechanical part, it is possible to start electrical connection. The generator is connected via a relay to the battery, which is included in the home network.
This is a fairly simple design, which can not boast of high performance. The disadvantage of it is that the high sail blade can cause them to malfunction when strong gusts of wind. However, ease of manufacture and maintenance, making it one of the most popular.
How to install a wind generator on neodymium magnets

This unit is more complex to manufacture and to operate, however, its efficiency is much higher.
Generator itself is made independently based on the automotive hub. Between its rotating parts will be installed from homemade stator coils are wound of copper. On the rotating parts of the rotor mounted neodymium magnets.

The works in this case carried out in the following order:
- Before you begin, you need to disassemble the old hub, test the functionality of bearings and lubricate or replace if necessary. Housing cleaned of rust and then painted.
- Root production generator should markup placing magnets on the hub surface. It is better to use a template. It is made on a circular piece of cardboard, the diameter of which is less than the hub diameter. It is divided into sectors by the number of magnets and attached to the hub. A pattern make a mark for attaching magnets.
- The magnets are mounted with the help of a two-component adhesive. It provides excellent adhesion to the surface. Before you start to glue the magnets, they should be spread over the poles. Doing this is very simple. It is necessary to apply a magnet marked "+" or "-", and then to plus bring another magnet. If it is a start, it's the same pole, so it put a mark "+" if attracted - "-".
- When installing the magnets need to be alternate poles. When the rotor magnets are pasted, the surface is filled with epoxy.
- Now you can proceed to the manufacture of the stator. Here you need to understand which generator is planned to be manufactured. For a single-phase generator, the number of stator coils should be equal to the number of rotor magnets, and the three-phase correlation of magnets to the coils should be 4/3 or 2/3. The three-phase stator is much better, as it has greater efficacy and does not vibrate with increasing loads.
- The total number of turns of coils for a low-speed generator ranges from 1200 to 1500. Sharing this amount to the number of coils, you can get the number of turns in each of them.
- For winding coils, it is better to use a large cross section. This will increase the generator power. It is also necessary to take into account the fact that the inner diameter of the coil must be slightly greater than the diameter of the magnet.
- The coils on the template on the plywood shape and are poured with epoxy resin. Before that, they must be connected in one chain.
- After the resin is driving, the generator is collected and tested with minimal load. By voltage, which produces a generator with a certain number of revolutions, it is possible to determine its power. To do this, you need to measure the voltage and resistance of the generator when working. Then from the received voltage to take away the battery voltage and split the result on the resistance. As a result, it will turn out the current that will fall on the battery.
- Now it remains to be made for the wind generator blades and mast. The material for the production of blades can successfully serve a PVC pipe with a diameter of 160 mm. It is cut from 6 2 meters long blades.
- The mast is a steel pipe, a height of 7-8 meters, at the base of which is attached to the movable flange for fastening to the concrete base. Thanks to this mast, it will be possible to lower repair work. After installing the mast, it is securely attached using steel cables.
This type of generator can ensure the work of most instruments in the house.


