Garden track is not only a beautiful decorative addition on the plot, then the functional element that provides the purity and ease of movement through the territory. The tracks may be natural and man-made, and the most optimal material for their creation is a stone. Laying stone on tracks - specific process requiring certain skills and knowledge. In this article we will tell you how to make beautiful and durable garden tracks with their own hands.
Content
Varieties of garden tracks
There are several types of roots for the garden depending on the method of laying and used materials:
- The paths are the paths created by naturally, that is, a person-trotted or rammed machines. It is very simple to create them, but such paths have a significant drawback - they are blurred during the rain and become very dirty and difficult. Protane tracks can be made more beautiful, posing on the sides of a neat border from bricks, cobblestones, paving slabs or river stones.
- Fucking is a very simple way to make cute and comfortable tracks on the site. To do this, it is necessary to dug a shallow ditch to approximately 10 cm, the internal space is to be taken geotextile with a density of at least 150 g / sq. m and strengthen on the parties a border. At the resulting base, pour pebbles, granite crumb, rubbank or explosion and dissolve. If possible, you can put the plates from concrete or natural stone from above, slightly drowned them in the sand to ensure reliable fixation.
- The bay tracks are the most reliable option that is used in cases where the tracks are subjected to a serious load (access to the garage). At first, the concrete base is made, and then the stone, paving or tile is stacked on it. If you make a track on a small elevation of 5-7 cm, then during the rain they will remain clean and neat, they will be easier to clean with snow and fallen leaves.
Laying paving slabs
Garden tracks from the stone are easy to do with the assay paving slabs. It will last no one year and give the plot of a neat appearance.
What will be needed for work:
- rubber cizyanka;
- pegs;
- level;
- rake;
- putty knife;
- hose;
- manual traam;
- channel;
- roulette;
- paving slabs with a thickness of 50-600 mm;
- rubbed fraction from 20 to 50;
- curbstone;
- m400 or M500 brand cement (can be replaced with a dry plastering mixture);
- geotextile.
Laying paving slabs takes place in several stages:
- Planning track direction - Creating a detailed drawing, choosing a method of laying plates (patterns), colors, calculation of the number of tiles (taking into account the reserve in case of repair), the flow of other materials.
- Marking - At this stage, the main thing is to do everything very accurately, and the roulette, pegs and cord (rope, thick thread) will help in this. Mark the direction and boundaries of the track.
- Preparation of the base - cut off the top layer of paths to a depth of 25 cm. If on your site, clay soil, you need to make drainage and spray it with a gravel or sandy pillow, then pour concrete (screed).
- Geotextile should be placed between rubble and sand, then the design will be stronger and more durable.
- The upper layer consists of a dry plaster mixture or a self-made cement mixture with sand. The layer thickness should be about 3-4 cm. After laying, to crush the surface with robbles and a chaserler.
- Laying the paving slabs - to lay it follows from ourselves, moving further towards. Pressing the tiles should be close, leaving a small gap of 1-2 mm. Each of them should be tamped by a wooden Cyan. Upon completion of laying one segment (1-2 m), check the result of the level and, if necessary, correct the position of the tiles with rubber xy.
- First, one-piece elements are stacked, and only the missing pieces (sides) are added at the end.
- When the track is ready, on the edges you need to make a border, securing it with cement mortar and sprinkled with sand.
- Suts between tiles float cement mixed with sand, tamper, watering water from the hose.
- Sprinkle the places where she asked from water, and pour out the hose.


You can use the track in 2-3 days.
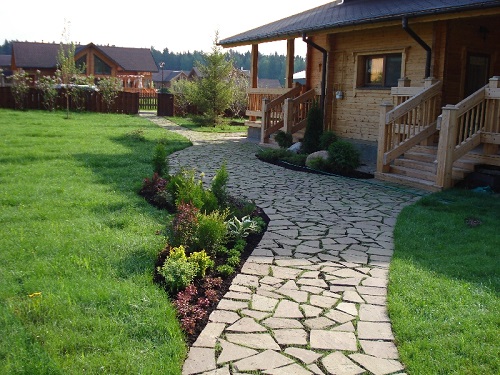
Natural stone tracks
Better than paths from paving slabs can only be paths from natural stone, which will harmoniously combine with natural natural landscape. There are a lot of ways to pavement paths - with patterns, ornaments, large and small stones, rocks or smooth river pebbles. The only thing that unites them is natural beauty and almost unlimited service life.
Garden tracks from the stone can be made from any breeds, but experts do not recommend using the sewer and limestone, as they quickly crumble and can rain.
Styling with cement
If you are going to dump the tracks from stone (photo), first you should form the outline of the future path with the help of pegs and rope. Come along the path to make sure of its convenience and correct the direction if necessary, because you will have to use this route for a very long time.

After you have planned the direction, you can start making a track:
- Drop the trench in a depth of about 20 cm. Dern (top layer) Remove aside, but do not throw out - it is still useful.
- In the resulting ditch, pour the layer of pebbles, rubbank or brick battle. Large material fractions will serve excellent drainage.
- Previously compact drainage and pour the sand layer over it.
- Next, the situation may develop in two scenarios: either you are placed with sand stones or - on a concrete solution. If you want to save and put in the shortest possible time, we recommend adhere to the first option.
- Place the stones on the sand, feeding them with rubber Cyans. Every 2-3 m fix the stones, pouring them with a liquid sandily cement solution, divorced in proportion 1: 3. To do this, build a cone from the cement bag, pour into it the solution and go through all the gaps between the stones.
- If you decide to make a stone path on a concrete basis, you can be sure that they will serve at least 10 years. Divide the concrete solution and put it with a 15-centimeter layer in the trench. Laying stone on the tracks also occurs with a slightly pressing and navigation with rubber Cyans. When the solution rises with stones, close the slots and wait for complete drying.
What should be taken into account when laying paths:
- The tracks should be understood on the ground at least 4-5 cm so that the water does not accumulate on them, and flowed down, leaving the surface clean and dry.
- Be sure to place the border around the entire perimeter, otherwise the track will "come out".
- Choose non-slip stones to reduce the risk of injury in rain or ice.
Launchless fashion
Geosynthetic materials, which is now a pretty set, allow you to make beautiful and neat garden tracks, even if you absolutely do not have construction experience. Moreover, you do not even need to use cement mortar!

What is an uncomplete way:
- Dig a trench with a depth of 25-30 cm and an arbitrary width (in the width of the future track).
- The bottom of the trench is cleaned from the roots of plants and carefully tumped.
- Buttoning the bottom and walls of the trench with non-woven geotextiles so that the edges of the panels stick to 30-50 cm outside the pit.
- On the cloth pour rubbank and compact it.
- Folding the protruding edges of geotextiles and cover the layer of rubble (it will be drainage).
- Pour a layer of small river sand with a thickness of 10-15 cm.
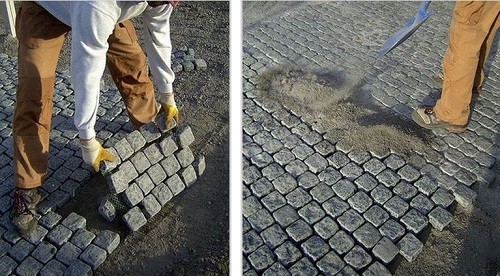
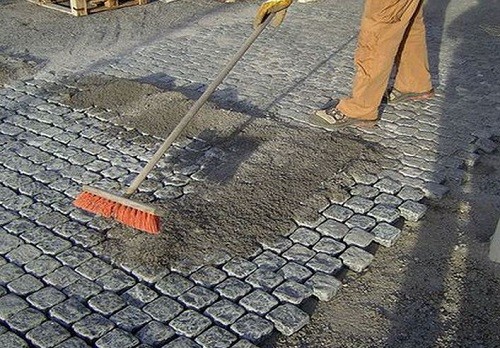
- Now you can put a tile or natural stones, tamping them with rubber xy.
- The slots should be pushed by sand, noticed by a broom, within 2 weeks after the end of work. Some elements can not be seen immediately, so it is necessary to constantly view the track.
Garden tracks from homemade stones
There is another way to create smooth beautiful tracks with special molding forms of stones. This technology does not require the creation of formwork, which makes it implementing it very simple and fast.


Progress:
- Determine the location of the future track and designate its direction and width.
- Remove the top layer of soil.
- On the bottom of the trench, put the sand layer with a thickness of 5-10 cm.
- Now you can start creating homemade stones. Cement mixture is made to fill in the form: 1 part of the cement is mixed with 4 parts of sand and 1 part of the water. The consistency of the solution must remind a thick sour cream.
- Pour in front of the fill in the recess of some water to seal the sand and prevent the seeding of the stone.
- During the fill, press the segments of the pieces of metal mesh or segments of the reinforcement so that the concrete does not crack.
- Constantly check that all segments are at the same level.
Finally, we suggest see which beautiful and unusual garden tracks can be made with their own hands from natural materials:


