To date, building materials allow you to create the most incredible designs and objects, which a few years ago it was possible to dream. It is confidently saying that this trend will continue to develop, and in the same active pace.
Content
It can be said that today it is simply necessary to use drywall inside the room today to create an attractive setting inside the room. This is the most building resource that allows you to make a real entertainment center from "gray" room. The main thing is to approach this case with the mind and do everything exactly as necessary.
Now in almost every city there are small organizations that carry out the installation of drywall in various construction work. Most often, with the help of this material, smooth walls are created, as well as some wall-based designs. For example, it is possible to create a decorative fireplace without any particular problems, which will not give out to the present material.
In this material we will talk about creating a two-level plasterboard-based ceiling. It should be noted that such a repair event is rather responsible, so professionals are often attracted to him. With the help of our article, you can fully analyze the process of creating a two-level ceiling and implement the entire work. With a proper approach, the ceiling transforms the room and makes it more cozy and modern.

The main features of the process
Despite the fact that the two-level ceiling is a fairly large design, it is created relatively simple. You just need to be attentive, as well as have all the necessary materials and tools. In addition, it is necessary to keep in mind that, in general, such repairs are not too expensive. First of all, this is because plasterboard is an affordable material that is often acquired in large volumes.
In addition, the positive side of this material is its low weight, therefore, in case of some problems when installing, even if the ceiling will be collapsed, it will not create any serious consequences. Of course, it is impossible to be allowed, but in terms of security plan, material is clearly better than their predecessors.
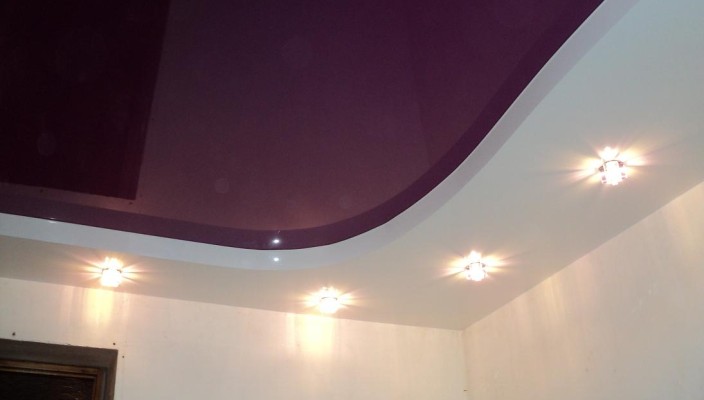
With the help of drywall, it is really easy to create a two-level ceiling, about the same as in many glossy magazines for the design of the premises. Moreover, the ceilings can be combined with other surfaces, for example, with stretch ceilings. The main thing is that it happens beautifully, so it is desirable to attract professionals who will select the most acceptable option for designing the room.
It is also important to know that to create a two-level ceiling you can use a small room, and a huge hall. Much more important to do everything possible so that it looks beautiful. If the room is really small, and the basic ceiling is too low, a two-level design can adversely affect the available space. If the room is too big, the scales of repair work may be too large for one person.
Often the two-level ceiling is a design that is located around the perimeter of the room, and in the middle there may be a basic ceiling and lighting elements. This option is the most practical and attractive externally. In some cases, the edges of the two-level ceiling have smooth bends, however, this decision is advisable only when we have an appropriate style room.
As regards directly designers who often create their own projects related to plasterboard ceilings, then they often create one or another design in a three-dimensional format (using special software). Accordingly, it is this way that can be familiar with the final result of the repair work. If you personally decided to repair repair, you can find ready-made options on the Internet, and based on them to analyze the situation.

Basic tools and fixtures
Often, in the process of creating a two-level ceiling, you must have the following list of tools:
- hoven for plasterboard;
- screwdriver and perforator;
- corolon, roulette, pencil;
- rule and construction level;
- construction thread;
- hammer;
- blades for cutting material.
Other tools may be needed, since much depends on the specifics of the room, as well as on some other factors.
The following consumables will also be required:
- plasterboard sheets;
- metal screws;
- carriers and guide profiles.
It should be borne in mind that it is necessary to start the process of creating a two-level ceiling only when all of the above materials and tools are available. Even the absence of one tool (or consumables) can seriously affect the success of the work.
Schemes for creating a two-level ceiling
As we said, the two-level ceilings are different. Accordingly, there are various schemes for creating such structures.
Creating a box with a visor and without
- First of all, it is worth noting that this design is created around the perimeter of the room. Accordingly, the center remains the base ceiling, on which you can safely stir the chandelier, or another element of lighting. Also, as we said, here we get the opportunity to place the stretch ceiling.
- In addition, the space inside the two-level design is often filled with various means of communication. It can be wires, as well as pipes. It should also be taken in advance to bring the wires for lighting elements that will be based on the ceiling.
Separately, I would like to note the addition for the two-level ceiling - the visor for the box. It is interesting that based on it is often creating additional luminescent lighting, which creates a really pleasant setting.
It must be said that often such a ceiling, in which luminescent lighting is present, allows you to peculate the room on the functional zones. Moreover, such unusual lighting can be used as an additional, or the main one, if you only need to highlight a little (for example, when reading the book, watching the film). Such a light will be insensitive, but quite pleasant. Also, the luminescent light source will focus on the irregularities that may be present on the base ceiling. Therefore, again, it makes sense to ensure the horizontal of the ceiling with the help of plaster, or just installing the stretch ceiling.
It is important to remember that the box, located around the room, can have one form or another. Often this is a straight corner, but the owners can make a choice and in favor of other options. Of course, for a person without experience in such work, something original to create is extremely difficult. The most important thing is that the future ceiling in the best way combined with the overall interior of the room. Most often, similar designs are created in order to emphasize the modernity of the house. Accordingly, now in fashion straight angles and smooth lines, and this can be achieved using a two-level ceiling.

Creating two ceiling tiers
Earlier, we talked about the option of creating a two-level ceiling in such a way that the plasterboard design was placed only around the perimeter of the room. In the case of bunk ceiling, it is implied to accommodate the drywall on the entire surface. Accordingly, a layer of plasterboard is installed on the base surface of the ceiling, and then the second tier (exactly the same as in the last paragraph).
This idea is implemented in the case when the base ceiling is obstruction, or has some other flaws. In this case, the plasterboard surface will allow you to realize a variety of plans for the decoration. In addition, a huge amount of communications can be held through the ceiling, and with this situation, it is necessary to create a certain space, through which everything would be easily passing. It is two tiers of a plasterboard ceiling will be the best solution, even if we have large pipes and other communications that cannot be hidden by any other means.
In this case, the process consists of the following steps:
- the basic ceiling area is mounted;
- the elements of the second tier are muted to the main frame.
However, if necessary, you can change a little idea, and for this, the box is first mounted on the perimeter of the room, and then the guide profile required for the main ceiling plane is installed. Experts believe that this option is not the most reliable, since it is advisable to create a base (that is, the first level), and further think over the further elements of the structure. Despite this, externally and functionally, these ceilings will not differ anything, and everything is about the same in terms of security.
Next, we will consider in detail the process of creating a standard two-level ceiling.
The most important thing is to remember that this process is quite simple, but the mistakes of the mistakes can still be allowed. Accordingly, it makes sense to explore all the information provided, as well as to conduct some consultations with specialists, if necessary.
Mounting process of two-level ceiling
Marking ceiling
Of course, everything starts with marking. It is at this stage that we can decide which problems we expect us with further repair activities.
- It is necessary to arm a tape measure and pencil. With their help, we must decide on the starting point that will become the bottom line of the box.
- With the help of a building level, you need to transfer this line to each angle in the room. Of course, it should be ensured that there are no deviations from the necessary values.
- Using the upholstered cord, you need to connect all the plastered points.
- Next, you need to read the lines that will be between the internal boundaries of the second tier structure.
Now it's time to draw the mesh for the suspensions of the first tier on the plane of the remaining space. Accordingly, at the intersections of the lines it is advisable to mount the suspensions.
As for the specifics of this grid, it is necessary to put the labels in the longitudinal opposite boundaries, the distance between which should be about 50 cm. On the remaining lines of the point are set at a distance of 60 cm. At this stage, the markup of the future ceiling ends.

Build construction
- First of all, you need to attach guide profiles, and this is done on the lines on the wall, and on the internal borders of the second tier of the structure.
- From the profile on the ceiling, you need to measure the distance to the lines on the walls. From the resulting value you need to subtract 1.5 cm, after which we cut into pieces of CD profile from one edge. Cut pieces are mounted in a profile on the ceiling. The profile is screwed using self-samples every 50 cm.
- A guide profile is screwed to the so-called "lip", and its sharp edges should be directed towards the wall. This allows you to quickly connect all components with a pieces of the carrier profile.
- Now it's time to cut pieces of CD profiles of the desired length, which are inserted into the guides and fastened.
- At the end there is a lining of the lower plane and the side edge of the frame.
Experts focus on the fact that it is at this stage that it is necessary to think about creating full-fledged lighting in the room. If a plasterboard ceiling is created, then this opportunity is not to use this opportunity. Thus, it is necessary to carry out all wires in advance, as well as other communications (if available), and locate lighting inside the frame. It is desirable to analyze all this and in advance to create holes required for lamps in the sheets of drywall. Often, many lamps are used in such design, therefore, with wires and their distribution will have to do. Also, all the wires should be positioned so that they do not confuse, and in case of any repair work, there were no confusion.
In addition, there are LED tapes that also well perform the role of lighting, while the best way is suitable for such ceiling structures. It is important to note that in this case you will also have to place wires into the box space. At the same time, this lighting will not become the main one, so you will have to additionally install the chandelier or some other sources.
Creating the first tier
- At the intersection of the lines, the suspensions must be fastened, and horizontal lines should be applied on the side edge of the box, which will be the bottom boundary of the first tier. Again, the guides are assigned to the lines and screws the screws.
- Now you need to insert a structural element in the guide profiles (a distance of about 60 cm), after which the profile is located 50 cm on the rest of the edges from each other. Thus, the design consists of peculiar cells, the dimensions of which are 50x60 cm.
- Using stretched threads, we obtain the desired location of the structural elements, after which we fasten them with suspensions.
- From the same profile, jumpers are prepared, which are mounted between all parallel-carrier profiles, after which they are screwed (step - 50 cm).
By and large, the main process of work is already behind. It remains only to check whether all design elements are located correctly, and if there are deviations - fix them. Next, the design is simply tinted with plasterboard.
It is worth noting that in the process of creating a design, it is necessary to repeatedly check for some problem areas. Often they relate to precisely elements of the frame, since small components may not be the best fixed, or just have low strength. Accordingly, after creating the design, it should not be hurry to install plasterboard sheets. It is necessary to carry out a small test strength of the frame.
Of course, after mounting the sheets of plasterboard, it is necessary to carry them out, which will allow you to get a really attractive and perfectly smooth surface. After that, some other other actions can be carried out on the ceiling.


