The housing heating device requires an optimal solution that depends on the availability of a source of energy. In some cases, the connection to the gas pipeline is impossible and electrical heating can be solved. Such heating, in addition to the main, is often used and as an additional - to heat the floor in the bathroom, the bedside zone and in the nursery. Electric home heating is different systems. Each has its advantages and disadvantages.
Content
Film infrared warm floor: mounting scheme
How to make electric heating economical? To do this, use new material - film warm floor.
Such heating has several advantages:
- Moderate electricity consumption - from 150 to 400 W / m²;
- Infrared warm floor lays down any coating and does not require a cement screed;
- there is no electromagnetic radiation;
- contributes to the formation of negative ions, which is useful for health;
- can be used in rooms where the floor level is impossible;
- The film can be dismantled and put in a new place;
- Installation of such a system is easy to perform independently;
- The operation of the floor can be started immediately after the end of the installation.
Film Warm Installation
Such work can be done yourself. Enough knowledge of elementary rules of electrical engineering. Phased process can be represented in the following form.
- The surface of the floor must be aligned and cleaned from dust.
- Thermal insulation material is laid. It is used for this foamed polyethylene with a foil outer layer: its shiny surface contributes to the reflection of thermal energy towards the room. Separate sheets are joined and connected with a wide scotch.
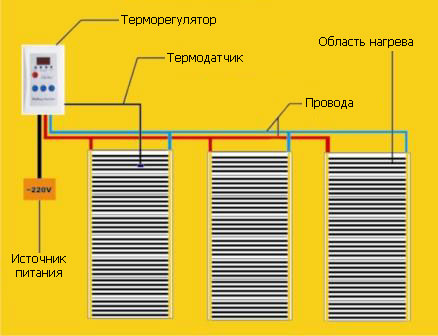
- Selects a place to install the thermostat on one of the free walls. A mounting scheme is prepared, according to which the film layout is made on top of thermal insulation. Preference should be given the location of the bands along the long wall: it will reduce the number of connection points, which means to save on the wires. You need to know where massive furniture will be installed: infrared film in these zones does not fit.
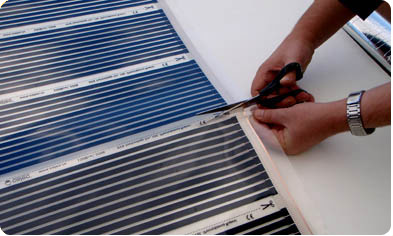
- If it is necessary to lay an incomplete strip of heating film, it can be cut according to special lines applied between active zones (orient to sign with the image of scissors).
- Film floor laying is made in accordance with the mounting scheme, while the copper strip must be addressed towards the floor, and contacts - towards the thermostat.
- At the edges of the copper strip, the contact clamps, which connect copper insulated conductors to be connected. It is necessary to isolate all terminals using "liquid rubber" and PVC isol. All conclusions connect to the thermostat as indicated in the manufacturer's instructions. All thermostat contacts must also be isolated.
- We connect the system to the electrical network and testing: the film must be heated evenly throughout the area, while the sparks in the wire connection zone should not be.
- For additional insulation, on top of infrared warm floor, we fill the polyethylene film, after which you can start laying the flooring. In the event that a high load is assumed, before laying the finishing coating, it should be covered with a film with sheets of moisture resistant HBL (thickness up to 6 mm).
- It is possible to exploit the floor immediately after the end of the installation. The exception is a ceramic tile: after it is laying, it is necessary to wait at least 20 days to the complete drying. After that, you can use the heating system.
Installation of the infrared heat control system
Automatic temperature adjustment is carried out using a thermal sensor. Its implies it where the load on the floor will be the smallest: this will prevent damage to the device. From the walls you should withstand the distance of 200 mm and deepen the sensor into the substrate so that its sharp edges are not crashed into the film.

In the terminal box of the wire sensor, which come from the contacts of the heating film, are connected via a parallel diagram. The wires from the thermostat are connected to the control circuit. After the installation is completed, make sure that the system is working: for this, the temperature regulator is set to the temperature and check whether the heating is turned off under the specified conditions. If the thermostat worked - you can start laying the floor covering.
You can familiarize yourself with some nuances of the installation of a film undergraduate floor using video.
Installation of cable electric heating floor
This type of electrical heating of the house is used as the main, but the consumption of electricity consumption should be made using a three-tariff counter. There are two types of such systems: heating mats and heating cables.
How to fit heating mats
The electric heating systems based on mats are mounted with the following sequence of actions:
- It is necessary to check the completeness: the dimensions of the mat and its impedance must comply with the information specified in the passport and on the package.
- Determine the location of the thermostat and prepare the grooves for the channel with a diameter of 16 mm in the screed for laying wires from the contact terminals to the thermostat. The same channel should be arranged in the wall for simplicity of replacing wires or thermostat.
- The base of concrete floor must be cleaned of dust and treat primer. This will improve adhesion of glue with its surface.
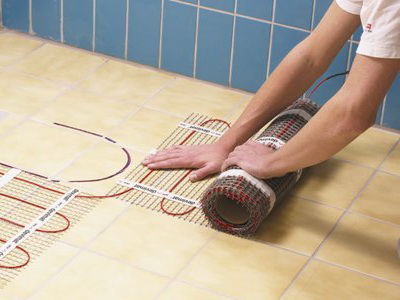
- To lay the heating mats to the floor, after which it is in advance the prepared deepening to place the temperature sensor. His place should be at the same distance from the adjacent turns of the cables of the heating mat. The crossing of the cable with the sensor is not allowed.
- Mats are stacked only with whole stripes. Changing the length of heating wires is not permitted. If you need a little configuration change, only the grid is cut.
- In the case when the length of the mat is much higher than the length of the room and the need to turn the mesh, it is cut, and then put it so that the distance between adjacent twists is less than 60 mm.
- If the geometry of the room complicates the process of laying the mat, the grid can be deleted completely, but the distance between the conductors should also not be less than 60 mm. Bending cable is categorically prohibited.
- In the event that there is an obstacle on the path of laying the mat, it is spared in such a way that the distance from it to the cable was at least 50 mm. At the same time, cutting mesh is allowed.
- To fix mats, a mortar should be used: a cement-sand mixture is laid out in a checker bag with such a calculation so that it does not create interference with the styling of the finishing coating.
- The thermostat can be mounted on any wall. The recommended distance from the floor is not more than 2 m.
- After installation, check the integrity of the insulation. The screen should not touch the heating cables. It is important that all contacts are connected correctly: electric heating in this case will function correctly.
- On top of the heating mat, it is recommended to lay ceramic tiles: this material, unlike parquet, is not afraid of high temperatures. Styling it is made both directly on the mat and after the device of the screed with a thickness of 30-40 mm.
- Include heating of the floor can only be completely drying the solution of tiled glue, that is, 28 days later.
The process of laying heating cables
This type of electrical heating is designed to lay under the screed. Phased in the whole process can be described as follows.
- Calculate the distance between the cable turns: it is equal to the separation result of 100 m² for the length of the section (the data specified in the passport). Permissible deviation - 10 mm.
- The distance between the ribbon brackets holding the cable is 25 mm, so the results of the calculations must be adapted to this size. The cable is laid in increments of 125 and 150 mm (alternately).
- Mounting begins with a cable laying from the installation location of the thermostat. The heating cable is distributed evenly, with permanent steps and without intersections. The distance between the turns should be in the limit of 80-150 mm. Flaw and stretching isolation are not allowed.
- Installation ribbon brackets are clamped without excessive effort: metal should not damage isolation.
- The minimum distance from the cable to the steam heating pipes should be 100 mm, the distance to the wall is minimum of 50 mm.
- The difference in connecting to the thermostator of a single and two-cable cable is that in the first case the wires are returned to the device, and in the second - this is done using the end coupling.
- Care should be taken with respect to cable insulation: work on their laying can be performed only in soft, rubber shoes.
In conclusion, video demonstrating the process of installing heating mats.


