
Interior design with ceramic tile gives many opportunities. With the advent of new production technologies, the color palette and the range of patterns of this material expanded.
Content
Interesting ideas for interior design

Monophonic white and pastel fragments of ceramic facing often seize boredom, although they are a kind of classic. Original solutions in this regard cause very lively interest. One of these proposals is a ceramic tile with a drawing of bamboo.

What is the features of cladding under the bamboo?
For the tile under the bamboo, a special technology is used, due to which not only color design appears, but the texture of the material changes. Interesting corrugation in accordance with the type of drawing gives it the volume and naturalness of the appearance of stems, leaves. Therefore, such a tile is perfectly combined with the other elements of the decor from a natural bamboo. 
Important! When using one type of material from this plant, monotony often appears, due to which the entire space is merged into a solid stain of the same color. Properly chopped tint and drawing of the facing tile will bring freshness, variety and additional decorative effect in the interior.

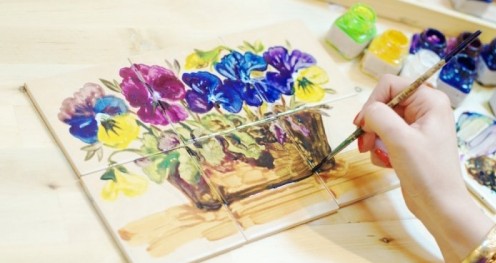
Floral motifs in the interior
Ceramic tile with floral pattern will give brightness, lively and special attractiveness. The choice of color palette is impressive by the violence of paints and species. In addition, the internal space, designed in this way, will constantly delight you and raise the mood, will not need a quick update, as the flowers are always in design in fashion.

Moreover, the use of ceramic tiles with a pattern for the arrangement of any type of room is relevant. Especially bright and elegantly the living room will look, the bedroom with flowers will set up on a positive way and will contribute to a full-fledged holiday. 
Is it possible to make a drawing tile on your own?
Given the popularity of patterns on facing material and additional costs in its manufacture, it is natural that its price is several times higher than ordinary, monophonic products. Therefore, there is a completely reasonable question: "Is it possible to apply a drawing on the ceramic tile with your own hands?".

This process is completely under power from a technical point of view, though painstaking. The main requirement is the maximum accuracy and artistic taste to independently develop the design of the drawing and color palette. 
Methods of drawing pattern
In large-scale production, several technologies are used:
- photo printing with firing
- photo printing with sublimation glue
- printing on ultraviolet printer.

All ways are available for use, but will require special expensive equipment for the last two and the oven for the first. Browse the tile process with a sublimation method in the applied video below.
More attractive, in terms of economy, the following two ways to form a pattern:
- hand-painted without template
- hand painted in stencil.

Important! Hand painted without a template under the power of more people with professional artistic skills. To create a really attractive facing of the room without them, it is recommended to use when drawing a pattern on the ceramic tiles of stencil.


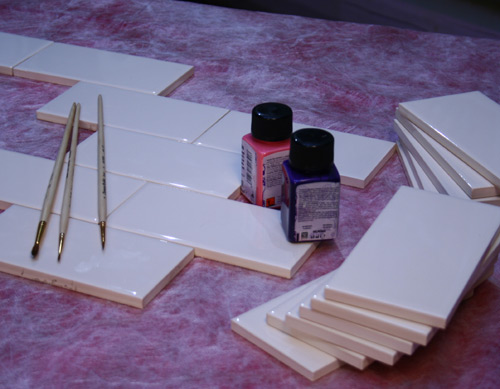
What will required for painting tiles?
To perform all works, prepare the following materials and tools in advance:
- tile (White or Color One Shade)
- stencil Slicing Lining
- laminated film or cardboard minimum thickness to create a stencil
- moisture-resistant primer deep penetration
- aerosol glue
- paper adhesive tape
- paint for ceramics (for example, water-dispersion latex or acrylic)
- brushes of different thickness (oriented on the drawing)
- sponge
- hard brush
- small-grained sandpaper
- cleaning
- degreased solution (alcohol)
- pen, marker, pencil
- calca
- cardboard cutting knife
- rags.


Important! If you doubt your abilities, buy a ready-made stencil in a construction store in several copies.

How to apply a pattern on the tile?
The whole process consists of several consecutive stages:
- Creating a template.
- Preparation of the surface of the facing material.
- Painted.
- Finishing work.

Creating a template
When making a stencil, follow the following recommendations:
- Select the pattern, picture from any catalog you like or draw yourself.

Important! Do not use very complex drawings with an abundance of small details. Clearly draw them on the tile will not succeed, so the entire image will be blurred, without certain boundaries of the flower transition.
- Transfer the pattern to the laminated film or cardboard, laying a tracing.

- Cut exactly along the contour.
- Prepare several instances of one pattern.


Preparation of the surface of ceramic tile
Treat the surface exactly with the recommendations below. This will provide a reliable grip of paint and the duration of the constant type of pattern. 
Sequencing:
- Clean the surface with a cleaning agent, sponge and rough brush.
Important! Especially carefully perform this work when updating the old ceramic facing.
- Rinse with water.
- Treat the entire facial surface of each tile fine-grained emery paper.
- Finish the grout after the soft roughness appears.
- Remove the dust remnants with a rag or a wide brush.
- Turn the tile by degreasing solution.
Important! This procedure will provide the highest possible surface, due to which the adhesive properties will increase.
- Wait for drying.
- Drink each piece of facing material.
- Start the execution of subsequent work only after drying the primer layer.
Important! The period of complete drying depends on the manufacturer. Read carefully instructions.


How to apply a drawing on ceramic tiles?
The process of applying the picture is more artistic, but, nevertheless, adhere to certain conditions of technology.
Sequencing:
- Choose a more convenient way to fasten the template.
- First:
- apply an aerosol glue to the opposite side of the stencil.
- secure it on the tile in 5-10 minutes.
- The second method of fastening the template to the material is a paper adhesive tape on the edges.
- Determine the sequence of colors.
Important! It is advisable to apply paint from the darker to the bright tone. This will avoid influx and irregularities.
- Mouse over the contour of the drawing.
- Circuit the contour of the paint of the corresponding color.
- Painting technology on the surface - point.
- Keep the brush at right angles to the tile.
- Wait for drying.
Important! If the paint is high quality, the time of drying the solution for painting ceramics is somewhat (up to 30) minutes.
- Fill in the inner pattern of the pattern.

Important! When painting, use not only brushes of different widths, but also a sponge, catching the paint with a wing motion. The effects of smears will differ, and accordingly, the whole picture will be more interesting and attractive.
- When applied with a brush not points, and smears, repeat the process of painting 2-3 times after drying the previous layer.
Important! Such a technology will provide the most rich color and a smooth layer without inclusion and vagueness.
- Wait for dried.
- Remove the stencil.


Video
View the drawing video to more clearly imagine the work process.
Finishing work

In order to give the drawing and the most ceramic tiles maximum strength and significantly increase the service life, follow the following instructions:
- Read the paint instructions, look for information about the possibility of heating.
- Heat the oven to 150 degrees if the rules for the use of paint allow heat treatment.
- Put the tiles with the finished painting on the baking sheet covered with parchment.
- Leave in the oven for 15 minutes.
- Disconnect the oven and enjoy.
- Leave the material in it until complete cooling.


Conclusion
As you have already seen, the entire process of self-design and painting ceramic tiles is not difficult. At the same time, the fulfillment of all work will bring many pleasant moments with your own hands. In order to continue to provide the longest possible operation, carefully take care of the surface, do not allow coarse mechanical and chemical exposure.


