Not the simplest thing - installation of the door block, especially if there is no need. And you need to embed the castle in the interroom door. But it is impossible to hurry, despite the desire to get rid of the problem faster, the errors cause the skew of the doorway and the failure of the locking device. To avoid trouble, we recommend to explore this guide on how to properly hang the door.
Content
Preparatory stage of work
Without the necessary tool and accessories, it is impossible to cope with the task. It should be cooked:
- Cyanka (Wooden hammer);
- Set of chisels;
- Electric drill with different diameter of drills;
- screwdriver or screwdriver;
- Construction knife;
- ruler, pencil, kitchen, roulette;
- building level;
- Raysmus, Mill.
Getting Started with door leaf
This can be performed in two ways: first install the box in the doorway, and then work with the web or mount the door cloth to the unidentified box. The second method is easier for one who fulfills such work for the first time.
How to hang the door to the loop? Phased in the whole process can be represented as follows:
- If the floor is even (what should be verified using the level and rule), the box can be put on it. But in order not to damage the coating, you should use the substrate or do everything on building goats.
- The door leaf fit into the box and the side racks in the lower part of it are fixed using the tape. Before this between the details of the box and the web, the sheets of dense cardboard should be inserted (with a thickness of about 3.5 mm) so that the rubbing surface is not formed, and it was possible to hang a loop and provide a free move. For bivalve doors between the canvases, a 5 mm thick laying is set.
- The width of the gaps should be the same.
- To determine the place of installation of the loops, you need to figure out the side of the door leaf close to the wall. The axial loop rod is always located on the opening side.
- Light fillety doors are attached to two loops. To do this, it is enough to retreat from the upper and lower edge of the canvas of 200 mm and make marks from the upper sections of the loop "wings". If the door is heavy, made of wood massif, you may need three loops. An additional loop is set in the middle.
- Markings are made and the door leaf from the box is required to be removed. The loops are applied to their places, and the contour of their "wings" will be burned by a building knife close to the edges.
- With the help of a cutter or chisel with a hammer, you need to choose wood on the outlined areas so that the "wings" hid in them flush. The chisel first should be overtaken in the mark of the markup of the sposue, at the angle of 45 degrees and with the help of the Cyanka make a depression along the contour. After that, the chisel must be turned over and remove the wood layer, moving away from the edge to the middle of the contour.
- Small emery paper should be slightly polished by a plot treated with a chisel. If the sampling of the wood was slightly no longer - you can cut from sheets of paper gaskets and correct the situation.
- The "wing" loop fit into the recess so that the axial rod is a parallel side face of the door canvase. Shell is scheduled to screw the screws of the screws.
- With the help of a thin drill, holes make, after which the loop is screwed into its place. Ships screws must hide in loop grooves.
- The second half is put on the loop rod and applied to the corresponding box rack for the wood sample zone. Preparation of the box to fastening the loop is performed in the above way.
Installation of the castle and other fittings
Now find out how to cut the lock on the door. This is the next stage of work, on the quality of the execution of which the normal functioning of the locking mechanism depends. Instructions for fastening this accessure looks like this.
- It should be placed where the lock and the door opening knob will be located. This is usually located below the middle of the door height, at the level of 800-1100 mm from the floor: it will be so more convenient to operate, especially if children live in the house.
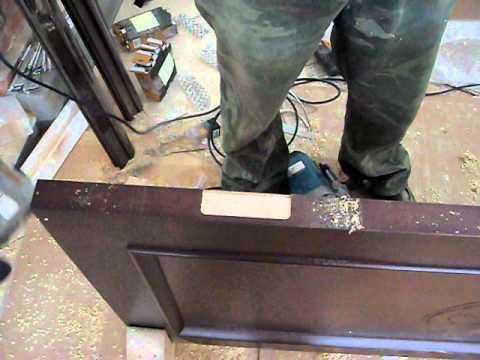
- There are no differences in the installation methods between the lock and the simple latch. Finding out how to properly cut the castle, we will cope with the latch. Both mechanisms are mounted in a mortise. At first, on the end face, the contour of the lock of the lock is placed and a sample of wood is made in the same way as during the mounted loops.
- Applying the lock from the plane of the door leaf so that they are aligned by the lock level of the lock and the place of its installation, we note the place of drilling hole for the keyfoil and the handle.
- Featuring the desired diameter, the feathers drill, with the help of an electric drill drill through a hole. In this case, it is necessary to ensure that the drill is part of an array of the door strictly perpendicular to its plane.
- To avoid the formation of torn edges from the outlet of the drill, to the doorway in this place should be tightly pressing a wooden bar.
- From the side of the plate placed the place of the recess required to install the lock case. It must correspond to its geometrical sizes and position. It is convenient to use the projection method, for which the position of the lock applied to the door plane is transferred to the end side.
- Using the chisel (hammer) and the chisel, it is required to beat the deepening. It is important not to overdo it: it will be very difficult to correct the situation. The degree of readiness is checked with fit: The lock case must be completely and freely installed in its place. The edges of the deepening should be treated with sandpaper.
- Now the castle can be installed in its place, fixing it from the side of the plate with screws. Pressure handles can also be fixed.
- Then the pencil chance is applied to the lock tongue and at the appropriate place to the door frame rack applied a narrow strip of white paper. Closing the door, notice the position of the lock tongue in relation to the box, after which they are placing the position of the response plate and the wood sampling zone.
- Already familiar ways we make a deepening in the box for the plate and tongue, after which we screw the detail of the castle with screws.
Important: In order not to form cracks in the wood array, at the scene of screwing screws, it is necessary to drill holes with a thin drill.
How to cut the loops and the lock with the mill
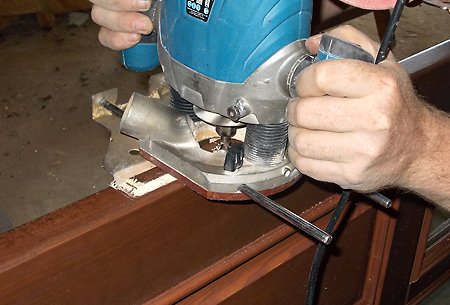
If you purchased an expensive door of solid and valuable rocks, do not risk it to spoil the chisel. If there is a special tool and skills to work with it, everything can be done carefully and faster. But for those who are unfamiliar to those with this way of working with wood, it is useful to learn about how to cut the castle with a mill.
We act as follows.
- After removing the transport package, we determine the position of the door in the doorway and the position of the loop. We plan these places.
- Install the door leaf so that it is convenient to work. If there are no special clamps or stands - a couple of chairs are suitable, between which the door put on the edge.
- Marking the placement of the installation of the loop and the lock perform exactly the same way as indicated in the previous section.
- The contours of the loop and the castle deepen with the help of a sharp construction knife: it is necessary so that the chips on the surface are not formed during the milling.
- On the hand cutter, we set the depth of the cutting part and the parallel focus. This device will not allow you to go beyond the planned perimeter of the sampling of wood.
- Near the upper and lower boundary of the contour should be careful: it is better not to "reach" the cutter, and then cut the millimeter by the chisel. Rounded corners are modified with a knife.
Important: Before proceeding with the milling, it is necessary to practice on wooden bars. Errors can cost a spoiled door leaf. You must be careful to avoid injury.
- After that, it remains to outline and drill holes for screws. The loop is screwed into place, after which it is similar to a sampling of wood to install the castle. The depth of immersion cutters is selected according to the dimensions of the lock.
In order for the sampling of wood faster and more accurately, you can use special templates that limit the cutter.
For greater clarity, we present a video showing the process of installing interroom doors.


