The most dangerous enemy of any basement are underground and melting waters, which gradually fill the foundation, destroy the reinforcement and seep inside. Plus, the walls of the basement are continuously experiencing a multi-torrent load from the box at home and from the ground surrounding it. In such conditions, it is very difficult to preserve the inner space. Fortunately, modern construction technologies and high-quality waterproofing materials help once and permanently solve this problem. If you are interested in how to make the basement waterproofing, read our article.
Content
Types of waterproofing
High humidity in the basement causes the appearance of mold, fungus, the destruction of the walls, which ultimately can lead to the deformation of the foundation and the collapse of the whole house. And so that this inspired perspective is not embodied in reality, it is urgent to take care of waterproofing. If the house is in the process of construction, then do everything right and efficiently much easier. But even if you deal with the old flowing basement, there are several ways to save the position.

Since the liquid affects the materials in different ways, for each specific case there is its own method of waterproofing.
Relying on this fact, such types of waterproofing can be distinguished:
- Anticipillary - protects the basement from dampness. The best option is penetrating waterproofing mixtures.
- Non-free - protects the basement from flooding during the spring melting of snow, strong sediments or floods. The main insulating material is a mastic based on bitumen.
- Anti-phoned - used in the pressure of groundwater to 10 m, in the absence of outer waterproofing of the foundation and drainage system. Forms a solid obstruction for water, which under pressure presses to the base. Unfortunately, this method of isolation will occur only outside and should be equipped during the construction of the house. However, when using some high-strength materials it is possible to make waterproofing basement from the inside.
According to the method of applying to the surface, waterproofing can be horizontal and vertical. The first is equipped during the construction of the house, and the degree of protection of the basement from water depends on its quality. Its task is to counteract the capillary penetration of moisture. Horizontal insulation is applicable for those cases when the basement floor is located at one level with groundwater or rests in dense clay soil. Hydrophobic materials are placed on the floor. By the way, the waterproofing of the floor in the basement is made in any case under any circumstances, even if the house is built on dry soil with a deep level of groundwater.

Vertical waterproofing can be organized both during the construction of the house and in the already exploited building. Its essence is to apply special hydrophobic coatings on the walls, floor and ceiling (rolled waterproofing, aerosols or mixtures). It is relevant in cases where the walls of the basement are at one level with underground waters, and under the floor there is no drainage pillow.
What you need to take into account when choosing a method of waterproofing basement:
- Physical and chemical features of the soil (degree of bunchiness, mobility, sand and clay content, percentage of salts).
- The level of groundwater occurs.
- What depth is the soil in winter.
- The climate of the region (the amount of precipitation, how long does winter last, etc.).
The best way to reduce the destructive effect of water on the foundation is to remove the liquid from the surface that adjies to the building. In other words, you need to make a drainage pillow and the right gesture. And if the first to implement it does not always work, then the breakfast should be configured in obligatory.
Choosing materials
Before you go to the store for waterproofing materials, it is necessary to study the specifics of their use in more detail. By the method of attaching to the wall, waterproofing can be coating, asphalt and ever. Consider each type of species in more detail.
Foolish waterproofing
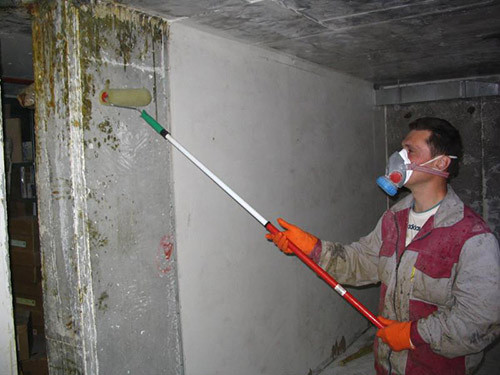
The liquid type of waterproofing, which is coated with the walls and the floor of the basement from the inside. Represented by a variety of compositions based on a special emulsion or bitumen mastic with additives. There are painted and penetrating waterproofing. In the first case, a layer of material is applied to the surface, which forms a waterproof film after drying. Typically make 2-3 layers with a thickness of 5 mm. To increase the protective characteristics, experts recommend over painting insulation to apply natural clay with a layer to 5 cm.

Mastic technologies is particularly popular, since it can be used even at a minus temperature, which is relevant for residents of the northern regions of the country. With applying it to the walls, anyone who knows how to use a spatula and a brush. The seams and cracks are simply poured with mastic, after which they leve out the surface with a spatula. For waterproofing of the basement of the basement from the inside, mastic №21 and 24 is also intended. There is also a mastic No. 33, containing latex based on it, but it is applied by spraying.
Penetrating waterproofing is capable of penetrating inside of the material (hence the name) to a depth of up to 60 cm. Its components react with concrete molecules, brick or blocks, creating a single waterproof layer without pores and cracks. In addition to protection against water, it increases the stability of the walls and the floor of the basement to the temperature differences and mechanical damage, thereby extending the service life. At the same time, the surface retains the parpropusk ability, which eliminates the formation of condensate.

Liquid glass uses the greatest demand among all types of penetrating waterproofing. It is easy and quick to work with it, and this does not require special skills. The composition has a high alkaline reaction, so before work, personal protection should be taken - put on gloves, respirator and glasses. Saves liquid glass extremely quickly - from 5 to 30 minutes. Depending on the thickness of the layer and the level of humidity.
How to work with penetrating waterproofing:
- Clean the walls from the old coating and sera. If necessary, remove the thin layer of material to open the pores. Sometimes it is enough to lose the wall with a rigid metal brush.
- Prepare the mixture - mix water powder according to the instructions indicated on the package.
- Move the surface of the wall, floor or ceiling.
- Apply penetrating waterproofing to the surface, starting with the angles and connections.
- After drying the first layer, repeat the procedure again. In order for the composition to have time to grab, wait before re-processing 2-3 hours.
- After completion of work, continue to moisturize the surfaces a few more days so that the solution solidifies evenly.
Asphalt waterproofing
As it is clear from the name, the asphalt is based on this waterproofing. It is applied to the floor with a layer with a thickness of no more than 15 mm. Distinguish cold and hot asphalt waterproofing. Hot has greater strength, but it is much more expensive than cold. It can be used for wooden coatings, because due to the high temperature, the composition can penetrate the pores of wood. Protective properties Hot insulation acquires after cooling, and cold - after hardening.

Outlet waterproofing
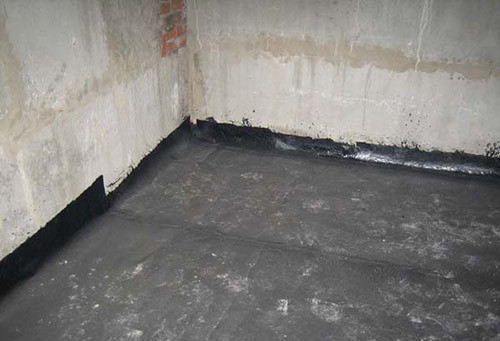
The most common way of waterproofing celled with their own hands. Represented by a variety of rolled materials, which are glued on mastic, special compositions or applied with a gas burner. The cheapest rooferoid and hydroizol uses the greatest popularity. To protect against moisture of wooden surfaces, their pre-primer is required for better adhesion.
Rolled materials attach 10-15 cm flashes to form a solid surface. The number of insulation layers depends on the force of groundwater. For fixing, use cold or hot mastic. Hot flashes with a layer with a thickness of 2 mm, and cold - 1 mm.

How to lay rolled waterproofing:
- Clean the wall from pollution.
- Remove irregularities if necessary.
- Cover the adhesive primer deep penetration.
- Cut the rolled material on the canvas, corresponding to the height of the basement walls, taking into account the allowance of 15 cm on the floor.
- When the primer dry, cover the wall with bitumen mastic.
- Overlapping waterproofing cuts with an overlap at 10-15 cm, scraping the joints of the mastic.
Cement waterproofing
This type of insulation is represented by a mixture of cement and sand. It is deceived by the floor and the walls of the basement with a spatula or brush. To enhance protective characteristics, it is recommended to use waterproof cement or portland cement with additives. This is the most reliable form of protection of cellars from moisture penetration, but at the same time work will require patience and time.
The main advantage of cement waterproofing is the availability and relative cheapness of consumables. When using polymer additives and plasticizers, it is possible to give a cement mixture elasticity or operating at a minus temperature. The shortcomings can be attributed to the briefness of such protection even when taking her strength. On average, it will last about 10 years.

How to apply cement waterproofing:
- Clean the walls from pollution and old coating.
- Abundantly moisten the surface with water.
- Introduce the solution to the consistency of very thick sour cream. Follow not lumps. Varnish the mixture in your discretion depending on how much the thick layer of isolation you want to get.
- Apply a solution with any convenient tool: flat-wide brush, roller or spatula.
Preparation for waterproofing
Before engaged in the waterproofing of the basement from the inside, see if it is possible to improve the protection from the outside. In most cases, dampness in the basement appears due to impaired or improper waterproofing of the outside of the foundation. Only in the case of a competently performed scene and creating a drainage pillow water will move away from home to a safe distance. Complex work on waterproofing is the key to a successful outcome of the case. But to dig the foundation around the perimeter of the house and to strengthen the defense is far from always, so it is worth repelled from the situation.

A total of comprehensive waterproofing works are as follows:
- Examination and strengthening of the cabin at the perimeter of the house.
- Detection of sources of moisture intake in the basement.
- Preparation of the design of the foundation for filling cracks and seams.
- Waterproofing of cracks and seams of the foundation.
- Performing filtration waterproofing floor basement.
- Ensuring reliable ventilation of the room.
- After that, the result should be "consolidated" by making drainage on the territory adjacent to the house (grooves, waste grilles, etc.).
Beginning waterproofing of the basement from the inside follows from hydrological surveys of the soil on the site, setting the depth of groundwater and the depth of the soil freezing. If water is underway under the foundation, you can be glad - you will save money on drainage and lowering their level. In such a situation, only protect the walls and the floor of the basement of inexpensive materials.
The second, which is worth stopping, is to inspect the cesspath around the perimeter of the building. Its width should be at least 100 cm. The breakfast can be made from concrete, asphalt, paving slabs, natural stone. The main thing is that the material does not miss the water and did not have cracks.

How to make high-quality disposal:
- Drop the trench around the perimeter at home with a minimum width of 100 cm, 30 cm depth.
- Pour the bottom of the trench with a bold clay layer 10 cm and thoroughly confuse.
- Over the clay, pour 5 cm river sand and also sink.
- The next layer is 5 cm rubbing fraction 10 mm.
- Strengthen the accumulation of the reinforcement grid with 10x10 mm cells.
- Fill the remaining trench depth (10 cm) cement-sandy solution. Cement is better to choose a brand not lower than M300.
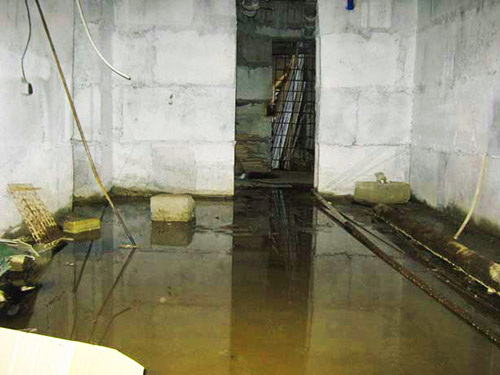
When the scene is ready, you can be engaged in the basement survey from the inside. To begin with, inspect the floor - if there is standing water on it, it must be downloaded and dried. After that, to detect the source of the penetration of groundwater into the basement will not be difficult. If the fountainists were found immediately after turning water, it's bad, but fixable. In this case, you have to raise the floor level. Stick these openings meaninglessly - you will only spend time and money, and nature will take your own.
If the water comes from the walls, you must first wait when it stops flowing, and then take for waterproofing. In most cases, it happens when the walls cannot contain the water pressure at strong precipitation or during the spring thaw. All places through which moisture comes with, mark chalk not to lose. When water stops flowing, dry the basement with the help of a heat gun. Before the deceased, take care of good ventilation so that the evaporated moisture is where to go out.

When the basement became dry, prepare the seams in the concrete to the sealing seals. To do this, remove the old solution from them to a depth of at least 5 cm. The walls, the floor and the ceiling must be treated with an antiseptic with a brush or spray gun, after which the hydrophobic primer of deep penetration.
Floor protection
Make high-quality waterproofing floor in the basement only at the construction stage. But there are several techniques that allow you to work already during the operation of the house. If we talk only about waterproofing from the inside, it will not be enough, but to strengthen the protective characteristics of the coating with special materials are quite possible.

Concretion is the most reliable and durable method of basement floor insulation:
- Put a layer of clay with a thickness of 15-25 cm on the floor and thoroughly confuse it.
- Check the cement-sandy solution in a ratio of 1 part of cement, 1.5 parts of sand and 2 parts of gravel. Cement Choose no less than M400.
- Align the concrete screed and leave to dry for 2-4 weeks.
- Once a day splash concrete with water so that drying happens evenly.
- After the specified time, fill the second layer of concrete with a thickness of 7 cm, prepare it according to the recipe described above.
- Wait for drying and install the floor with a finishing coating - linoleum, tiles, self-leveling bulk mixture.
Only after the protection of the floor can be moved to waterproofing walls.
Protection of walls
First, all the corners and joints should be missed. For waterproofing the basement from the inside, the penetrating mixtures are best suited, especially when it comes to concrete walls. If you are going to cover the walls with a cement mixture, specialists recommend adding liquid glass to improve its protective characteristics.

Seams in brick and block walls should be cleaned with a depth of 2 cm and fill in bitumen mastic. In order for the wall to acquire a homogeneous color, apply the composition with a lighter structure on top of the waterproofing mastic, then plastered the surface of the cement mixture with liquid glass.
Another effective material for the basement waterproofing is liquid rubber. It consists of bitumen and a set of polymer additives. The principle of operation of liquid rubber is to ensure the maximum strong compound of the membrane and the base at the molecular level. The rubber surface does not rot, it can withstand a strong water pressure, temperature differences, the effects of fire. It is easy to repair, and with careful use, such waterproofing will last long decades.

How to make waterproofing basement from the inside of liquid rubber:
- Clean the walls from pollution.
- Treat the surface with an antiseptic.
- Align the wall if necessary (wall alignment due to rubber will be too expensive).
- Apply adhesive primer deep penetration, starting with corners and cracks.
- After 3-4 hours, when the primer dries, apply liquid rubber using a roller or a special spraying unit (depending on the composition). In the case of machine waterproofing, the cost of work and lease of the equipment will exceed the cost of the liquid rubber itself, but the coating will be kept as much as possible and applied evenly.
- Perform decorative finishing works after rubber frozen.

Useful advice
Finally, we suggest familiarizing yourself with the useful recommendations from professional builders who will help you make the waterproofing of the basement from the inside as much as possible.
Recommendations of specialists:
- Be sure to throw away the water from the basement or wait until it leaves it yourself. Waterproofing work in the raw room is not allowed.
- Before applying any waterproofing material, the wall should be cleaned and if possible to align.
- All seams and cracks must be replaced and cleaned so that later they do not turn into potential spacing.
- Apply each subsequent layer of coating waterproofing only after complete drying of the previous one.
- Be sure to use adhesive primer. It is better if it is hydrophobic and deep penetration.
- If you make waterproofing the basement in a new house, then it can give shrinkage. In order for the walls to do not collapse, strengthen them with a reinforcing grid and apply waterproofing on top of it.
- If the floor is in the basement of the soil, pour into it a layer of crushed stone with a thickness of at least 10 cm and fill with concrete, after which the bipathy mastic or stick the rolled waterproofing.
- Do not cover the walls or floor of the basement with oil paints if it is heated.
- Staircases leading to the basement should also be protected from moisture.
- Be sure to organize high-quality ventilation of the basement.

Make waterproofing in the basement from the inside is completely simple. Moreover, this work takes not so many tools and time as it may seem at first glance. If you wish, any owner will cope with it, seeking to save and sort out in the basics of the construction of a private house.


