
Water heating of the floor is an excellent solution that allows you to create a warm and cozy atmosphere in your home even in a cold winter time. Especially relevant installation of warm floors becomes when a child appears in the house, which will certainly crawl along the floor. In addition, the water heating will save all family members from the cold due to foot overcooling. As they say, keep your feet warm, and head in the cold. How to make heated floor with water with your own hands, you will learn from this article.
Content
- Advantages and disadvantages of water warm floor
- Warm floor mounting methods
- Criteria for selecting and calculating a heap system
- Water heating floor
- Preparation of the foundation
- General Mounting Rules for All System Types
- Water floor mounting technology on a concrete screed
- Laying of a warm floor - polystyrene method
- Installation of flooring with heated wooden coating from modules
- Laying the water system on a wooden floor
- Rules of operation of warm water floor
- Conclusion
Advantages and disadvantages of water warm floor
Most people somehow seeks to reduce the costs of housing. Heated floors of water - the pleasure is not cheap, but, knowing how to make the installation with your own hands, you can minimize financial spending on the comfort of comfort in your home. 
Important! The heating price of water is largely depends on the selected technology and the type of base. How to choose the best economical option, find out below.


The advantages of warm water floors
Competently designed water floor with heating brings the following advantages:
- allows you to evenly warm the surface of the floor on the entire area of \u200b\u200bthe room;
- does not affect the appearance of the room, since the system is completely hidden from the eye;
- provides a warm area of \u200b\u200bthe house with a minimum cost;
- mounting effectively pays off in the process of subsequent operation due to savings on electricity;
- minor temperature loss in the heating network;
- low probability of leakage.

Floor Defects with Water Heating
The installation of warm water floor has a number of difficulties that can be called disadvantages:
- the presence of certain difficulties during installation;
- lowering water pressure throughout the riser;
- difficulty in determining the place of the accident;
- the need to apply a special water pump;
- the complexity of adjusting the temperature of the floor surface.

Important! Water system is permissible to create exclusively in the presence of autonomous water supply in the conditions of a private house. To enhance comfort in the apartment, this method is not suitable - it is associated with a complex procedure for obtaining appropriate permits and may later affect the quality of heating and hot water in other apartments.


Warm floor mounting methods
Installation of warm water floors, of course, requires certain knowledge and skills. But, having familiarized with different technologies, you will be quite able to pick up the most acceptable for yourself and install the system yourself. Be sure to do it before making water heating with your own hands. 
Concrete Mounting Technology
This method involves the installation of the system and its elements under the solid concrete screed. This is due to the fact that during the installation process you will certainly encounter with a large number of "wet work", which requires labor and time costs. Flooring, be it laminate, linoleum or tile, is stacked only after a complete drying of the concrete screed. This period lasts about 28 days, depending on the thickness of the screed. Despite this complexity, this method is quite popular. 
Flooring technology
This method is to install already ready-made materials. Due to this approach, the process of mounting the warm water floor is significantly accelerated. Since working with concrete solution is completely excluded, time costs are reduced. However, this technology is more expensive - you will have to acquire materials for the flooring in several layers to choose from:
- polystyrene;
- modular wooden system;
- wooden system.


Criteria for selecting and calculating a heap system
Whatever installation method you have not chosen, be sure to calculate the system as accurately as possible for that room where you plan to install it. To do this, pay attention to such factors:
- the type of room and the area of \u200b\u200bits floor;
- the temperature you plan to get;
- factors leading to heat loss;
- type of flooring.


You may need a high power of a water warm floor system in case:
- the heated premises is on the extreme floors (first, base or last);
- a large number of stained glass windows;
- the walls of the room are subtle or weakly insulated;
- outdoor coating is plates from natural stone.
Important! Do not install the system with a warm floor in bedrooms or children's rooms.


Water heating floor
Water floor is a system consisting of;
- polymer or metal-polymer pipes;
- heat insulating layer;
- fasteners;
- collectors with fittings by which the system connects to the pump and the central heating network.


Preparation of the foundation
To install a warm floor, it is necessary to carefully prepare the basis. To do this, follow these steps:
- remove the old floor covering;
- align the surface with a screed.
Important! Alignment is required if the base base level varies over 5 mm. If you do not align the floor - this can lead to the flow of pipes and the output of the entire system.

General Mounting Rules for All System Types
For the correct and efficient operation of the warm water floor, comply with the rules of installation that are relevant for all of the above methods:
- Install the cabinet for collectors.
Important! It should be purchased in the construction market or profile store.
- Get into the cabinet feeding and return pipe.
Important! The feed tube is output from the boiler and filled with hot water. Return - brings the water used in the system, which lost heat to the boiler, for re-heating. This circulation is provided by the pump embedded in the system.

- Install lock valves on both pipes.
Important! Use in the right places of shut-off valves will allow you to turn off the system from the heating network if the repair is required. In addition, for the purpose of saving, the warm floor can be included only as necessary, avoiding energy recalculation.
- Connect the pipe with a stop valve using fitting.
- Connect the collector to the valve.
Important! On the one hand, install the air vent, on the other, attach the drain crane. Installing a conventional plug is possible, but it is weakly functional.

- The cabinet is assembled. Getting Started with the rest of the work, according to the system you have chosen.
Important! Review the video example of the water floor assembly to eliminate the occurrence of any questions or misunderstanding the principle of the system of the system during the installation process.


Water floor mounting technology on a concrete screed
This water flooring technology implies several stages.
Stage 1. Installation of thermal insulator
- Clean the basic base.
- Place the thermal insulation layer on it.
Important! Choosing thermal insulation, pay attention to the thickness of the material. It must be a maximum of 30 mm. In addition, choose a material with a density of at least 35 kg / m3. Perfayx or polystyrene is ideal. Remember, the thickness of the thermal insulation is directly proportional to the thermal load.


Stage 2. Supplement design by damping tape
- At the perimeter of the room, attach the ribbon.
Important! It compensates for the expansion of the stretching, which necessarily occurs during thermal exposure.
- On top of the heat insulation, put a dense film from polyethylene.


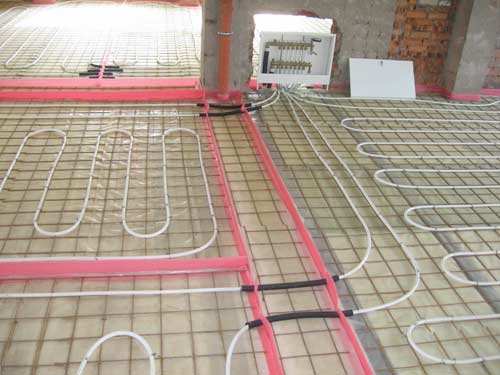
Stage 3. Gasket fittings
- Place the reinforcement grid throughout the area of \u200b\u200bthe room.
- Attach the corrugated pipe to the grid using clamps.
Important! This stage allows you to make the design more durable, and the pipe itself protects the compensation seams.
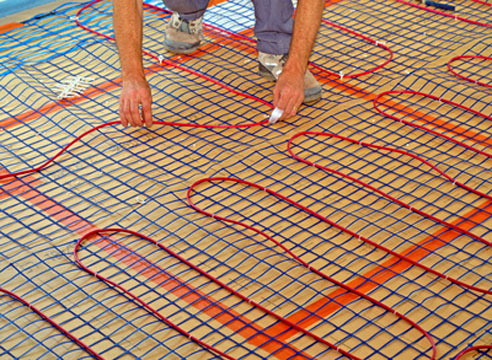

Stage 4. Selection of pipe laying scheme
- Decide how you will lay out pipes - spiral or snake.
- Note that 1 square meter. The meter will require approximately 5 meters of pipe, with a step of laying in 20 cm.
Important! If the room is too large, the pipe is placed by several separate loops. Spiral layout is suitable for large areas in the best possible way. Due to the fact that the hot sections of the pipe lie next to the cold sections of the neighboring "snail" - thus the uniform warming of the floor surface is achieved.


Stage 5. Hydraulics Testing
- Run the system to check the tightness and strength of the water floor.
Important! Ignoring this stage is unacceptable! Before the screed is flooded - it is imperative to eliminate defects and flaws that are very often allowed when laying. Tests for at least 24 hours at a pressure of 3-4 bar.
- After checking the system, troubleshooting, proceed to the next step.


Stage 6. Design of a concrete screed
- Fill the screed by controlling its thickness.
Important! It must be 5-15 cm above the pipes.
- Place beacons to control the smokers with the help of the rule.
- Leave the screed 28 days before complete drying.
Important! Do not turn on the system before the concrete dry.
- Connect the system, and increase the temperature to the required for 3 days gradually.


Stage 7. Installation of decorative coating
This stage is finishing. The only requirement for its competent implementation is the right choice of finishing material. Prefer the modifications that are combined with the Warm Paul system.

Laying of a warm floor - polystyrene method
The essential advantage of this method is the absence of a procedure for creating a concrete screed. This factor affects the facilitation of the floor design, the reduction of the load on the base, as well as to simplify the installation work. The height of the room in this case does not decrease, since the thickness of the plates is insignificant.
Important! This method is great in order to minimize the load on interhesive floors, as well as for premises with low ceilings.

The essence of polystyrene technology:
- special plates are equipped with aluminum plates, due to which the uniform heat distribution is achieved;
- the plates are equipped with grooves for the maximum reliable fastening of pipes;
- for parquet flooring, an installation of 1 layer of GWL sheets is carried out as a surface coating of water design;
- for the finishing of the floor covering from other materials, laying of 2 layers of GVL is carried out.


Technology laying
- Clean the basic base from all kinds of garbage.
- Check out the floor evenness using a level.
- Place polystyrene plates on the base.
- Install the plates of aluminum and pipes.
Important! Calculate the number of plates in such a way that they cover at least 80% of the room area. With this approach, it will be possible to achieve a uniform distribution of heat during the operation of the system.

- Perform the installation of GWL according to the requirements for a specific decorative material.
- Mount the finish coating.
Important! Technology using polystyrene slabs is permissible to apply for finishing any type of room. However, for the flooring of the floor heated in a wooden house or any other design without concrete overlap, give preference to a rush or modular installation principle.


Installation of flooring with heated wooden coating from modules
If you decide to make floating floors on wooden floors from the modules, work as follows:
- Place the heat insulator.
- Cut in chipboard stoves under the plates and pipes.
- Mount the chipboard layer.
- Set aluminum plates.
- Mount the pipes.
- Place the desired number of layers from GWL.
- Perform decorative floor decoration laying.


Laying the water system on a wooden floor
This system is an excellent solution for the water floor device by any floor of a tree house above the second. This is explained by the fact that in such a design, the most thin thermal insulation layer is used.

According to the technology rules, follow these steps:
- Between lags, put heat-insulating material from minvati or polystyrene.
- Place the boards with a thickness of at least 2.8 cm.
- Leave the grooves in 2 cm wide.
- In the slots insert aluminum plates.
- In the plates, secure the pipes.
- Place the GWL in 1 or 2 layers.
- Floor floor coating.


Rules of operation of warm water floor
In order for the floor heating system to serve you for a long time and reliably, and also smoothly functioned, be sure to follow the following rules for the use of warm water floor:
- periodically follow the operating pressure in the heating system;
- in time, react to malfunctions in the work of the pump or valves;
- for a long lack of in the house, such as a trip, disconnect the system.


Conclusion
Laying the warm water floor, as you can see, rather complicated, long and painstaking work. It is important to take into account all the parameters of the room, its general thermal insulation, etc. But when choosing a correct technology, compliance with all rules for laying the system - in the finals you will get a high-quality and reliable way to warm up yourself and your family in the most bodied frost. And the realization that you have also saved a significant amount of funds on the installation, will delight you additionally!


