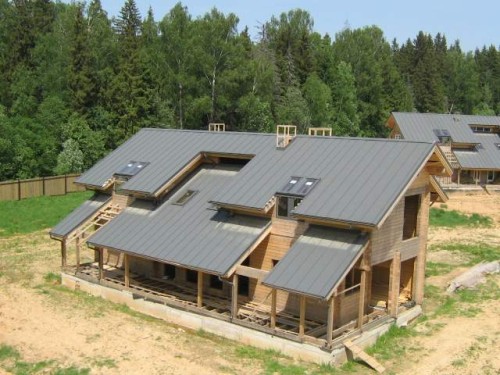
Building almost any home ends with the construction of the roof. And then the owner needs to decide what kind of roofing build. The least worthless option is considered a single roof. In addition, its construction does not require greater experience in construction work. On the peculiarities of this type of roof, we'll tell you further.
Content
Choice of design type
Single roof is suitable for almost any construction. The angle of inclination of such a roof can be different and depends on which roofing material is used for cladding. The fact is that various materials are in different ways protect the roof from rain, snow and wind. The ability of the roof material is independently cleaned from precipitation dropped to the surface, is a major factor that affects the required roof slope. If the slope does not strictly comply with all the parameters and features of the area in which the house is located, the roof can simply fall under the severity of the precipitation.
- For such materials as the runneroid is allowed to make an angle of inclination of only 6-8 degrees. This, by the way, is almost the minimum value.
- If the roof is with a slate, the angle of inclination for this material should be slightly over 30 degrees.
- If the tile is used, then it takes at least 25 degrees.
The minimum angle of inclination is highly dependent on the smoothness of the material surface. But not only the characteristics of roofing affect this indicator. So, should also take into account the basic properties of the relief of your region. Perhaps the locality where your home is being built is subject to wind from all sides. In this case, the angle of inclination is allowed to do less. The coolest rods can be erected only in cases where high trees grow around the house, which will protect the roof from the wind. Below we learn how to make a single roof.
Design features of the roof
It is not so difficult to make a one-piece roof, as it seems at first glance. To do this, it should be previously familiar with the main theoretical and practical aspects of such work. In addition, you need to learn more about the types of such roofs.
Roof design can be both ventilated and non-ventilated. Which option to choose, first of all, depends on the appointment of the main building. For example, non-ventilated roofs are usually arranged over arbors, verandas, terraces. The roof should be located at an angle of 3-5 degrees. Thanks to such a small slope, the roofing material can be regularly cleaning in winter from snow without any problems. Otherwise, under the weight of snow, the roof simply fails.
As for ventilated roofs, they are most often elevated at homes and baths. Similar structures allow not only to protect the placement of precipitation, but also provide a favorable microclimate. Air easily circulates due to the presence of a gap between the side openings and layers of isolation. This allows, among other things, to increase the service life of the roof. However, as in the first case, with a small angle of inclination, the roof needs timely cleaning in the winter period.
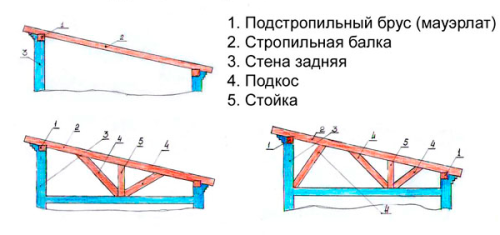
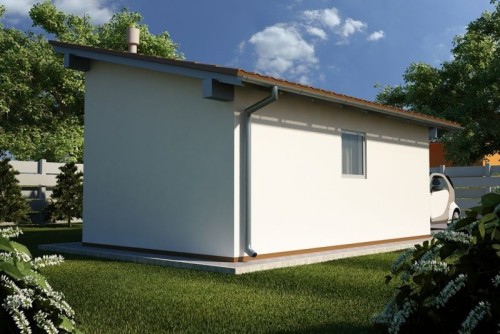
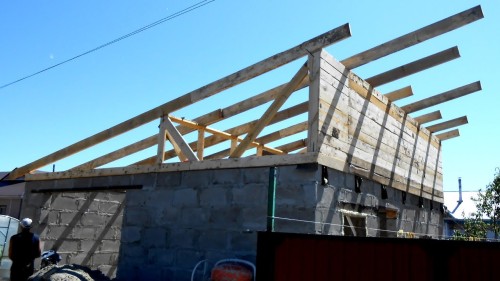
Single constructions are quite enough to arrange a simple rafter system. The rafters rest on Maurylalat, equipped on the walls of the future at home. From the difference in the height of the walls directly depends the angle of inclination of the roof. If the walls of the construction have the same height, then one of them will need to make a fronton, which will create the desired height difference.
Materials, tools
- To successfully make a single roof with your own hands, you will need to get wooden bars. They play the role of the main supporting structure.
- In addition, boards will be needed for the founding and finishing of the walls of the walls. They usually fit over the horizontal bar.
- If the roof lies with slate, then the slate itself will be needed and nails for its attachment. For each roofing coating apply appropriate fasteners.
- We will also need a waterproofing membrane and thermal insulation material.
- For fastening wooden parts, such as boards and bars, large nails will be needed.
- As for the tools, then they will mainly need those of them that are used when carrying out any repair - this is a hammer, an ax, a tree-hacksaw, a sharp knife and a construction stapler. These construction accessories are available in almost any home.
- When arranging a single-piece roof, crates are usually used. To create these structural elements, a timing is required with a cross section of 50 × 50 mm.
When all materials and tools are available, you can proceed directly to the construction of the roof.
Installation of roof
When installing a single-table roof, such work is performed as the construction of Mauerlat, the device rafters, installation of the crate, as well as the creation of the so-called roofing pie.
Mauerlat is a bar, which places around the perimeter on the walls of the main building. Its main function is the lower support for the rafting base.
Phased procedure for performing work:
- The first thing you need to do is put the bars. They are laid out on top of the wall, and the distance between them should be respected at least 75 cm. Next is the base for beams - seismopoyas and Maurylalat.
- To make a mauerylalate for a single roof, as a rule, a timber is taken by a cross section of 100 × 150 mm. Stropile supports can be made of 70 × 150 mm cross section. Or it can be performed in the form of a special glued design of the desired length.
- If the rafter consists of two parts, the junction should be made so that it accounted for a support rack. To protect the structures from precipitation, the rafter should be over the edge of the wall at least 310-400 mm.
- The task of seismopoyeas is quite simple: an increase in the resistance of the basic design of the deformation created by the winds. It is equipped, as a rule, on the upper perimeter of the elevated walls and looks like a design made of a solid piece of reinforced concrete. It is important that this frame corresponds to the upper part of the walls and was solid and closed.
- To make a similar design, the formwork is installed at the first stage, which should be slightly higher than the dimensions of the design itself. At the next stage, fittings are made.
- The bottom support for rafters will be Maurylalat. It allows you to distribute the load from the reference points on the top edge area of \u200b\u200bthe wall.
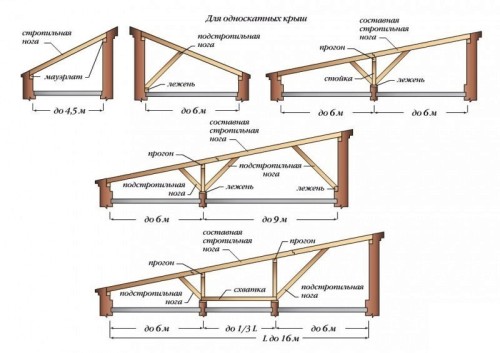
- The distance between the supporting walls strongly affects which design will be at the rafter system. So, if it is not more than 4.4 meters, then there is no need to strengthen rafters with some additional elements. If this distance reaches 4.4-7 m, the rafter design will already be strengthened by a wooden bar. It holds along the wall and at the same time one of the ends rests in the lower support horizontal bar.
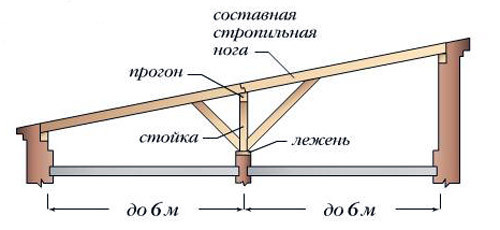
- At the length of the span from 7 to 11 m, it is necessary to make it so that rafters with its middle part relied on a run, which is placed on the rack. In addition, on both sides of the rack, elevation supports, resting in the raftered itself, should be installed.
- To install the racks, parallel to the front and rear wall, you need to lay a horizontal support of the boll, called Legene. At the same time, more than 6.5 m should be from the wall to the rack. And this distance should be observed on each side.
- When you fly between the supporting walls at 11-15 m, you will need to install two supports consisting of a horizontal bar, racks and runs. They need to be installed at a distance of a maximum of 6 meters from the walls. In this case, between the racks, the distance should not be more than 1/3 from the length of the span. Directly supports are bonded with a contraction. Between the racks and the rafter design, subcording supports are installed (also called legs).
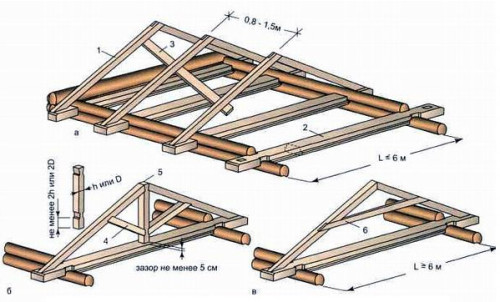
- When the beams are installed, the rafters should be fixed on top of them, which are needed as the main support for the top point of the roof. As for the number of rafters, they should be as much as the ceiling beams were laid. The collected design of beams and vertical rafters should be reminded by a rectangular triangle.
- To complete the installation of the rafter, you need to establish inclined beams that are secured for a concrete base using anchor bolts. Or they can be attached to Mauerlat with the so-called "Hundreds" nails.
- Skat of the rafter base is placed primarily. Usually it is done in the direction of the back of the house.
- After which the roofing material is stacked. To make it easier to work, you can put the boards on the rafters, which are cleaned when the time is the roof time.
- If it was decided to use Slate, then it is nailed to the clamp in places where the four sheets of this material are connected, i.e. One nail will hold four slate sheets.
- At the edges in each sheet, you will need to install two nails. Thanks to this, slate will be more resistant to wind load.
- When the material is pretty fixed in its place, you can proceed to the arrangement of the windproof. It can be postponed with bricks or wood.
Roof insulation
Not so long ago, clanobeton and cement-chips were mainly used for insulation of this type of roof. Heat insulators from these materials, to put it mildly, were ineffective. They hardly confront moisture and poorly retain heat. Today, modern techniques have come to replace such technologies. Thus, as a material for a single-pate roof, a URSA insulation is often used, which contains insulation plates, glass gamble, as well as basalt mats, saving heat. This material has a number of advantages. In particular, it is worth noting its effectiveness, relatively low cost and ease of use.
As part of the heat insulation layer, there is vapor insulation material and waterproofing. When laying it is very important that the insulation remains dry. In addition, appropriate ventilation should be provided. If the moisture falls into the insulation, it can lead to its decomposition, which will do all the efforts applied earlier, in vain. To date, there is a URSA insulation, the basis of which is a layer of metallic foil, providing protection against moisture. In the absence of such protection, vaporizolation will need to be done apart.
The room under the rope of the roof will need to heat insulating. At the same time, the attic is recommended to be used on the floor in the floor of the wood dice. Between the ceiling and heat insulator, air circulation should be provided. If a wooden flooring is put on the floor, then the air in the room will be dry. This room can be safely used as an extract or pantry. If necessary, make a room under the pitched roof, where you can live, it is necessary to use foamizole as a material for thermal insulation.
So that the moisture does not penetrate into the room from the outside, you need to properly install vapor insulation material. In this case, vaporizolation needs to be equipped and inside the room. If the angle of inclination of a single-table roof is less than 29 degrees, then you will need to do a few more holes to ensure efficient circulation of air and ventilation. Ventilation holes will also be needed if there will be many windows in the frames of the design.
Before mounting the thermal insulation material, it must be unpaved, straighten and withstand about 25 minutes. During this time, mats will be able to return their original shape. When this happens, they should be cut to the desired size and lay in 1-2 layers between the rafters. In the horizontal direction, they are usually placed by 250 mm. Between the mat and waterproofing, the space for ventilation should remain. To ensure equal gap between the membrane and mat, you can use bars.
Then, a vaporizolation membrane, protecting the insulation from the formation of condensate, is placed on top of the heat insulation layer. As for the membranes, they are usually mounted in a cleaner by about 100 mm. After that, they are attached to the rafter supports with the help of brackets and stapler. It can be attached to them and nails with a round hat. The existing joints usually practice specials. ribbon.
General advice
Pay attention to the following points:
- Before starting the construction of this type of roof, it is important to correctly calculate its inclination angle. Than this indicator will be higher, the design will be able to maintain more load generated by snow in winter. In any case, snow needs to be removed periodically to avoid the drawdown and deformation of the roof material.
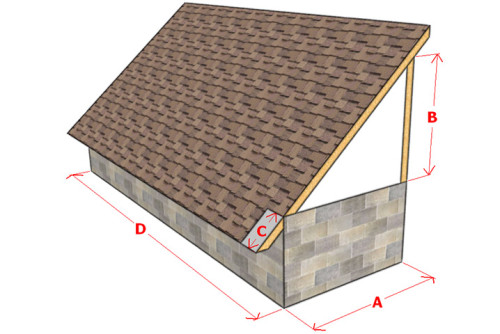
- It is important to decide how many meters will need to raise the rear wall so that the desired angle of inclination is. At the same time will have to correctly calculate how much material you need. If it is impossible to produce the necessary calculations, it is advisable to refer to the people who understand it. This will avoid errors and unplanned repairs.
- The bars for the rafter supports and boards for the execution of the crate can be susceptible to the harmful effects of fungi and insects. Therefore, these structural elements are recommended to be treated with special preparations to prevent it. The scenes and junctions are best handled additionally. Some drugs give the surface additional protection against fire. It is important that the wood is smooth and dry. There should be no sites on its surface where pest nests can be.
- Installation of any roof implies work at height. Therefore, be sure to adhere to the basic safety requirements. When the frame will be assembled, you need to check it on strength with simple loosening. Stropile supports need to be firmly attached to the walls. They must withstand wind loads, and large enough.
- Waterproofing usually stacked before the installation of the crate, while the joints must be carefully glued.
- It is important to lay the roofing material under the correct vector. The flooring stacked on the frame at the bottom up. At the same time, the place of the joints should be thoroughly seal. Additionally, the joints are allowed to mount borders, which will help increase the roof resistance to the intensive wind. The curb itself also needs to protect. For this purpose, you can use tile or galvanized metal.
- In some cases, the finish coating is made of massive material. In this case, the framework frame should additionally strengthen. If necessary, the drains are installed along the roof.
Single Roof: Photo

