The smooth surface of the floor is the key to the durability and aesthetic beauty of its coating. If you put even the most expensive parquet on the uneven floor, then the life of its operation will noticeably decrease. In addition, the coating on the uneven floor when walking and loading will be creaked and deformed, which ultimately will lead to the destruction of locks and the formation of cracks. Therefore, before flooring on the floor of any coating, it is necessary to align it.
Content
There are many ways to align defects and irregularities on the floor. In our article, we will look at the fastest and easiest option - a dry concrete band screed. Currently, this method is the most popular among professional builders and lovers who want to make a dry film tie with their own hands. On the Internet you can see how dry floor screed is performed. Video lessons set out detailed instructions for these works.
Benefits of the dry screed method
- This method significantly reduces the repair time of the floor, as well as less costly, as the price is less than other methods, therefore, in order to buy a dry floor screed, not required.
- As a rule, it takes a lot of time to dry out a wet screed, which makes it impossible for this period the use of the room. The dry band of the floor in the apartment with an area of \u200b\u200b40 square meters is mounted in two employees in just 9 hours, after which it can be coated in a few hours.
- In addition to the simplicity of installation, the dry screed is cheaper than other leveling technologies due to the relatively cheapness of materials.
- This type of work can be performed independently, without resorting to the help of specialists, and thereby reducing the cost of execution of the screed. Due to the fact that the screed can be performed gradually, at certain parts of the floor, it is possible to gradually improve its skills on the performance of work, as well as adjust the minor inaccuracies of the installation.
- This type of screed has excellent heat and noise insulating properties, no temperature drops are not afraid. Thus thus ensures additional heat to the future floor.
- The floor, when installing the coating on a dry tie, is perfectly smooth, and the coating serves a long time. In addition, the small weight of materials allows you to use this method where the loads on the floor should be limited: on balconies, attic, attic.
- This version of the screed has excellent sound insulation properties. This is achieved through a special bulk fringe and edge ribbon, located between the wall and the screed.
Disadvantages of dry tie
There is a dry screed and its shortcomings. The most important of them is the fear of moisture. When absorbing moisture with powder material, the latter can swell and the floor simply will lose its aesthetic appearance. Therefore, when the device is dry tie a floor, great attention should be paid to the waterproofing of the surface.
The main stages and materials for the production of work
The technology of the dry tie of the floor is pretty simple and consists of several main stages:
- surface preparation;
- laying of waterproofing material;
- installation of damping tape around the perimeter of the room;
- laying a layer of filler;
- laying overlap.
For mounting dry screed, we need the following materials:
- polyethylene film with a thickness of 1-1.5 mm,
- damper polystyrene tape
- moisture-resistant plates (GVL, chipboard, OSB, fat plywood, etc.),
- screws,
- glue,
- ceramzit,
- sand or slag as aggregate.
Approximate material consumption on the surface 100 m 2 next:
- GWL plates size 1200x600 mm - 140 pcs.
- Dry mixture for floor screed - 4 m. 3
- Keramzit fishing - 150 m 2.
- Metal profile - 97 m.
- Self-tapping screw - 1200 pcs.
- PVA glue - 5 kg.
Preparation of the surface
- Preparation of the surface for laying a screed is the most important stage of work. Start it from dismantling old coating and its design.
- Then we clean the surface from garbage and dust. All slots on the prepared surface fill with a sealant or mounting foam. If there are large potholes on the surface, they are filled with cement mortar. Large bulbs need to be aligned.
- After that, set the reference point (zero) using a laser level and mark the parameters of the future screed.
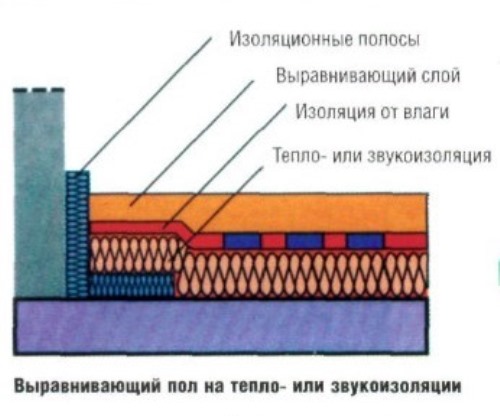
- For additional thermo- and noise insulation on the waterproofing layer, plates of polystyrene joint in the joint.
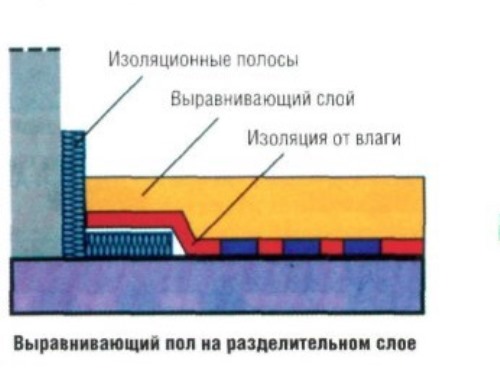
- To limit moisture from entering a dry tie of the wall, as well as isolate the propagation of noise from the walls to the floor around the perimeter of the room, the damper film is mounted. As a rule, polystyrene or "air polyethylene" is used as a damper. The width of the tape should be slightly larger than the height of the floor level.
Waterproofing
This is a very important stage, since poor-quality insulation may result in further to the fact that the water will penetrate into the layer of embankment, as a result of which the flooring will swell and deform. Waterproofing will prevent moisture from the outside.
Technology of work:
- For concrete gender, a polyethylene film is used as a material for waterproofing (200 μm thickness), and for waterproofing the old wooden floor, which will serve as a base for a screed, it is necessary to use bitumen paper or rubberoid.
- The insulating material is lined up so that it goes a little on the wall. The height of the insulating layer should be slightly larger than the level of the screed, and peel approximately 6 centimeters.
- Each strip is placed so that it goes to the previous and subsequent approximately 15-20 centimeters.
- Then the strips whose thickness is equal to the depth of the screed, should be fixed throughout the period of the walls. Be careful, because these strips must cover up even previously decomposed insulating film that goes on the walls. This will provide sound insulation and depreciation with thermal deformations of the floor.
True, it is worth noting that this method of insulation will be able to prevent moisture from the bottom from the bottom of the floor, if the moisture falls from above, for example, in a breakthrough of water supply systems or heating, dry screed will probably suffer. Therefore, this method of alignment of the floor is better to use in private houses and indoors with a minimum set of water communications.
Failure of a bulk material
- After that, for backfilling the leveling material, it is necessary to install beacons. As the latter, you can use a metal profile. Lighthouses are installed around the perimeter of the floor with a level.
- Extreme lighthouses are set at a distance of 0.25 m from the wall, the rest at a distance less than the length of the rule. If a profile is used as beacons, then it is placed edges up.
- Fix lighthouses to the surface with a solution.
- After drying, the solution can be poured up with a screed. It is better to use clamzite as a bulk material. He is porous, not too hygroscopic, fireproof, and also has a small shrinkage. Sometimes specialists instead of bulk materials for screed use mineral wool slabs or polystyrene plates.
- With the help of shovels, we slut the clamzite to the surface, including the space between the edges of the profile. On the edges of the beacon, we carry out the rule to flatly lay the screed. The minimum thickness of the dry bands of the floor should be 5 cm. With such a layer, you can achieve a practically perfectly smooth surface. After alignment of the layer of clay, it must be tamped using a wooden plank.
Laying of the surface
- The next step will be laying the surface. Gypsum fibrous stove is best suited for these purposes. In the manufacture of such plates, they are reinforced and impregnated with special compositions that have water-repellent properties. The thickness of the plate is only 10-20 mm., Dimensions range from 1.2m x 0.6 m to 2.5 m x 1.2 m. Such plates, such as the dry knauf floor screed, perfectly ensure the maintenance of heat, Soundproofing. In addition, the installation of such plates does not require any special knowledge. For these purposes, any moisture-resistant material, such as impregnated chipboard, OSB and others.
- It must be remembered that the plates before installation should fly in the room at least a day to "get used to" to the temperature regime and the moisture level. Before mounting the GWL slabs, it is necessary to strip so-called islands or tracks, which can be walking, without damaging the bulk layer. Most producers are made in the ends of the plates of the grooves that significantly facilitate the installation process. On extremely from the wall, the plates scold the chamfer of locks and the sliced \u200b\u200bside laid to the wall.
- Pv glue before laying the second plates is applied.
- After installing the second plates, the connection site is fixed with screws with an interval of 150-200 mm. When installing, it is important to move less stacked plate on the filler layer, otherwise it is possible to damage the smooth surface of the bulk layer (the stove simply goes in such a layer). Self-tapping screws It is advisable to use with a conical slot so that their caps are not discharged over the surface of the plates, because they can damage the coating on top. It must be remembered that the screws should be with an anti-corrosion coating.
- After mounting the plates, it is necessary to remove the remnants of the damper tape using the stationery knife. At this stage, the screed is ready and you can start the installation of the finishing coating - parquet, laminate, linoleum or carpet coating.
Some tips:
- If such a screed is performed in rooms with high humidity (bathroom, kitchen), then the installation of another layer of waterproofing is required. This will suit the bituminous coating or film.
- If the tile laying is performed, then no additional work is carried out. The tile is simply lined with adhesive compositions on top of the laid tie.
- If a linoleum is used, a cork coating, then all the joints between the HBL sheets are closed using a putty. In the same way, the hats from the screws placed on the screed are close.
- Under painting it follows the entire surface to apply a spike layer. This will provide smoothness and evenness of the floor surface.
- The laid tie should be given to be searched for one day. During this time, glue will completely dry and all possible stresses in the material will disappear.
Dry screed version
Dry screed mounting options can be a lot:
- If the unevenness of the floor is insignificant, and the floor level does not allow it to raise it, then you can do the option: Waterproofing - GWL plates.
- You can use the option: Waterproofing - Polystyrene - GWL Plates.
- For large irregularities, the floor is better to use the option: waterproofing - polystyrene - clayzit - GWL plates.
- If in the room there may be an excess of moisture, then another layer of polystyrene can be added to the last option from top of the GWL plates and still lay a layer of dual GBL plates.


