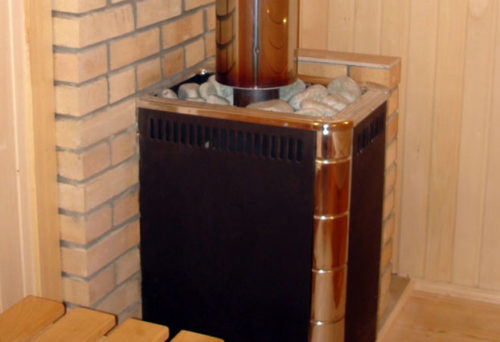
According to many, setting the stove in the bath is a difficult task, so it is better to trust the specialists. However, when complying with the installation and safety regulations, this unit can be installed on its own. This is a great way to save on the commission of this type of work. It is worth saying that metal and brick furnaces are most popular in bathrooms. About the characteristics of these structures and how to install the furnace in the bath properly - then in the article.
Content
Characteristics of bathing stoves
Metal furnaces have some advantages, compared with stone units:
- They need less time for full heating. Thus, thanks to the metal furnace in a bathroom, the air will be heated to the desired temperature for a fairly short time.
- Metal structures are considered more durable than bricks. They are more resistant to mechanical damage.
- Easy installation. The masonry stove is a rather time-consuming occupation that requires special skills and skills. Install the iron oven in the bath with your own hands will be somewhat simpler. It is enough just to adhere to technology and installation rules.
- Convenience and simplicity of cleaning. In the course of operation, the metal design can easily be cleaned from gary and dust, while it is allowed to use various cleaning products.
- Metal structures designed to heat the bath are small, so the installation can be made independently, without the involvement of specialized equipment and assistance.
It is worth saying that brick structures have similarly many advantages, so this information should be taken into account when choosing and installing the stove in the bath. So:
- Brick furnaces, unlike metal, are heated for a long time, but at the same time they hold heat in the room for a long time. Metal furnaces are heated and cooled quickly.
- When heating metal structures there is a high probability of injury and burns, if accidentally touch the stove. Brick units are not so intended.
- High infrared radiation comes from metal furnaces. In brick units, these indicators are small.
- Brick structures, in contrast to metallic, do not overcame air indoors.
- Metal furnaces are subject to corrosion.
- Constructions made of bricks have an externally aesthetically attractive appearance, in contrast to bath furnaces made of metal pipes.
Installing the stove in the bath with your own hands
Choosing a place to install the stove in the bath
The most important thing is to choose the right place where the stove installation will be carried out in a wooden bath. The safety and operational characteristics of the future design depends on this. The following points must be taken into account:
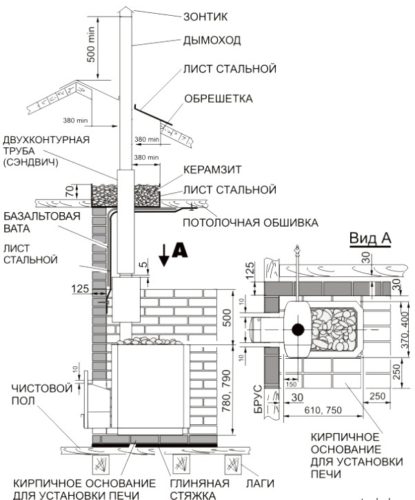
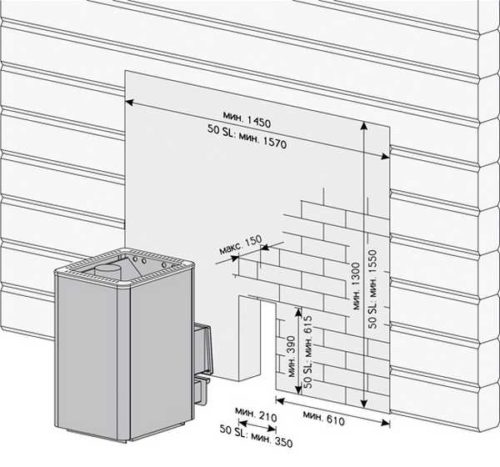
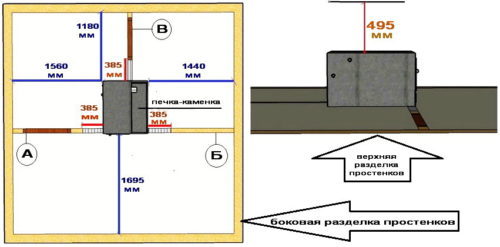
- The stove should be located at least 60 cm from any combustible elements and materials.
- On the wall, near which the furnace will be installed, it is necessary to carry out refractory bricks. In addition, insulating plates should be paved.
- The furnace should be placed so that the furnace doors are placed in the direction of the entrance to the bath. Kamenka doors should be located towards the corner.
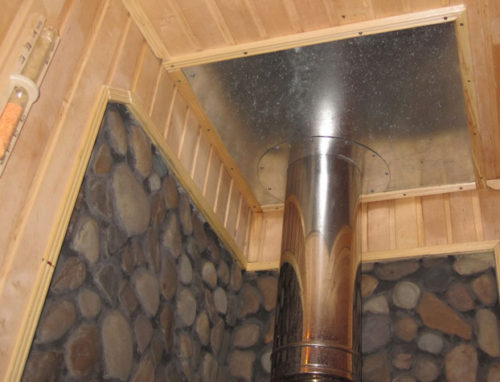
- Since the warm air from the stove rises up, the ceiling is considered the most fire-hazardous place in the bathroom. Therefore, it is facing insulating material, for example, a metal sheet with a layer of basalt. It is necessary to place insulating material in the part where the oven is. At the same time, the area of \u200b\u200bthe metal sheet should be 3-4 times the area of \u200b\u200bthe furnace.
- If an electric furnace is installed, then it is necessary to make grounding and exhibit the wires. In addition, the installation of such a design must be coordinated with the fire supervision authorities.
- In order to install the oven, you will need to properly prepare the site. So, if the installation of a metal stove is performed in the bath, then it is necessary to consider that this design has a lot of weight. Therefore, the foundation for it should be durable and reliable.
- Place the bookmarks of the foundation and platforms under the stove should be designed at the stage of building a bathroom. For medium weight designs, it is possible to use a massive foundation, but, for example, a reinforced concrete or brick stand.
- If the weight of the stove is small (up to 60 kg), it can be installed even directly on the wooden floor. Only it should be bred by non-flammable coating. So, when installing the stove in the bath on the wooden floor, it is covered with sheet steel, 4 mm thick. In addition, the furnace should be installed so that its weight is distributed evenly over the entire floor surface.
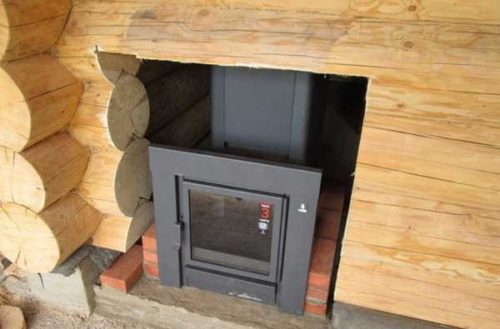
- The refractory material should be facing not only the floor, but also the walls located near the stove. Alternatively, you can use a diphole brick, 500 mm thick, magnesite plates or to treat surfaces with flame care facilities.
- It is better to arrange the furnace separately from the furnace, then oxygen will not evaporate when burning out of the room. However, such an idea is hard to implement independently, without the help of specialists. Between the pre-banner and the room for the pair, it is best to install a partition.
Installation of a furnace with remote furnace
Furnaces with remote furnace, as mentioned above, is the perfect option for bathrooms. The order of its installation is as follows:
- Choose a place to locate the stove. At this stage, it should be guided by the rules set out above.
- Next, go to the arrangement of the foundation. To do this, in the place where the furnace will be installed, we pull the cutting slightly wider than the dimensions of the aggregate itself.
- The bottom of the trench is thoroughly tamper and on her day we draw a crumbnt pillow.
- Next is the sandy layer. It is then covered with a waterproof film.
- We strengthen the foundation for pieces of fittings.
- Plive trench concrete. We give the solution to finally frozen.
- The correctness of the installation is tested using a construction level.
- On the layer of concrete lay the reservoiroil.
- Next, lay out from refractory bricks a platform for which the stove will be installed.
- After waiting when the brickwork layout is completely frozen, go directly to the installation of the furnace. At this stage, we are guided by the previously composed furnace scheme.
- We are waving the walls and the floor in the place where the furnace is installed, fire-resistant material.
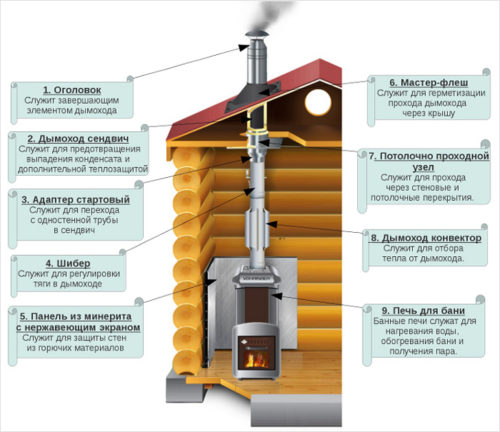
- We mont into the wall of the adapter. It is welded to it part of the chimney. On top of the chimney we protect the visor from the penetration of precipitation inside the system.
Independent manufacture of a stove for a bath from a pipe
To make a bath oven from the pipe with your own hands we will need:
- Cut pipe with a diameter of more than 500 mm and a long at least 1500 mm.
- Pipe with a diameter of 157 mm. Need to build a chimney.
- Sheet metal thickness of at least 4 mm.
- Pipe with a diameter of 325 mm. It will be necessary for firebox.
- The equestrous corner (width of the shelf is 25 mm).
- Crane plumbing for tank ½.
- Welding machine.
- Gas cutter.
- Bulgarian small power.
The preparation of parts is carried out according to the following scheme:
- First of all, make an approximate drawing of your future furnace for a bath from a pipe depending on the size of the room. Consider all the nuances of the building.
- For this scheme, calculate the amount of metal required.
- Our tubular furnace will consist of several main parts: firebox, stones tank, water tank. For their installation, initially cut the pipe into two parts 900 and 600 mm, respectively - for the firebox and for the tank.
- To separate the tank from the furnace for the construction of the containers for the stones cut from the corners of the stand, on which we raise the tank above the furnace. The length of each such design should be 300 mm. You need to cut 3-4 corners.
- For the bottoms and caps of the tank and the furnaces, cut the circles from the sheet metal with a diameter of equal dimensions of the pipe.
- We measure the length and cut the chimney pipe. We do it extremely accurately. From the pipe 325 mm, cut the boot tambour for the furnace.
Let's start assembling the bottom of the stove - fireboxes. This is a rather important stage. So, the lower part of the design is assembled according to the following scheme:
- So, on one side of the pipe cut 2 holes. One for the bootable tambour (its diameter is equal to the dimensions of the tube tube), the other - under pistened.
- With the help of a grinder, we fit the hole in the furnace and the end of the tambura for welding. We weld the data of the structural parts. In another end of the tambour, we set the firebox door.
- To the hole for ponded on the hooks mounted the door. Inside the furnace in the bath from the pipe, slightly below the level of the bootable tambour weldings for the cast-iron grate.
- We install the grate and weld the bottom of the furnace.
- Then slightly below the upper edge of the furnace, we place and weld the cover of the furnace, having pre-cut the hole for the smoke tube. The design is hermetically welded. This operation is sufficiently important, since the carbon black gas can act through a leakage, which is very dangerous to health.
- Next weld the rack for the tank from the corner. The bottom of the design is ready.
Further step will be the assembly of the tank:
- Cut in the bottom and capacitance cover of the hole for the chimney. Their sizes should coincide with the dimensions of the chimney hole in the cover of the furnace.
- The top cover is cut into two parts. Connect them together with the help of curtains so that it can be discovered for topping the water.
- A little higher from the bottom of the tank is welded a piece of pipe ½ "to which the container is installed.
- The finished tank is "sitting" to the smoke tube and place it on the welded racks.
- Watering the design is completely. At the same time, it is necessary to closely monitor the quality of the weld connecting the chimney and the bottom of the tank. This is necessary to prevent water flow.
Installation of a furnace from the pipe in the bath is the final stage. So, the furnace in the bath must be installed on a rigid fireproof coating, it is best if it is concrete. The design should be resistant to tipping. If the angle in which the tubular furnace will be placed is trimmed by a tree, the distance from the walls to the design should be at least 1 meter. To prevent fire coating, it is recommended to install a metal or asbestos sheet before the furnace.
Installing the stove in the bath: Video
You can see more detail how to install the oven in the bath with your own hands on the video.


