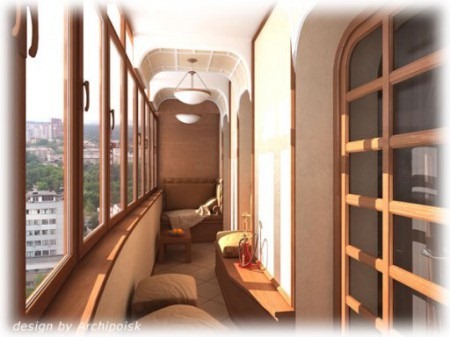
Many of us, making repairs, probably faced with a question about the insulation of the balcony, because in the house the main thing is warm and reasonable use of available space. Unfortunately, in this regard, old and panel houses leave much to be desired, since in the winter period most of the heat simply disappear through the loggia to the street. However, stop the heat loss and forever get rid of the nondes, dampness and drafts can be used by the minimum of the smelting and creating the insulation of the balcony with their own hands.
Content
Advantages of a warmed balcony:
- it can be used all year round;
- due to the fact that it has an insulating layer, the coolness does not go to the room;
- it is an additional place to relax.
All work on this type of thermal insulation can be made in any season, but specialists are still recommended to do it in warm sustainable dry weather. Initially, double-glazed windows, which can be performed on the basis of aluminum profiles or PVCs. Next, engage in insulating gender, side sides, facade and roof.
Requirements to which heat-insulating building materials should correspond:
- have a low thermal conductivity;
- have a small weight;
- be a moisture resistant and breathable.
What to insulate the balcony
Today, the stroke offers a huge amount of this product (mineral wool, sandwich panels, foamed polyethylene, polystyrene-based materials), but making a choice, see not only for the price, but also on the main characteristics of the building material. For example, polystyrene foam is simply mounted, it has little weight, thickness and acceptable cost, but not durable and fragile. As for the sandwich panels, they are great to keep warm, but have a big thick. It was remarkable in this regard to the Minvat, which can be easily selected using a special table.
How to insulate the balcony
The insulation of the balcony from the inside includes several stages:
1. Preparation:
- cleaning of all things and items;
- dismantling old windows;
- preparation of floor and walls.
2. Installation of new windows
Even if the old wooden frame is in a normal state, it is unable to save heat compared to plastic windows, because it has blurred slots and one glass.
3. Heat insulation
Specialists recommend starting the insulation of the loggia from the floor, because at the end of the work its level is slightly lifted.
4. Thermal insulation of parapet and walls
In this case, the capital wall can not be touched, but if you want, they will warm it.
5. Finish:
- installation of slopes of room windows;
- finish finish and decor.
Next, consider each stage separately.
How to insulate a balcony yourself
Loggia preparation (balcony)
If the building has a tiled cladding, it is better to knock it down within the balcony. As for concrete partitions and balcony railings, they should be left - they will become a good insulating layer. Outside, they can be hidden by experiencing any finishing facade material.
Recommendations:
- if there are signs of the destruction of overlapping in any place, they need to be melted with a solution of cement;
- if the parapet is covered with plates from concrete, in which the gaps are present, they can be blown by the mounting foam.
Installation of windows
After installing balcony frames, make sure that all the slots are carefully embedded and eliminated. Then we spend the floor and remove the whole garbage.
Heat insulation
The tool that will need:
- mounting foam;
- self-tapping screw;
- penoplex;
- wooden rails.
Recommendations:
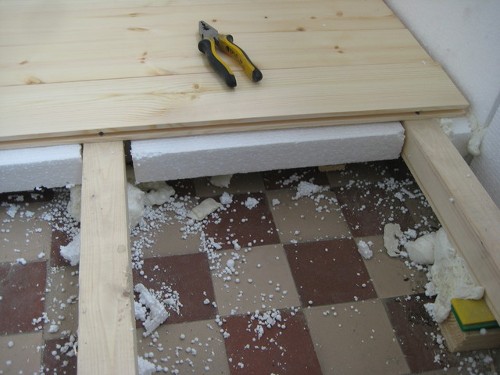
- deck fixation is carried out along the loggia;
- the width of the installation of the REC should be equal to the width of the sheets of the polyplex and plus another 10 mm;
- the thickness of the rivers should be the same as the thickness of the inferno (approximately 5 cm);
- use the building level.
Progress:
1. Start with the installation of insulation should be wooden slats, which are fixed to the floor with screws. Self-tapping screws are screwed with an interval of 30-40 cm. If you are insulated floor on the balcony, you can use the anchor, but in pre-rails need to make a hole screwdriver.
If it becomes necessary to raise the level of rails, it is better to use plastic pads. After laying on the floor Penoplex, all joints should be carefully treated with foam.
2. When the draft of floor insulation ready, can proceed to the deck floor. What type of material used - chipboard or plywood - you decide, but in any case take its thickness is not less than 20 mm, because it must be to withstand heavy loads.
3. Next, by means of screws plywood (DSP) is fixed to the joists. Screws should be located at 10-15 cm from each other. If your balcony is the usual size, it is recommended to lay the sheets across. At the same time they should not fit tightly to each other, because it can then start rubbing and squeaking arise.
Recommendations:
- after installation of the material, process it does not need;
- working with decking, try not to walk on it.
Warming of the balcony ceiling and walls in the panel house
How to choose the material for insulation of walls and ceilings up to you, but if you give preference to foam or Penoplex you will need:
- foil tape;
- penofol;
- plugs with caps;
- mounting foam;
- foam or penoplex.
Progress:
1. Isolation of the ceiling and walls begins with fixing a heater:
- cut the material along the length;
- zigzag movements applied to the wall a thin layer of foam;
- joints of sheets and the floor is also covered with foam;
- fasten the canvas with dowels with caps.
Recommendations:
- use level;
- during acquisition dowels consider thickness balcony slabs.
2. Then, on the insulation adhesive penofol:
- penofol better to glue whole layers;
- make sure that he went to a couple of centimeters to the adjacent wall;
- formed to seal the seams with tape foiled.
3. Insulation of the main wall
Create a main wall insulation is not necessary, but if you have decided on this, you will need:
- polystyrene foam;
- plugs;
- wooden rails.
Progress:
- with the horizontal masonry Penoplex fix the rack;
- using the level was equal to their attachment;
- fixing strips produced at a distance of the sheet width Penoplex minus 10 mm;
- in the joints of rails and Penoplex foam is not used.
Decorating balconies
You will need:
- decorative guides;
- mounting foam;
- laminated panels;
- brackets;
- construction stapler;
- self-tapping screw;
- wooden rails.
Progress:
1. Initially, it is necessary to fix the rails using self-samples to the already existing wooden framework, which was used to fix the insulation.
Be sure to use the level.
2. After installing the plates on the ceiling, go to the fixation of the plates on the walls.
Recommendations:
- reiki must be installed at a distance of 35-40 cm from each other;
- before mounting the rails to the wall, apply a mounting foam on it;
- fastening can be produced by dowels or screws;
- to preserve the useful area, the thickness of the rivers should be more than 20 mm.
3. After the frame is completed, we make the installation of laminated panels that are attached to a construction stapler. The ends are closed by decorative guides.
4. Next, proceed to the installation of panels on the walls whose ends also close with decorative guides.
5. Upon completion of wall decoration, we begin the installation of the framework for finishing building materials on the parapet. In this case, rails are used with a thickness of 20 mm.
Progress:
- fix the frame so that there is a groove between the window sill and the rail for the dense entry of the finishing panels;
- we use the stapler;
- downstairs, we leave everything as it is, because in the future everything is decorated with a plinth;
- for decoration of slopes, the same panels apply as when working with walls;
- sucks are installed using a stapler, foam and guides;
- if desired, you can use decorative corners;
- formed joints close up with white sealant.
The laminate or other coating is spilled on the floor, after which the plinth is fixed.
How to insulate the balcony with your hands video:


