The columns in the modern interior play not only the role of supports, more often they perform a decorative function. False columns are an integral part of the classic style, their decorative value is difficult to exaggerate.
Content
Modern materials allow you to create such structures quickly and efficiently. Columns from drywall, due to low weight, can be constructed at different levels of cottages and even on wooden floors.
Decorative columns made of drywall can hide various communications: ventilation, chimney and sewer pipes, plumbing. They are used to separate the large area into separate functional zones. We will tell about how the mounting of the gypsum cooked columns is performed.
Materials and tools for work
First of all, it is necessary to clarify what instruments and materials should be stocking before proceeding with the construction of the column. It will take:
- Construction knife;
- ladder;
- metal scissors;
- roller;
- Corolnic;
- screwdriver;
- Perforator;
- roulette;
- Spatulas;
- Construction plumb or laser level;
- compass;
- drill;
- pencil or marker;
- ruler;
- plasterboard sheets;
- metallic profile;
- self-tapping screw;
- primer;
- Start and finishing putty.
Rectangular Column Mounting Technology
It all starts with the installation of a frame that is a carrier design for drywall. It sets the form of the future column and therefore the work technology is applied different. Metal profile is used to create a frame. Phased process can be described as follows.
- The location of the column, its shape and size is determined.
- Using a marker (pencil) on the floor or ceiling, the outline of the cross section of the structure is applied, after which the image is projected with a plumb or laser level to the opposite direction.
Important:special markup accuracy should be paid to the shape of the column. It is necessary to check the correctness of the contour with the help of various measuring instruments (used roulette, traceser, circular, square, line).
- In accordance with the outlines from the metal profile (with the help of metal scissors), parts are cut and attached to the floor and ceiling by self-draws and dowels.
- The height measurements are made for the manufacture of vertical racks.
- From the "rack" profile mounted vertical parts of the design. Their quantity should be such that they can withstand the considerable weight of the drywall and finishing material (the column can be lined with ceramic tiles, artificial stone).
- Between racks (for enhancing the design), transverse and diagonal jumpers are attached.
- In order for the column does not seem empty, it is necessary to strengthen the sound insulation material in the internal volume of the column. This is especially important if pipes, water pipes or sewage are paired inside the column. Plates of mineral wool, foam or polystyrene foaming plates are attached to vertical stands. Plates are installed between vertical racks and horizontal crossbar in the strut. This also provides for a frame of a frame with two layers of sheet material.
- Conducting columns with plasterboard: parts are placed in size sides of the frame, after which the cardboard layer is cut on the contour lines on one side. Material sheets break through the cut line and screw to the profile with self-assembly for metal. The distance between the self-containers is about 150 mm. The hat should hide in a sheet material flush.
Care should be cautious when screwing the screws: they should not get the sheets of plasterboard.
- The corners of the column are decorated with a special profile that "sit down" to putty. After that, the column is treated with finishing putty, fasten the ceiling and floor plinths, apply the finishing material (decorative putty or paint) or facing.
Round Column Mounting Technology
How to make a column of drywall round, semicircular or oval? To understand this, you should study the flexing technology of this material. Work is performed in a certain order.
- The framework of a complex shape is constructed. For the manufacture of contour parts, fixed on the floor and ceiling, use scissors for metal. Cuts are performed on the outer sides of the flexible profile, which is attached along the lines of pre-made markup.
- In order to mark the markup on the floor and the ceiling, the circus is used and the pattern, which are made of dense cardboard.
- Vertical racks are set more often than in the case of a rectangular column facilities. The distance between them is selected depending on the radius of the contour bending - the smaller the radius, the smaller the distance should be between the racks.
Facing a column of plasterboard in this case can be performed in two ways. The first is more suitable for columns with a large radius and for this you need to do the following:
- A piece of plasterboard sheet is made: the width must correspond to the length of the design of the cross section of the structure, the height is the distance from the floor to the ceiling.
- On the one hand, longitudinal cardboard cuts are performed: the distance between them should be about 50 mm.
- The sheet is prey on the cut lines, after which it is attached to a predetermined frame from the profile by self-draws.
- To get a surface with smooth bending lines, you need to apply several layers of starting and finishing putty on top of the drywall.
- Overnight should be pulled by the emery paper M40 ("zero").
- Decor is applied to the surface of the column: it can be paint, wallpaper, decorative plaster, etc.
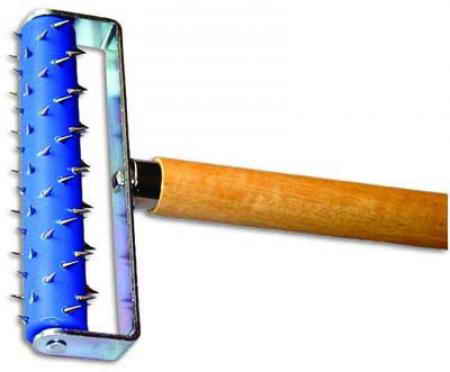
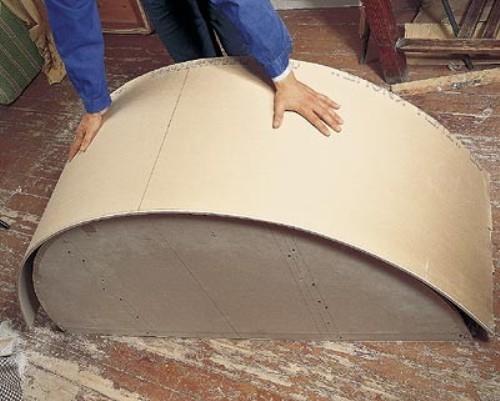
The second method differs from the first in the way that its moisturizing is used to bending the plasterboard. Initially, with the help of a needle roller, the integrity of the protective cardboard is disturbed, after which its surface is moistened with a sponge dipped in water. You can also use a wet cloth: it is covered with plasterboard and wait for a while, until the moisture is absorbed into the gypsum.
It is important to take into account that excessive moisturizing can lead to the destruction of the sheet material.
The drywall is softened by this way turns around around the struts of the column frame and is gradually attached to the profile by self-draws. After drying the material, plastered and then decorate the surface.
To obtain curvilinear surfaces, a specially manufactured template design can be used. The detail of the drywall is fixed to it and leave until complete drying, after which they are installed on its permanent place and fixate with self-draws.
As a result, columns from plasterboard (photo for clarity is presented on the site) acquire a finished look and harmoniously fit into the interior of the room. The upper part of the column can be decorated with stucco in the form of a floral ornament. Decorative backlight applies.
Cladding concrete or brick column
This is a special case of a plasterboard column: in this case, the carrier function of the frame performs a concrete structure, and the sheet material is used to align its surface.
For fastening drywall, a special glue is used, prepared from a dry mix packaged in bags. The mixture is diluted with water and applied to the parts cut from drywall, large cakes in a checkerboard and on the edges.
After that, the sheet is pressed against concrete (brick) and set down in terms of level. After drying the adhesive, the angles are formed, the column is processed by primer, then with putty and decorative materials.
In conclusion - video, clearly demonstrating the process of creating curvilinear designs from plasterboard, including columns.


