
Soft tile, undoubtedly one of the most beautiful roofing materials. Its flexibility and plasticity allow you to solve the design tasks of any degree of complexity, which highlights it among all other building materials for the roof improvement.
Content
- What is a soft tile?
- Is it possible to make a roof from bitumen tiles alone?
- Pros and cons of the soft roof
- Where are the soft tiles apply?
- Instruments
- How to install the roof of soft tiles?
- Creating a crate
- Installation of lining carpet
- Arrangement of eaves, frontones, endon
- Soft Tile Mounting Technology
- Video
- Conclusion
What is a soft tile?
Flexible tile - piece material (shingles), the basis of which is a durable fiberglass, impregnated with bitumen and grapped basalt crumb. On the back side there is a self-adhesive layer, which is melted and performs adhesion with the surface of the roof after removing the film under the influence of sunlight or heating with a construction hairdryer. Figured cutting edge varies depending on the manufacturer. 
Tile parameters
- Standard Gone Width - 1m
- Height varies depending on the manufacturer and form of cutting petals (on average up to 40 cm)
- Release form - packaging, volume 2-4 m2
- Elements for the arrangement of endanda, skate, the ends are often collected in a separate packaging.
Soft tile device
Carefully consider the attached scheme of the structure of this material to understand how its strength is ensured. 
Is it possible to make a roof from bitumen tiles alone?

To equip the roof with soft tiles, do it yourself will not be much difficult. But first, be sure to get acquainted with the positive characteristics, disadvantages of this material and the specifics of the installation, to fully understand the entire process and perform the entire volume of work correctly. 
Pros and cons of the soft roof
The list of advantages of this material is impressive. 
We highlight the main:
- Strength
- Tightness of the coating due to the maximum dense adjacent of all elements
- Exclusion of chips and cracks due to the characteristics of the structure of the canvas - plasticity
- No negative effects when exposed to moisture and ultraviolet
- Silent exploitation, which is especially manifested during precipitation
- Accountability of the installation process due to the possibility of cutting fragments of any size and convenient sheet width (maximum up to 9% with complex design)
- Cormativity of monophonic colors and all kinds of drawings
- The impossibility of corrosive
- A light weight
- Easy laying
- Economical transportation and unloading.

The cons of the use of soft roof is more conditional, that is, they mainly represent the terms of installation and operation:
- Excluded use on flat roofs
- Large consumption of sawn timber due to the requirements for the type of crate (required solid flooring)
- Problematism of partial repair work without prior training
- Possible deformation of sheets and, as a result, disruption of sealing in non-compliance with the rules of laying.

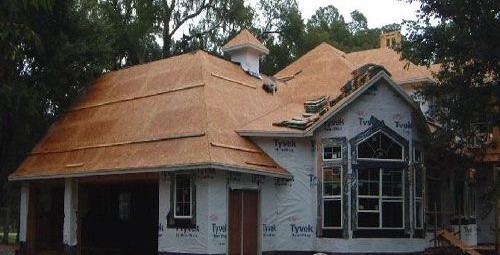
Where are the soft tiles apply?
This material is suitable for arranging the roof of any type. At the same time, regardless of the complexity of the structure, quite often the installation of soft tiles do it yourself. The main condition is the angle of the skate above 11 degrees. 
Instruments
To perform work, prepare all the necessary materials and tools. Check with the list below:
- Level
- Roulette
- chalk
- Saw
- Screwdriver
- Hammer
- Building stapler
- Material for crate (selected type)
- Roofing nails and self-tapping screws
- Anti-condensate film
- Tile
- Lining carpet
- Planks for registration of frontones and cornices
- Triangular Planks for Arrangement Places
- Roofing nails for the attachment of the shingles (length 25-30 cm, the diameter of the rod - from 3 mm, the diameter of the hat - from 9 mm)
- End rover
- Construction hairdryer if the installation is planned in the cold time
- Mastic or glue for the processing of seams.


How to install the roof of soft tiles?

The whole process consists of a sequence of several stages:
- Creating a crate.
- Laying a lining carpet.
- Installation of cornice, frontal and end slats.
- Strengthening endanda.
- Decorating roofing space tiles.
Important! When planning the entire roof space, you will definitely consider the importance of proper ventilation. Design it correctly.

Creating a crate

The process of mounting the crate under a soft tile has its own characteristics. A single-layer or two-layer solid filling technology is used. This uses:
- plywood moisture resistant
- chubbed board
- oSP Plates
- edged board.
In the first case, the fragments of one of the above materials are stacked directly on rafters, in the second - on the first, rarely, layer of the crate of 60-150 cm.
Important! When creating a two-layer crate, keep in mind that the strength of the whole roof will be significantly higher, but also the load on the carrier elements of the frame will also increase.

To perform this work, do the following:
- Cry all prepared timber antiseptic.
- Lose the time required for drying.
- Place an anti-condensate underlining film on the rafters.
- Stelite the material with horizontal bands of the brass 15-20 cm.
- Turn over the edges of the sinks and ends.
- Secure the stapler brackets, nails or specially trained small bars.
- Mark the markup of the shade of the crate on the extreme rafters by driven by small lighthouses.
- Mount the first series of crates, ranging from the sink of the cornice.

Important! The first lower beam along the line of the sink should be 10-15 mm thicker. Consider this in the preparation of materials.
- Create a second row of the material prepared for this.
Important! When choosing, note that the material parameters must match the specified step. For example, the thickness of the plate of plywood or osp for a step of 60 cm - 12 mm, 90 cm - 18 mm, and for large gaps of 150 cm - 27 mm. For the edged and tipped board, the parameters will be 20, 23 and 37 mm, respectively.
- Leave the gaps of 1-5 mm to prevent deformation with possible wood expansion under the influence of climatic conditions.
- Dispose of joints in each next row when using plywood or OSP.
- All fasteners are made by self-drawers and nails, having hats into the column of plates.
- In the ends, use parts with rounded edges to prevent damage to the lining carpet and tiles.
- Check the surface on the absence of any protrusions and irregularities.


Installation of lining carpet
Methods of laying
Select technology based on the angle parameters of the slope:
- 11-18 degrees - arrangement of the entire roof space
- over 18 degrees - only along the skate, cornice skes, endands, ends.


Important! When choosing a material, pay attention to the self-adhesive canvas to ensure the maximum dense clutch with the surface.
Technology
Observe the following installation rules:
- Direction - bottom-up when horizontal laying, top-down - with vertical.

- Fall - 10-15 cm (take into account both transverse and longitudinal).
- Use nails for fastening around the edges.
- Fastening step - 20 cm.
- Get all the seams with mastic or glue.

Video
Browse the video in which the entire process of installing a lining carpet is clearly represented.
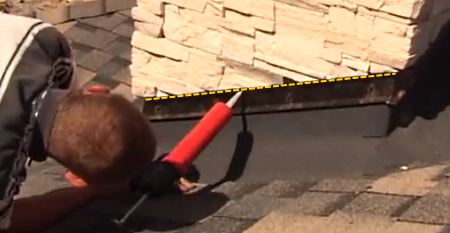
Arrangement of eaves, frontones, endon
To prevent moisture access inside roofing pie, strengthened complex places as follows:
- Mock the droplets of eaves and end planks on the frontones.
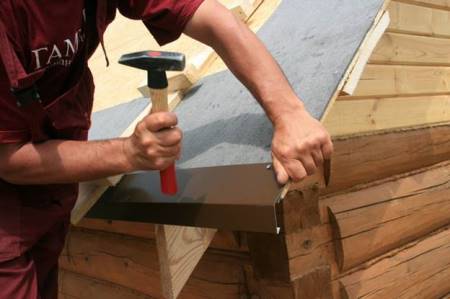
- All panels fasten with nails with a period of 10-15 cm, peaks up to 5 cm.
- In places connections to the planks, take the fastener with a step in 2-3 cm.
- Hold the zigzag direction.

- Masting the places of installation of extra waterproofing - vertical joints with walls and pipes, rtandov.
- Lay the end carpet to all of the above places.

- Fasten with roofing nails, withstanding the gaps of 10 cm.
- When placing the adjustment to the vertical surface, adjust the triangular bar below.
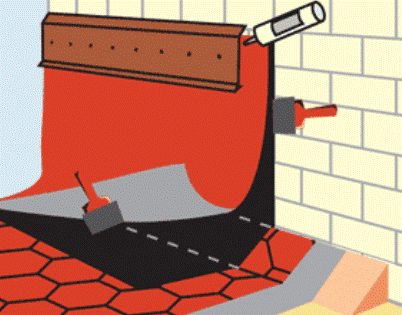
- Mounting in this case, make directly to the additional panel screwed above on the vertical surface.


Important! When choosing a carpet for mounting the roof of soft tiles, pay attention to the color corresponding to the tile.
Soft Tile Mounting Technology

Before starting the tiles, make sure that suitable weather conditions:
- lack of current precipitation (rain or snow, if the installation is carried out in the cold season)
- air temperature is not lower than + 5C
- sunny weather is desirable for a guaranteed final hermetic tile clutch with a surface.


Soft Tile Installation Instructions

Carefully read the following priority of work:
- Remove the protective film from the cornice shingles of the tiles.
- Place around the perimeter, withsting the indentation from the edge of the inflection of the cornice strip 1-2 cm.
- Fasten with nails with a period of 10 cm.
Important! Mounting places determine in such a way that they overlap the next rings of the ordinary tile.
- Mix all fragments of ordinary tiles from several packages to avoid possible color contrast.
Important! Do not leave the material on the open space in direct exposure to sunlight to avoid premature melting of the adhesive base.
- Make a chalk marking of the roof vertically through each meter, horizontally approximately 70-80 cm.
Important! Properly made markup will allow you to withstand a flat line of installation.
- Determine the central axis vertically.
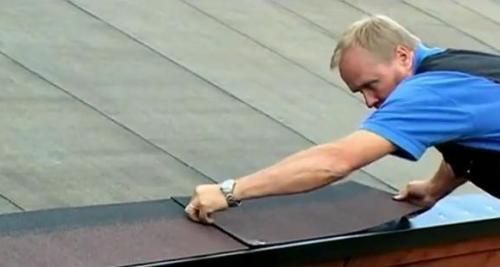
- Make a soft tile from the center to the ends.
Important! Do not forget to remove the protective film from each shingle before laying on the roof.

- Place the first row with an indent of 10 cm between the edges of the ordinary and cornice tile.
Important! Please note that fragments of the ordinary tiles must overlap the fastenings of the cornice shots.
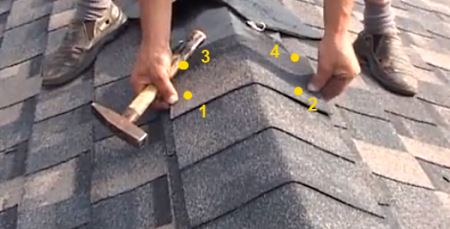
- Fasten nails along the horizontal line slightly above the groove.

Important! The calculation of the number of nails for attaching one shingle is regulated by the roof slope angle:
-
up to 45 degrees - 4 pcs / sheet
-
over 45 degrees - 6pcs. / Sheet
-
- Mount the subsequent rows in such a way that the protrusions of the petals of each shift are in the corresponding notches of the previous row.

- When making the ends, cut the material clearly along the edge and proof by glue or mastic, the width of the layer is 10 cm.

- With the arrangement of the end, the material from two sides cut with such a calculation so that at the bottom of the ended, the space of 15 cm wide at the bottom of the row.
- Clear the last 10 cm of the width of the shingle to the edge of the edge.
Important! Sliced \u200b\u200bvery carefully or down under the roofing material at a slice of a small bar to eliminate damage to the lining carpet.
- Place the skate tile.

- Secure each gear 4 nails (2 on each side).


Video
View the applied video installation of the roof of soft tiles to more clearly imagine the whole process.
Conclusion
As you have already seen, the principle of installing bituminous tiles is quite easy, but requires accuracy. Therefore, be careful in the process of performing all the works, and you will create a reliable protection of the indoor space of the house from any effects from the outside.


