Plasterboard is used everywhere for alignment of walls and ceilings, for the device of interroom partitions, for zoning premises. Technology of work with this material provides for pre-installation of profiles under drywall. From how correctly the framework will be built, the quality of the surface, strength and durability of the entire design depends. The material presented in the article will help to deal with the process technology and avoid errors.
Content
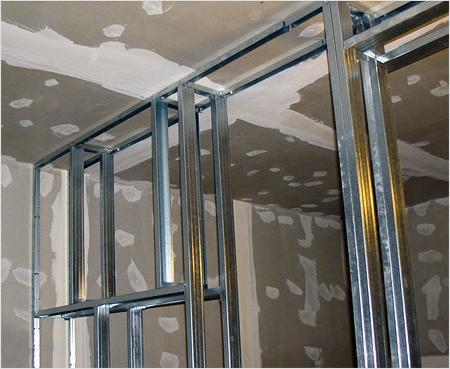
Profiles used to build a frame for plasterboard
Installing the profile under plasterboard on the walls involves the use of the following parts.

- For rack elements - profiles with longitudinal perforation (it makes the design more durable to bend), having a CW 50 × 50, 50 × 100 and 50 × 75 marking. The numbers mean a width ratio to the profile height (in millimeters). Profiles with marking PC and UA can also be used (the latter has a slightly large wall thickness).
- For horizontal mounting, UD 27, UW 50 × 75 (50 × 100) profiles are used or similar to the PN marking.
- The framework of the frame is based on the CD and PP profiles of the cross section of 60 × 20 mm.
- Arched structures are installed using PA profiles.
- Angles are strengthened by PU type profiles.
- Connectors for profiles from which the framework of the framework is mounted.
- Ceiling straight and anchor suspensions for PP profiles.
- Element for lengthening PP profiles.
- "P" -d-like bracket.
- Element of the type "crab" for a rigid connection to crossed at right angles of profiles.
Tools required for mounting profile under plasterboard
During the installation of specialized systems, the following tools and devices are used:
- perforator with a drill with a diameter of 6 mm;
- bulgarian with a disc on metal 115 or 120 mm;
- metal scissors;
- roulette;
- marker;
- construction level;
- hammer;
- screwdriver;
- tongs-rod;
- corolnic;
- dowel-nails;
- self-tapping screws.
Profile Mounting Technology for Plasterboard: Preparatory Stage
Before starting the installation of the profile, it is necessary to assess the quality of the base (wall or ceiling). It is required to determine:
- material density, its ability to withstand loads;
- microclimate indoors;
- the height of the ceilings or the size of the walls;
- method of fastening profiles.
Important: In rooms with high humidity, moisture-resistant sheets of drywall are used, and where the installation of boilers and flopping is planned - fire-resistant sheets of GCL. Due to the fact that the specified material is harder than usual, the construction of the design with additional profiles to increase its strength should be provided.

Profile fixed on a P-shaped bracket
Phased description of the technology of montage framework from metal profile under plasterboard
The frame of the metal profile is mounted will be easier if the floor and walls in the room are aligned. Otherwise, you will have to adjust the length of the fasteners, which will require a lot of time and strength. After preparing the base and walls, the framework of UW and CW profiles are set in the next sequence of actions.

Rack profiles are installed on the cord
- Prepares scheme for installing profiles under plasterboard. With a sheet of paper, it is transferred to the floor of the room where the wall or partition will be constructed. It is important that the markup is made taking into account the thickness of sheet cabarton sheets and other finishing materials.
- To the ceiling and semi with a dowel-nailing of UW profiles are fixed. The distance between the attachment points should not exceed 0.5 m (at the edges - must).
- To properly install the plasterboard profile by the wall, it is necessary to use a laser level or stretched cord. In the event that the wall surface is well aligned, profiles are mounted on top of the sealing tape. At the edges of the guides (on the floor and on the ceiling), and the reference racks of type CW are installed on the edges of the door and window openings. The mount is performed using selflessness - flea. The front side must be addressed inside the openings.
- Operactions of doors and windows are strengthened with additional AU type profiles or wood bars.
- Over the entire length of profiles attached to the ceiling and semi, install CW racks with an interval of 60 cm. The first rack should be located at a distance of 55 cm from the wall.
Important: Installation of the curved profile under plasterboard is performed with an extract of its side of 45 ° and bending. Side sides are connected by self-drawing.

Bending metal products
Useful tips to help avoid mistakes
During the installation of a carcass from metal profile under GCC, the following rules must be followed.

For insulation, leave the required volume
- The rewarding profile of plasterboard is performed taking into account the width of the sheet, that is, a multiple of 1200 mm. In this case, the edges of GLC will rely on the racks. The stiffness of the structure is provided by additional racks installed every 600 mm.
- Guides for drywall do it yourself are mounted from UD profiles. The form of their section allows you to insert CD profiles in them, as a result of which the rigid design is formed.
- If the wall is planned to be attached to the wall, which is located in relation to the first perpendicular, in the place of the docking should be placed an additional rack profile. In this case, the angular compound of plasterboard will be high-quality and reliable.
- For mounting the ceiling frame, as well as in some cases for the walls of the wall, the profiles are fixed using P-shaped brackets. The maximum distance from the base to GLC, which can be achieved using such brackets - 110 mm. But this distance can be increased by using an optional bracket.
- To mark the framework of the frame, it is recommended to use coloring cord.
- In the event that the wall-cutting wall is planned to insulate, it is necessary to provide sufficient volume for laying mineral wool or other material. The distance between the rapid profiles should be strictly equal to 600 mm.
- The curvilinear elements of the design are obtained using frequent (with a few centimeters interval) cutting the side of the profile. Metal is bent so that the bend line for accurately repeated the markup line on the base.

Profile cut for curvilinear design
In the conclusion of the article on how the installation of a profile under plasterboard is performed with their own hands - video with a specialist comments.


