What could be better than a country house or cottage? What could be better than rest from the work week in the fresh air away from the "concrete jungle" in the family circle. Many are now considered the country area mainly as a place of rest, where more attention is paid to the garden and the garden, but a landscape design device. One of the most important parts of the landscape design is lighting. When installing and laying the lighting, two tasks must be solved. First, it should be beautiful. Each lamp is a detail of a general design solution. Secondly, it should be functionally. Movement over the site in the dark should be made as comfortable and safe as possible. How to install lamps in the country with your own hands, let's tell further.
Content
Tasks for lighting in the country area

Before starting the lighting planning in the country area, it is necessary to determine which zones will be prioritized for lighting. It is them that needs to be equipped with street lamps:
- Porch and gate. The space in front of the house should be highlighted first. This is not only a matter of comfort, but also security. At night, the owner must clearly see what is happening at the fence of his household, as well as those who came to visit him. Basically, the illumination of this zone uses spotlights in a pair with a motion sensor. In this case, the effect of the presence of the owners is created, even if the latter is not at home. This reduces the risk that the manor will be robbed.

- Car parking. Purchased in the conditions of the illuminated platform is much easier and safer. Therefore, a pair of lamps in this zone should be present.
- Alcove. Naturally, sitting with guests and in the dark is unlikely to bring pleasure. Therefore, to highlight the gazebo and the track to it must be necessary.
- Also should be covered, although not constantly, approaches to economic buildings.
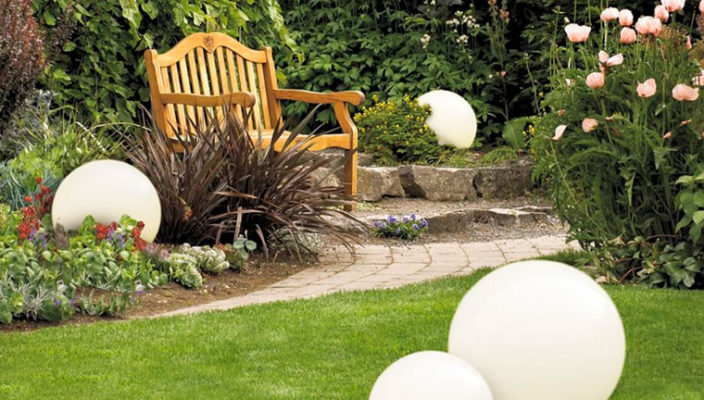
- Decorative lighting. The operation of decorative lighting lamps does not carry the functional load. Lighting the flower, the garden, the illumination of the alpine slide may not be carried out on an ongoing basis, therefore, for each such lamps, a separate switch must be provided.
Types of lamps for garden lighting

Currently, there is a wide range of models for organizing street lighting of cottages or country house. First of all, they differ in the type of light source, or simply speaking - the view of the lamp.
- Incandescent lamps. There are quite rare in modern lamps. There are many reasons for this. Such lamps are very long, but they consume electricity much more than other devices with an equivalent lighting intensity. The only positive side of the incandescent lamp was their price, however, taking into account the constant reduction in the price of halogen or LED lamps, this advantage is "no".
- Halogen lamps. Have average performance indicators. The principle of their action lies in the glow of some substances (iodine, bromine, fluorine) when the electric current is passed through them. In comparison with incandescent lamps, halogen is not so defeated by the harmful effect of voltage jumps, so they serve much longer.
- Sodium lamps. Basically used for decorative lighting, as they differ in soft glow of the yellowish shade. The principle of their action is similar to halogen, only sodium ions are lit in them.

- LED lamp. The most progressive light sources. They are distinguished by a long service life, excellent energy efficiency indicators. Performed both in the form of one powerful LED and in the form of a matrix, which consists of several details of less power. Perfectly suitable for installation both in the room and on the street. With the constantly declining price of these products, the popularity of LED lamps is only grows.
In addition to the type of lamp, you need to choose the right luminaire itself. Here it is necessary to choose closed structures with protection against dust and moisture. For this, each lighting device has a special IP index on its housing. So, if the IP index on the housing is 44, such a model can only be installed under the visor. This means that the luminaire case is not reliably protected from moisture. With IP equal to 65, the lighting device can be installed in the open air. He is absolutely not terrible rain, snowfall and temperature differences. About how to connect the garden lamps to a particular type, should be indicated in the instructions for them.
Lighting layout in the country area

Preparatory work consists of several stages. So, in order to proceed with the preparatory work and procurement of materials, it is necessary to draw up a project of street lighting on the site where the electrical circuit will be compiled. What should the project take into account:
- The number of lighting devices and their power. It is necessary to know in advance to determine the overall power consumption, power of wires, circuit breakers.
- The mode of operation of each type of lighting. Naturally, it is not worth one switch "SAN" lighting of parking space and highlighting garden flower beds.
- Type of lamps at each point. They are outdoor and suspended. Sometimes for floor lamps serve special pillars that must be included. Their height is determined depending on the owner's preferences, but it must be remembered that the lower the post, the less the illumination radius. Support for suspended luminaires washes the wall or angle of the building, as well as a suspended cable.

How to mount the wires of lamps on the garden tracks:
- Basically use the air and looming method of cable laying. The latter is more aesthetic and safe, as the wire itself is out of sight and does not spoil the design, besides, it is not subjected to wind loads, sharp temperature differences and exposure to direct sunlight. This significantly increases its service life. True, earthworks significantly increase the overall estimate cost of the project.
- Depending on the method of laying, as well as the power of the entire system, the cable type is also selected. The simplest option is to use an aluminum cable in a double PVC insulation area of \u200b\u200ba cross section of 4.5 mm 2. This is quite enough for lighting devices.

- Lighting panel location (shield). It should be indoors with constant access, while be equidistant from all points of perimeters, as it will significantly save the cable.
- The presence of lighting sensors. Recently, motion sensors, light sensors are used to automate the lighting. They help include lamps precisely when there is a need for this. This significantly reduces electricity costs.
- After drawing up a project coverage of the country area, you can start buying equipment and installing garden lamps with your own hands.
How to install garden lights right

Floor lights are the most popular lighting devices on the household plot. They not only highly illuminate the necessary zones, but also approach any designer decision.
Procedure for work:
- Installation of lanterns in the country is made on a pre-prepared foundation. The higher the height of the pillar, the more powerful the foundation should be. Otherwise, the wind pressure on the pillar will increase and due to sailbo it can fall. The cable to the tables are paved under the ground.
- For the cable laying, it is necessary to dig a trench of a depth of at least 0.7 m and a width of 0.2 m. The trench is digging along the entire length of a row of lanterns. The bottom of the pit is sleeping with sand and rubble. Such a drainage will be able to remove excess water from the cable. For additionally, protection is advisable to place it in a special sleeve.

- When the trench is ready, you can start to fill the foundation under the poles. To do this, in places of their installation, the trench is expanded so that its size is 40 x 40 cm. The formwork is installed and the reinforcing belt from the reinforcement with a diameter of 6-8 mm. It is needed, so that the concrete is greater strength.
- Now inside the formwork needs to be putting a metal-plastic tube with a diameter of ¾ inch. When the formwork is filled with concrete, the pipe will serve as a kind of channel in order to pave the cable. So that it does not move when pouring, it is fixed with wire.
- The next step is set by anchor bolts M12 (the diameter must correspond to the size of the holes on the column flange). Install them need strictly by holes on the flange of the pillar. Otherwise, install a pillar without any problems will not work. For this work, you can make a plywood pattern with holes, as on the flange to check the correctness of the bolts. Bolts are also tightly tied to the reinforcement wire.

- Once everything is installed, you can pour concrete. Make it from the mixture of cement sand and rubble in the ratio of 1: 2: 2. At halfn the cement, sand bucket and as much rubble leaves about a bucket of water. First, make mixtures of dry materials, which are then poured with water and are thoroughly mixed.
- After the foundation is flooded, it is necessary to wait 1-2 day until it freezes. After this period, you can start a cable into the pipe. Next, it connects to the wiring of the lamp, and the pillar is screwed to the anchor bolts with nuts with washers. The correct installation of the pillar is checked with a level. If necessary, under the flange put thin washers in order to align the pillar.
- All electrical connections are performed using terminals that are subsequently insulated with PVC ribbon. The connection of the lamps is carried out in parallel with the cable output on the machine.


An interesting article, a lot of useful information, just going in the spring to enjoy the development of the site. Just a description of installation, lamps that have already bought in http://svet4park.ru/ For our garden))
An interesting article, a lot of useful information, just going in the spring to enjoy the development of the site. Is there any descriptions of installation, lamps that have already bought in svet4park for our garden))