Vinyl siding panels are very popular material for plating private houses. With their help, any building you can give a presentable view. To see the house by siding on its own easily in the presence of minimal construction skills. It is important to prepare, studying the features and nuances of the installation, and make careful planning to get the most qualitative result.
Content
Calculation of the required amount of material
To carry out calculations of the amount of material necessary to perform cladding, it will be necessary to measure the height and width of the building. Any complex form building can be schematically divided into the simplest geometric shapes - measurements are performed, their area is calculated, the data obtained in the future will be summed up. As a rule, in calculations include, including the area of \u200b\u200bwindow and doorways - this technique allows you to create an additional stock of the material that may be needed in the process of conducting work. The windows and doors of large dimensions (for example, garage) from the calculations should be excluded.

Thus, to calculate the required number of vinyl siding panels, you will need to calculate the total area of \u200b\u200bthe wall surface in need of facing. Further, if you are going to lay the panels of the mustache, follows from the total area to subtract half the area of \u200b\u200bwindow and doorways. If you are going to apply connecting planks in the form of a H-shaped profile for connecting panels on the walls, from the total area of \u200b\u200bthe walls of the building should not be deducted. Further, the obtained number should be divided into the area of \u200b\u200bone panel of the selected manufacturer and roundate the result in the biggest.

The main stages of work
The process of lining the house by vinyl siding can generally be divided into the following steps:
- Pre-training. At this stage, you will need to develop a scheme of installation of vinyl siding, perform the necessary measurements, determine the required amount of materials, prepare the necessary materials and fixtures.
- The implementation of the main installation work is to install horizontal either vertical siding panels (you should first explore the manufacturer's instructions in which detailed recommendations are given, how to mount vinyl siding). At first, the starting plank is attached, then vertical elements (angular and H connectors). Next, the vinyl siding panels are mounted. After that, it is necessary to establish the framework of window and door openings, arches, bonded the protruding elements.
- Next, you need to install finish planks, mount sophod panels intended for ventilation of space under the roof. After that, the frontone is performed.

How to see the facade siding yourself
When planning, how to see the facade of vinyl siding, you need to take into account the following information:
- due to the temperature drops, over time, a noticeable linear expansion of this material can be observed, therefore, between the elements of the sheath - starting plates, panels and their rows, the gap is 6-8 mm (if the work is carried out at low temperatures - 10-12 mm);
- cut panels should be started on top. When cutting siding using scissors, no more than ¾ of the length of the blades should be used - in this case, the slice is obtained most neat. If you apply a knife, you should not try to cut through the material through - it is enough to do an incision, in the future it will be necessary to gently break down a part of the part;
- siding panels are attached to the self-tapping screw with a step of 25-30 cm. Screw screws, and also clog nails should be strictly in the direction perpendicular to the area of \u200b\u200bthe base surface. Self-tapping screws should be installed in the middle part of the nail hole of the siding elements - this technique allows the fastening details to slide at a temperature expansion;
- according to the technology of installing vinyl siding, this material should not be fixed on the base surface too tight. Between the details of the sheat and the caps of the fastening elements, it is necessary to leave the gap of about 1 mm - otherwise there is a risk of deformation of panels when changing weather conditions and obtaining an inesthetical "wave". To create a gap, you can invest between the screw of the self-press and the coin siding, or tightly twist it, and then weaken slightly (about one turn). When using brackets should also be leaving 1 mm;
- you should not seek sealing in places of connection panels with angular elements, as well as a J- profile.

Preliminary preparation
Before starting work on finishing the facade of vinyl siding, it will be necessary to pre-prepare it. It is necessary to get a flat and solid final surface under lining. In the construction, which was already in operation, it may be necessary to strengthen the discharged designs, pull out protruding nails out of the walls, close the existing seams. In wooden houses, you will need to replace the rotational boards and process the surface of the walls by an antiseptic composition that prevents the effects of moisture and the appearance of fungus or mold. In addition, it is necessary to remove the drains, shutters, platbands and other protruding hinged elements. If necessary, further performed the heat insulation of the construction. For the purpose of the longest operation of the cladding, siding manufacturers recommend mounting panels over the installed layer of insulating material that protects the building from the freezing of the walls and penetration of moisture.

Required tools and devices
To fulfill the installation of vinyl siding, you may need these tools and devices:
- construction level, roulette, square, marker;
- hammer and ax;
- stationery knife, scissors for metal or Bulgarian with metal discs - to cut siding;
- punson - for breaking the ears along the edges of the panels;
- drill or screwdriver (if the construction is erected from the brick, you will also need a perforator;
- fasteners - galvanized or aluminum screws and nails;
- building stapler with brackets 18-20 mm;
- protective glasses.

Sequencing
Prepare the walls, it is necessary to mount a solid crate on them. In the case of the presence of frame walls, it is possible to do without it - for this you need perfectly even over the entire surface plane (without convexities and depressions, not necessarily strictly vertical) and angles, which is quite rare. On the uneven walls of the brick, the bars or logs, as well as building blocks, it will be necessary to build a creewater frame.
To do this, you can use well-dried and antiseptic-treated wooden rails with a cross section of 60x40 or galvanized metal profile. If the siding panels are planned to be assembled horizontally, it will be necessary to orient on the walls of the frame rack vertically, with the planned vertical placement of the cladding elements - on the contrary, in the horizontal plane. The first row of panels in the exploited houses usually coincides with the level of old cladding, in new buildings you can begin to mount the trim, covering the top level of the foundation. A few hours before the start of the installation work, vinyl siding should be outwarded to be located for some time at a street temperature.

Siding installation stages:
- First, around the perimeter of the construction you want to bind, you need to fix starting strips, as well as angles (external and internal):
- with the help level, you will need to determine the lowest location point of the starting panel. Having retreated 4-5 cm up, you should drive the nail - and pulling the cord or a kapron thread, put markings along the entire perimeter of the house. Checking by vertical, you will need to return to the same starting point;
- next, in the corners it is necessary to secure the corner profile, as well as mount the connecting profile. It is worth considering that the angular elements are attached on top of the self-tapping screws installed in the upper nail holes (the rest should be attached in the middle). At the top between the vertex of the angular profile and sofit or the roof eaves, as well as at the bottom of the ground, leave a distance of 6-7 mm. Sometimes it may be necessary to lengthen the angular profile. In this case, from the top plank, you should cut off the side locations of the mount, and then "wear" it on the lower bar, without forgetting to leave the 0.5 cm gap for temperature compression;
- having retreated from the angular element 6 mm to the side, the starting band should be fixed - its upper edge must be ripe on a predetermined horizontal line on the crate. Between the planks you need to provide a gap of 10-12 mm. The starting strip will close a number of panels in the future, so you can use trimming.
- After that, you can proceed to the main stage. Starting from the starting strip, the siding panel is mounted in succession from the bottom up. In this way, you can be facing one wall and then start up, or move along the perimeter. Installation of siding panels is recommended to start from the doors or other significant places, in which case their connection will be less noticeable. The main panel is inserted into the starting profile and is fixed with nails (not "tightly", but lightly free). It is necessary to sequently sow walls, checking the horizontal styling, moving up to the level of the eaves. Stripes in the area of \u200b\u200bcorners and connecting elements should be built into a solid line. The junctions should be tried to make a little care.
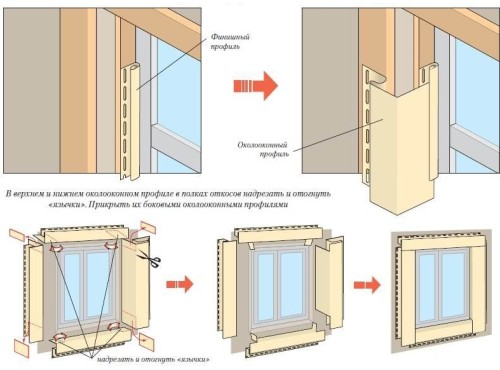
- Next, it will be necessary to assemble the framing of doorways and windows, as well as the protruding elements of complex shape (arches, drain pipes). Window openings can be located in one plane with the surface of the walls - in this case, the j- profile is installed around the perimeter of the opening and the siding panels are installed. In the windows with slopes, the lamp is mounted for fixing the finishing profile, which is attached to the window profile bar.
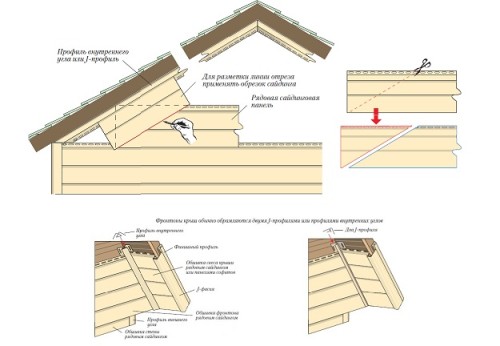
- After that, it is necessary to establish the upper edge of the walls. A j-profile is mounted around the perimeter of the cornice - to the wall and by the lower cornice edge, panels are inserted into it. To ensure the possibility of draining water from the roof, in the top of the j-profile, it is necessary to drill holes in increments of 0.6 m. To cover the front, it will be necessary to cut them at an angle according to it. On the surface of the frontones, it is recommended to dial the siding panels in the direction from top to bottom - so the overall picture will look more aesthetic. In addition, at this stage you can go to the vertical method of mounting siding.


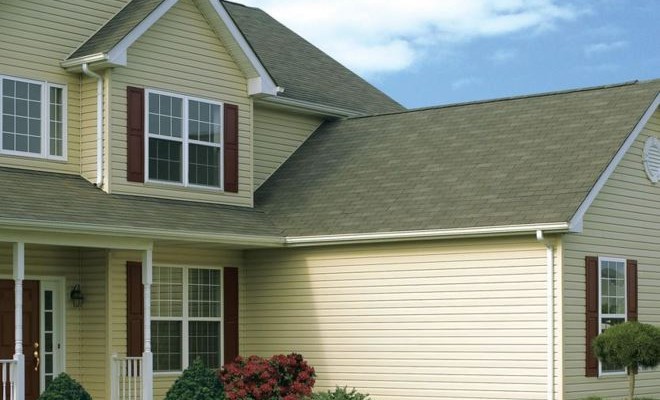
Vinyl siding - Photo


