Plasterboard is the versatile material that in the hands of the wizard can transform into slopes, curly arch and a decorative niche. Easy to work in combination with structural strength allow you to create a beautiful and functional interior. If you correctly pick up the design form, think over everything to the smallest details: ranging from the location of the niche, combinations with the ceiling and interior of the room, then the niche of the drywall will revive even the most unsightly room.
Content
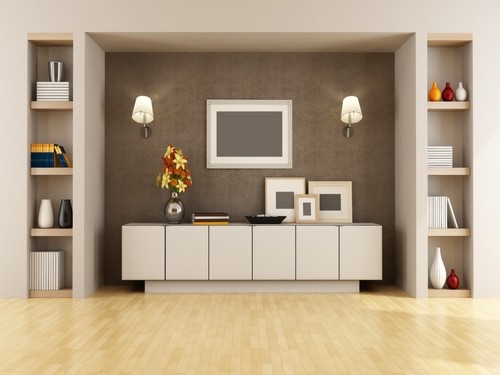
With a niche of drywall in the wall, you can competently place all the techniques: TV, speakers and stereo systems, as well as lining lighting elements. Agree, cumbersome items will look at the niche shelves much better than just attached to the wall.
About material
Plasterboard refers to the number of universal building materials. It can be used to build partitions, decorating walls, mounting ceilings, creating shelves, built-in wardrobes and niches.

When choosing the main material, one should stick to this opinion that all plasterboard is the same. Ask for a construction store consultants, in which room there is plasterboard. In addition, it is necessary to pay attention to the flatness of the sheet. If you "get" wet and uneven sheets, then with such material it will be more difficult to work.
Consider the strengths and weaknesses of the universal material.
The advantages of drywall include:
- plasticity and flexibility of material;
- ease of installation;
- the ability to hide the wiring;
- ecology and safety (not flammable) material.
Of the disadvantages, you can note the following:
- if you compare with a brick wall, then plasterboard has low strength;
- cardboard sheets are problematic to raise the upper floors.
Advantages of drywall niches
Niche is a slight deepening in the wall, which will give uniqueness, functionality and plasticity to any room.
The design of the drywall niches can be both built into the partition and open. In this case, the building material allows you to show fantasy and arrange a niche at its discretion. An internal part of the design can also be issued differently: install mirrors, apply texture plaster or caught the surface with wallpaper.
Options Niche from plasterboard, see photo:


Many are interested, whether it is possible to make a niche of drywall do it yourself. If you wish, you can do everything, the main thing is to have the necessary tool and determine the size of the niche. If you plan to use additional space to place a collection of statuettes or collection of dolls, it will be enough to install a metal frame and tinkering it with plasterboard. If niche will be used as a television shelf, then its base must be made more durable. This rule should be observed when placing heavy items.
In the case of using a niche as a television shelves, or to accommodate other heavy items, the base should be made more durable.
On a concrete example, we consider the advantages and disadvantages of a niche of a drywall under the TV.
About the pros:
- ease of manufacture;
- the ability to hide the wiring;
- security for the TV;
- the ability to hide the irregularities of the walls;
- there is no need to purchase additional racks and stands for equipment;
- the ability to create niches of different designs;
Minuses:
- if you have to install larger technology, the niche may not come up;
- when rearranging furniture, Niche is not going anywhere, and in some cases it has to be dismantled.
Necessary Materials and Tools
Before you go to the store for everything you need, you need to draw a drawing of the future design and determine its size to calculate the required amount of materials.
For the construction of a niche of a drywall, you will need with your own hands:
- plasterboard sheets;
- metal profile (main and guide);
- fasteners (screws and screws);
- putty knife;
- putty;
- primer mixture;
- drill with a nozzle for the preparation of putty;
- reinforcing tape;
- perfivers;
- screwdriver;
- ruler;
- building level;
- marker;
- acute building knife for cutting sheets;
- materials for finishing a niche.
In addition, if you have conceived to arrange a niche of a backlit drywall, then it is better to purchase the LED cord in advance and everything you need for the installation of lighting.
How to make a niche of plasterboard
If you have not yet decided on the place where Niche will be located - it's time to do it. According to experts, the optimal version for the niche is a wall located opposite the front door. But you can move away from this rule and choose a place at your discretion.
To pay attention to when choosing a place for a niche:
- If niche is located opposite the front door, it will make it more functional (a good option for an entrance hall).
- Choose a free part of the wall, a width of at least three meters.
- When the niche equipment, the backlight needs to choose a place with the electrical wiring or the ability to carry out the cable through the plinth.
Installation of a niche of plasterboard in the living room consists of such steps:
- Marking on the wall.
- Mounting frame from a metal profile.
- Frame covering plasterboard.
- Putty.
- Finish finish.
First, make the markup of the contour of the workpiece. With a pencil and ruler on the wall, you need to mark the location, size and depth of the structure.

Attention! At the edges of the wall you should remain the same distance. If you break the symmetry, the niche will not be harmonized with the design of the room.
How to make a frame mounting:
- Take a guide profile and screw it to the wall with self-draws. It will be the back of the frame.
- If necessary, fasten the metal profile on the floor and the ceiling.
- Install the main profile.
- Fix the profile using self-tapping screws.
- After completing the work - the design must be checked for strength.
You must have this design:

The next stage is the framework of the frame of the plasterboard sheets. From the sheets you need to cut the details of the desired size and with the help of self-samples to attach to the frame. At this stage, the screwdriver will be greatly alleviated and will accelerate. Try to screw the screws so that their caps go a little in the plasterboard. Keep track of joints - they must be smooth.

Attention! If you plan to place the lamps in the niche, the wiring must be laid before mounting the plasterboard. Holes for lamps also need to prepare in advance. And do not forget to carry out the ground wire.
Performing putty works are always starting with corners. Pre-prepare the mixture and with the spatula, process the seams. From above, they need to impose a reinforcing ribbon to apply a layer of putty.
Look in the photo: under the angle should be held a spatula:

When the tape serves - it can be removed, and the seams are cleaned with a shallow grinding skin. Then you need to apply another layer of putty and wait until it gets up.
After completion of the putty work, you need to complete the finish. You can buy a finished mixture, or use a universal putty and process the entire surface of the niche.
Since there are many angles in the niche design so that they remain smooth, it is necessary to use the auxiliary elements and before applying the first layer of putty to install perfogee.
At the final stage, the facilities of a niche of a drywall can be made of waterproof paint, caught with wallpaper or apply a layer of decorative textured putty.
If it is decided to paint the niche of water-free paint, then you should not use dark tones, because on the background of light walls you can get the opposite effect of "gaping holes".
A niche of drywall is ready - it remains to install the TV and connect it.

Such a niches of drywall in the bedroom you can also do yourself:


