
For modern technology, nothing is impossible, thanks to new techniques of the simplest repairs can transform a room in an original and unique. Thus all the work actually carried out on their own, without any loss of quality. This also applies to such complicated processes as replan.
Content
- Availability plasterboard work yandex_partner_id \u003d 22445; yandex_site_bg_color \u003d 'ffffff'; yandex_ad_format \u003d 'direct'; yandex_font_size \u003d 1.0; yandex_direct_type \u003d 'vertical'; yandex_direct_border_type \u003d 'ad'; yandex_direct_limit \u003d 1; yandex_direct_title_font_size \u003d 2; yandex_direct_links_underline \u003d true; yandex_direct_bg_color \u003d 'ffffff'; yandex_direct_border_color \u003d 'ffffff'; yandex_direct_title_color \u003d '0C77EC'; yandex_direct_url_color \u003d '000000'; yandex_direct_text_color \u003d '000000'; yandex_direct_hover_color \u003d 'CC0000'; yandex_direct_favicon \u003d true; yandex_no_sitelinks \u003d true; document.write ( ''); . (Adsbygoogle \u003d window.adsbygoogle || []) push (());
- The possibility of working with the material
- Erection of interior designs
Availability plasterboard work 

Now, using a set of tools plasterboard partitions erected with his own hands quickly and easily.
Advantages of facilities
Designs created from this material have their advantages:
- it is possible to hide all communications;
- low weight;
- good sound insulation and refractory indicators;
- ready smooth surface.
Necessary components
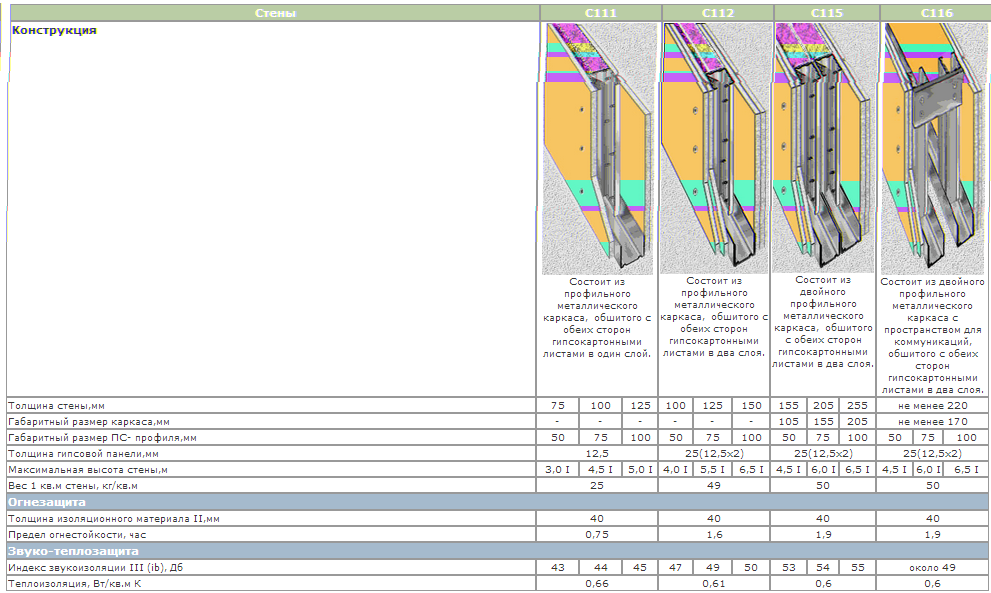
The calculation of the necessary materials is carried out in accordance with the existing standards. The person first knows only the appointment of the partition erected, already repel from this when calculating components. For convenience, a table with technical data of plasterboard partitions is offered.
Work opportunities with material
The technology of working with the material gives the following devices of plasterboard partitions:
- Single design consisting of one layer of plates. Such partition is intended only for space markup. Thanks to the small thickness and weight, it is ideal for the premises of a small area. When erecting this type, UW and CW 50mm profile use;
- Single carrier with a double layer laying plates. Apply in cases of the need to enhance the soundproofing of the premises. For the construction, experts recommend using UW and CW 75-100mm profile;
- Third type includes double bearing structures consisting of a double layer of plates. Such structures are used with the need for increased sound insulation properties of the room. Then the insulation is laid inside, and the profile for such plasterboard partitions is used UW and CW 50-75mm;
- Double designs whose elements are connected by double drywall plugs. Apply in cases of laying plumbing sleeves for a large number of pipes. Also isolated partitions with a three-layer plate, then the profile requires UW and CW 100mm.

There are many tips on how to make a plasterboard partition, most of them:
- Choose to choose the material. This means that the varieties of the proposed types of drywall do not end with the wall and ceiling, there is a division into GLC, GKKV and GKLO.
- Putting the waterproofing layer is mandatory for premises with elevated moisture levels. Installation is carried out between the material sheets;
- It is carefully fastening all the elements, it will protect the damage to pre-laid communications from damage.
Erecting interior structures
There is a process technology, a peculiar instruction for the construction of plasterboard partitions. It includes such operations:
- markup;
- installation of profiles on guides;
- installation of vertical racks;
- partial construction of construction;
- use of insulation materials;
- closing structure.
- You can work with drywall at any time of the year, the main condition is a normal level of humidity and temperature, in the room should be at least + 10 ° C. The markup is performed on the floor, before it is holding all the surfaces. This condition is observed to exclude the occurrence of deviations. To work, you will need such tools: construction level, roulette, line, plumb. After applying the mounting points on the floor, the marks are transferred to the walls and the ceiling, it is worth constantly monitor the accuracy of all measurements. Start the process from the location of the rack profiles, they are installed in 50-60 cm.

- Directly the installation of plasterboard partitions begins with a frame, UW profile is used as guides, it can be different brands. Dowels apply to the concrete base, the self-tapping screws are suitable in the case of wooden surfaces. The maximum stability of the design will add pre-sticking of the sealing tape to the profile.
- The rack profile takes the grades CW-50 × 50, CW-50 × 75, CW-50 × 100, cut off with scissors for metal. The length is practically corresponding to the height of the room, but for convenient installation in the guides, 1-1,5 cm are cleaned. The elements are recorded vertically in the framework, while the open side of the profile should be located in the direction of installation. A dowel and self-tapping screws are used as a fastener, which record a profile to the wall and guides, respectively. There is a nuance - with a design height, more than 2.6 m should be gained. It is enough to apply additional horizontal jumpers between the racks.
- Next after the construction of the frame is carried out with a trim on one side. To do this, cut off drywall and close the design from the wall. Mounting with self-draws with a step 25 cm. At the same time, the caps should not go beyond the plane of the overall surface, but also not very sinking in sheets. In the case of a strong flooding, the hats screws up, and fasten the fastening near.
- Reliable partitions in the drywall room must have a sound insulation layer, mineral wool mounted as a gasket. For the process it is worth taking care of the means of individual protection, a couple of gloves and glasses. To fill the cells of the design, the canvas is cut or burst, the sound absorbing effect is achieved.
- Now you can close the design completely, during the trim between the elements there should be a 20 millimeters gap. In this way, the process of alignment of the seam on the partition is simplified. They begin to twist the sheets into the profile from the angle, in both directions perpendicular to the surface. From the edge of the sheet they make an indent of 1-1,5 cm to eliminate the possibility of crumbling.


After the construction, you can begin to put the prepared surface, do not forget about the mounting tape for the joints. Initially, the spatula is filled with a mixture with a mixture, carefully leveled to the cut off of the surplus. After drying the solution, the seams are sampled with a mounting ribbon, topped with a layer of putty. After drying, it is cleaned with sandpaper. Ideally, it turns out a smooth surface, ready for staining. To strengthen external angles, angular profiles are used, they are fixed with a layer of a spacion mixture. The internal angles are placed by the reinforcing ribbon, for this it is bent at right angles. So decorative plasterboard partitions are obtained by reliable and durable structures. 
A distinguished variety of designs is a partition with a drywall door. For convenience, it is worth considering the process of its construction.
- Initially, the drawing is drawn up with an indication of all sizes, the profile fastening scheme should be present separately.
- Next, the frame is built as for a conventional interior partition, the installation of carrier elements for the sliding door is carried out in a horizontal position to UW profiles.
- The framework profiles, the lower and top are inserted into the frame according to the instructions.
- With the help of a screwdriver, a transverse CW profile is installed.
- Next, the stage of the construction of the design, carrying door elements is closed by a protective profile. Next, the process of shtlocking is carried out.


