Despite the fact that modern windows are made with reliable accessories, which can guarantee a long reliable design work, they, like all other mechanisms, require periodic maintenance. Works on the repair of plastic windows are not really complicated. The most important thing to know where the main nodes are located and have the necessary tools with them.
Content
- The handle loosened
- Installation or replacement of handle with fuse
- Do not work well
- Jammed handle
- Settings of the clamping mechanism
- The edge of the sash hurts the frame of the window
- The window is strongly blowing from the loop
- Replacing the sealer on plastic windows
- Replacement of a glass package in a plastic window
- Cleaning and repairing accessories in old plastic windows
So, for the repair of plastic windows, the following tools will be needed: cross screwdriver, hex key to 4, set of t and tx nozzles in the form of a star for screwdriver, passage or planks, as well as machine oil or special WD-40 brand name. For repair and adjustment of plastic windows, a hex key is used. At the masters who do this, often there is a slightly modified key. This tool has a special bend to the smaller part for convenience.
Star ending nozzles are applied much less frequently, they are usually used only in some fitness models. Immediately fittings usually attached to the profile using bolts suitable for a crusade screwdriver. Between the products that today is available on the market, of course, there is a difference in adjustment and configuration, but they are similar to each other. Therefore, we consider the mechanisms of setting up and adjusting accessories in various kind situations, when repairing and maintaining plastic windows.
The handle loosened

This fault is solved quite simply - for this, it is usually enough just to pull the finishing of the handle. Under any handle on the door there is a pad of a rectangular shape. It is this gasket that needs to pry (with fingers, but not with a screwdriver) for one of the edges and turn it on a quarter of turnover. There are two bolts under a crusade screwdriver. It is these bolts that should be tightened.
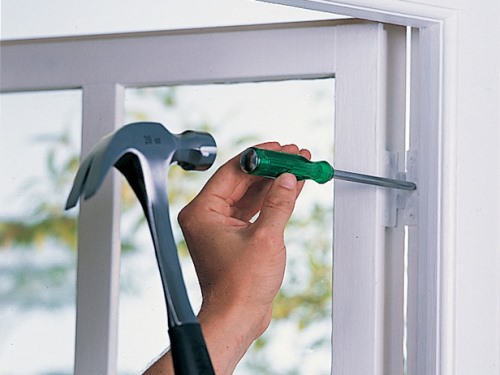
Installation or replacement of handle with fuse
Some rooms useful handles equipped with fuses. For example, they will be very relevant on the windows of the children's room so that children cannot accidentally open the window. To remove the handle, you need to unscrew the lining below it and unscrew a pair of bolts. Then you should take it gently. After that, take a new handle and insert in the same position in which the old one was located. Finally, secure a new handle with bolts.
Do not work well
It happens that the handle is jammed or simply does not reach some position. It may mean that its mechanisms need lubricant and cleaning. In addition, if it does not close to the end, then you need to weaken the clamping effort on the sash. For cleaning or lubricating the handle, it must be started to remove from the window. After that, it is necessary to clean the mechanism with a brush or vacuum cleaner. At the same time, it is allowed to use in small amounts cleaners intended for washing glass. The main thing is that there are no surplus in the mechanisms. When all pollution is eliminated, you need to lubricate all movable parts of the mechanism. The WD-40 aerosol can be used as a lubricant. After that, the handle can be collected back. If the problem is in a tightly closing handle, then it is usually enough to make less clamping force. For this, the hinges have bolts for adjustment, as well as special eccentrics.
Jammed handle
If you have this problem, it is not necessary to replace the handle or even remove it. The reason is the violation of the triggering of the blocking mechanism. This mechanism does not allow to change the position of the window when it is open. To solve this problem and make the stroke of the handle free, you need a little diverting the lever of the block. It is usually located on the side of the end of the sash.
In general, the blocking mechanism can be represented in two different versions. In the first case, the plate has a type of tongue. This tongue is screwed to the end of the sash. When opening the sash, it is removed under the angle relative to the rubber seal. In another case, the block is clips set on a sealing gum. Swim the handle may in winter. Then it will also be necessary to repair plastic windows. The video posted below will tell about all the variants of breaking the breakdown.
Settings of the clamping mechanism

On the perimeter of the window sash there is a sealing gum, which gradually can lose volume, because of which the gaps appear through which cold air goes. Not only tightness is worse, but also sound insulation. The slots can also appear due to deformation arising due to temperature drops at different times of the year. To solve this problem, the sealant is not needed. After all, to repair the accessories of the plastic window, in the design there is a way to configure the clamping force.
For the repair of the mechanism of plastic windows on the sash, namely, on their end, the protruding cylinders of the oval shape are located in the slots of the metal plugs, which are called pinges. At the same time on the window frame there are response hooks. To configure the clamping force, it is enough to scroll through the pin or move the response hooks on the frame. To adjust the closing of the sash, the most protruding part of the pin is rotated gently toward the inner surface of the window for tightening the mechanism, and in order to weaken, on the contrary - towards the outer surface.
Fittings for different manufacturers, the adjustment of the axle may vary. The following adjustment options are possible:
- on the pin there is a slot in which a slotted screwdriver is inserted for adjustment,
- the pin is assigned to the surface of the end (with hand or passats) and scrolls,
- the Tsazpa turns with a slight effort to passage.
If you cannot configure it, then you need to change the position of the hooks on the frame. They are usually attached to the hex key bolts. To change the position of the hook, it is enough to pre-light the bolts. The movement of the hooking can be loosen or strengthening the clamping force. After this setting, you can go face with canopies.

For example, we give the order of configuration of the Framene System.
- Remove the plastic cap from the bottom canopy. Directly in the suspension itself there must be one hidden bolt and a pair of visible bolts. Through these bolts, you can change the relative position of the sash to the frame.
- Configuration of the clamping force is better to do with the closed position of the sash. To do this, use a bolt, located perpendicular to the plane of the window. In this case, the setting is made by a hex key, which is inserted into the bolt head and revolves counterclockwise if the clamp is required, and clockwise - if you need to strengthen it.
- In order to adjust the fit of the top of the sash on the bottom of the lever, holds the sash, there is a special head. Adjustment of the clamping force is carried out in the same way as an adjustment of the TsAF.
The edge of the sash hurts the frame of the window

This problem may occur when the windows are sharply open and closed, or for a long time are open. When this happens, then some mechanisms that hold the sash can deform and break out. To solve this problem, you need to adjust the position of the sash. Detailed instructions on how to configure accessories, can be found on the manufacturer's website. They can repair plastic windows. Prices for these services should also be listed on their website.
The setting should be done depending on what the sash hurts the frame. Sometimes it concerns the frame with the bottom end. To resolve this problem, the sash must be raised, and then a little tighten the top part to the side where the top mount is located.
If the sash touches the frame with the upper end, then it is necessary to turn it towards the lower canopy. It may not be enough, then you need to lower down the entire sash.
Sometimes the middle part of the handle side is tied. The solution of this case is to displace the sash towards the canopies. If the touch place is shifted, then depending on the side of the displacement, it will be necessary to rotate the sash or toward the top or lower canopy.
To configure the position of the sash, you should adjust the bolts with the head under the hex key. These bolts are located on the lower awn. In addition, if metal-plastic windows are large enough, then there are special closers in their designs, with which it is possible to raise the sash at the moment when it closes a couple of millimeters. If there is a need, the position of these closers should be corrected.
The tuning bolts are also available on the lower awn. They are used to control the turning of the flap at the bottom. In addition, with the help of them you can adjust the height of its installation. The bolt is in the hole at the top of the canopy. To gain access to it, it is enough to remove the protective platband. In order to raise the sash, you need to rotate the bolt clockwise, for lowering - you can turn the bolt in the opposite direction.
It is possible to adjust the movement of the bottom of the rod to the right or left side in the mounting plane. To do this, in the part of the canopy parallel to the window there is a special bolt. It can be adjusted by two ways - from the side of the sash and on the side of the slope. The direction of movement of the sash depends on which direction the adjusting bolt will rotate. It is desirable after each half-timer to check the accuracy of the window.
At the top of the window there is a mechanism called "scissors". In order to adjust it, the sash must be fully open. The side of this mechanism is a slightly recessed bolt, which can be used to adjust the displacement of the sash in one direction or another in the window plane.
The window is strongly blowing from the loop

There may be several reasons to provoke the emergence of this problem. Poor-quality installation is one of them. This happens when the workers during the installation pulled the frame in the middle part anchor bolt. Richting plates are used for alignment and fixation of double-glazed windows. Some of them are installed in the middle part of the sash. The displacement of these plates can also cause this problem. Perhaps these plates could not install even at the stage of production. In this case, you need to remove from the sash stapper from the loop side. Then put the required number of plates between the profile and the glass. To remove the stroke, you can use a hard spatula or chisel. The tool leans to the place of the junction of the stroke and sash, and then with the help of light blow, the part is disconnected. As a plate, you can use a simple school line.
Replacing the sealer on plastic windows
The seal in high-quality windows can serve from 5 to 10 years. Therefore, sooner or later it will have to be replaced. To do this, first should buy a new seal. There will last a long time for German production. In any case, when buying should be checked for marriage. For replacement, you first need to get an old seal from the groove, then clean it and rinse it, after which the glue is applied around the perimeter. Now the new seal must be carefully started in the groove. At the same time, you need to follow so that it does not shrink and stretched.
Replacement of a glass package in a plastic window
- First of all, you need a new glass unit. Do not count on your strength if you do not know exactly how it is done. In this case, it is best to entrust this business to specialists in plastic windows. Repair and maintenance are their main specialization.
- In order to replace the glass, you must first remove the old one. All strokes can be removed using a metal spatula and rubber Cyanka. When all the strokes are removed, you need to remove the former double-glazed windows from the frame. He is heavy enough. Therefore, it is better to do together.
- Now you can put a new glass pack. If the sash you have deaf, then the strut plates should be installed below, if the sash opens, then these plates need to be put at an angle, retreating about 100 millimeters.
- After inserting the glass package, inspect it, the geometry should be correct. If necessary, put additional straightening plates. After that, set the strokes again. The installation of a new glass package on this is completed.

Cleaning and repairing accessories in old plastic windows
During operation, accessories are forgotten by mud and dust due to what the work of the mechanisms is disturbed. Sometimes they come into disrepair when the windows left during the blots open. Timely prevention and cleaning of fittings warns her breakdown, and also excludes the possibility of further repair of locks of plastic windows and other equally important elements.
- When the transfer mechanisms are clogged with something, then it is necessary to completely overdo the accessories. In order to do this, you first need to remove the leaf with the loop. At the same time will have to remove decorative lining with each of them.
- In addition, you need to knock out the axis from the top loop. To do this, you need to hit it from above, and then take out from below with the help of the passage. Folding hard. Therefore, do not do it alone. The second person must hold while you take it off with the loops. After the top you need to remove the leaf from the bottom loop and put on the table.
- Then remove the handle, unscrew the windows around the perimeter all the screws and remove the mechanism from the groove. Another table we drag the film and lay fittings on it. On it, with a wet tassel, we rinse the entire mechanism.
- When everything is washed, you need to give accessories as you can dry. Before assembly, you should get a special lubricant to handle all the running parts.
- When this is done, carefully put the fittings on the profile, screw, install the handle. Before hanging on the loop, they need to be lubricated. After that, the sash can be inspired.


I wanted to replace the seal. The windows began to freeze, asked friends who can replace, advised these guys https://www.remstek.ru/zamena-uplotnitelnyh-plazinok-na-plastikovyh-oknah/