
Plaster - Universal Wall Coating. It can be like an exquisite and decorative part of the interior, as well as a conventional monophonic background or a rough version of surface preparation for any finishing material. Plaster is sufficiently resistant to moisture and perfectly tolerates different adverse effects, from temperature drops to scratches from animal claws. However, even this pretty durable material has a tendency to destruction. About how to competently make repair of plastering of the inner walls, you will learn in this article.
Content
Causes of destruction of plaster
There are a lot of reasons why the plaster is destroyed and loses its aesthetic and functional properties. Most of them are easy to warn during the fulfillment of plastering, but some cases impossible to foresee. 
Causes that can be avoided:
- poor-quality preparation of the base under the application of plaster;
- unstable residues of the previous coating;
- invalid selection of the solution for the inner or outer surface.
The reasons for which it is impossible to influence:
1. Cracks that appeared in the places of high load on the surface:
- window frames;
- door openings.
2. Plaster defects due to long-term operation.
3. Destruction of plaster due to natural disasters, such as earthquakes. 
Important! Plaster, like any other material, loses its properties over time, but any cracks and defects can be eliminated with their own hands. The price of plastering inner walls in this case will be significantly lower than when performing these works by professional builders. We note another fact that the inner plaster of walls from aerated concrete is also performed as easily as the decoration of brick or monolithic concrete bases. Therefore, the main rule is to comply with the sequence of actions and all the conditions of the injury sealing technology. 
How to check the strength of the coating?
Before repairing the visible zone of destruction, be sure to check the entire plastered surface. The check is done in order to prevent the ambulance destruction of new sites. To do this, it is fairly easy to catch it with a rubber or wooden hammer. 
Important! The durable coating makes a ringing sound, and not durable gives a deaf tone.
What to choose a solution for seeding damage?
Repair plaster in mandatory procedure, make the same solution to which the plaster was initially made.
Important! Do not allow a typical error, purchasing and manufacturing more durable, in your opinion the composition, which is not always combined with the previous coating. The price of plastering of the inner walls in this case is entirely dependent on the quality of the initial mixture for the solution, so give preference to proven manufacturers, but with the available value of the materials. 
The texture, color and aesthetic surface view directly depends on what mixture you will use.
Important! If the destruction is significant and caused precisely the fact that the solution was initially improper quality, in this case it is advisable to completely replace the plaster, and not to enhance individual fragments of the wall by another composition. Otherwise, repair work on the plaster of the inner walls will have to be carried out regularly. 
How to properly prepare walls when repairing plaster?
To save time and money, many prefer to repair only noticeable irregularities and damage, not paying attention to the fact that in other places the plaster can also hold on an honest word. It looks presentable, but in practice is fraught with a constant re-restoration of the surface. 
To avoid this result, before starting fine repair, do the following:
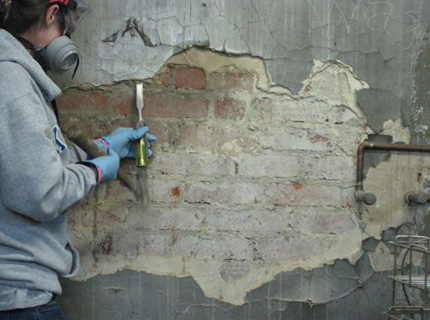
- Cold with a hammer all the surface of the finish.
Important! In places where the sound will be deaf - the finish moved away from the wall. - Remove the plaster that has lost its properties.

Important! Before removing the old layer of a rough method, try to clean the wall with special means and metal brushes. The choice of liquids is great and varied when working with different bases. Therefore, be sure to consult a specialist regarding the optimal option specifically for your type of wall surface.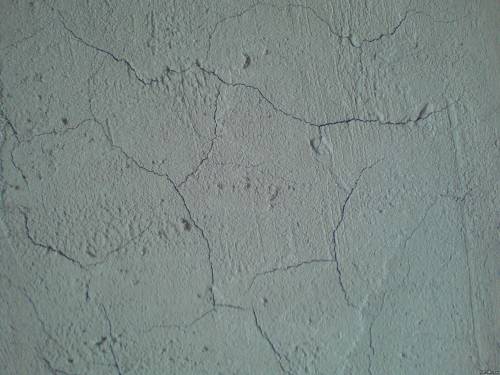
- Make sure that there are no salt sediments on the remaining surface, fungus, mold or other changes.
Important! In case of detection of such changes, be sure to treat the wall using a fungicidal solution with antimicrobial properties. - Start directly to the preparation of the coating restoration.
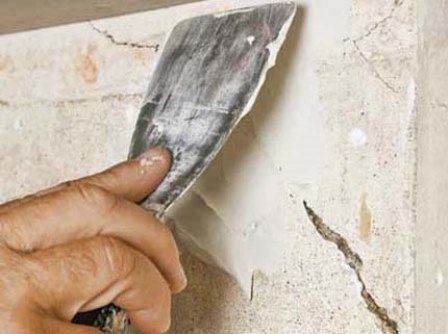
Important! Repair of damaged plaster is carried out taking into account the depth and size of cracks.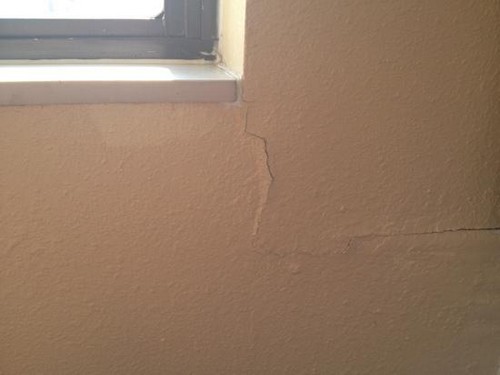
- Expand the crack slightly with a spatula.

- Moisten it with warm water.
- Remove the remains of the old material.
- If the grace is deep - lay the reinforced ribbon in it.
- Propate the surface.
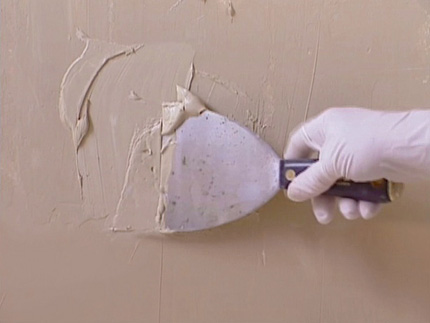
Important! Do not forget that the stucco solution must be used the same that was used at the initial finish of the walls of the walls.


Technology repair of plaster inland walls
Regardless of the type of material in need of repair, the technology of work is the same:
- Moisten damaged zones with water.
Important! Special attention is paid to the edges - the adhesion of the new layer of the solution with the old ones depends on this.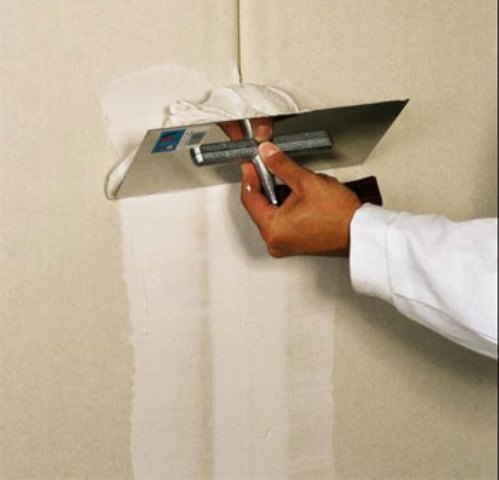
- Wash abundantly, otherwise cracks may form again.
- Apply the primer to the selected portion.
- Treat the wall surface a thin layer of liquid mixture by the method of spray.
- Wait for a while, until the plaster grabs.
- Sand the renovated area using sandpaper.

- Produce grout with circular motions.
Important! Do not neglect grinding, since it depends on it the appearance of the repaired surface. The material should be smooth and homogeneous, and not manifest in the form of a dark spot on the wall. To more clearly imagine the solution of the task, browse the photo of the plaster of the inner walls, which will help faster to understand exactly how to perform one or another part of the work.


Video
Check out the proposed example of video plaster inland walls to visually see the whole process and properly organize yourself when carrying out repair work.
Gypsum Plaster Repair Features
Repair of gypsum plaster is carried out in accordance with the main rules of sealing cracks on the surface, but there are some distinctive nuances. After checking the wall on which cracks are detected, proceed to eliminate damage by reading the proposed method below. 
Instruments
For repair, you will need the following tools for repair:
- narrow spatula;
- wide spatula;
- drill or screwdriver with a nozzle mixer;
- surpeck grid;
- sandpaper, pumice or grinding bar;
- round capacity for kneading plaster;
- rectangular sampling tray;
- primer deep penetration;
- dry gypsum mix.


Preparation of the surface
This procedure is not much different from the standard preparation process:
- Spatula expand cracks.

- Make edges smooth and smooth.
- Clean the wall from the remains of the old mixture.

- Sprouter the surface.
Important! The primer is needed for a good clutch between the wall and plaster.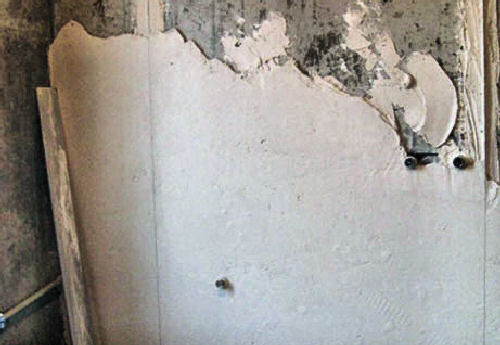


Technology repair
- Apply a gypsum solution with solid, pressing movements.
Important! When applying plases, make sure that all air bubbles were squeezed.
- Install the reinforced mesh for the plastering of the inner walls.
Important! The grid prevents the appearance of new cracks at the joints of the old and new gypsum. - Over the mesh not on the edge of the surface, but not too deep. It must be covered with plaster.

- Strip the wall surface with a wide spatula.
- Give the surface to dry.
- Collect the site with sandpaper.


Features of repair of cement-sand plaster
This type of plaster is not more complicated by plaster, the overall algorithm for their implementation is very similar, but the method of applying a mixture and the preparation of the base includes distinctive features. 
Instruments
For this type of wall repair, materials and tools are needed:
- sand, cement;
- master OK;
- a grater of foam;
- concrete mixer;
- hammer;
- nails or dowels;
- round tank for solution;
- metal reinforced grid;
- rule or wooden rail.
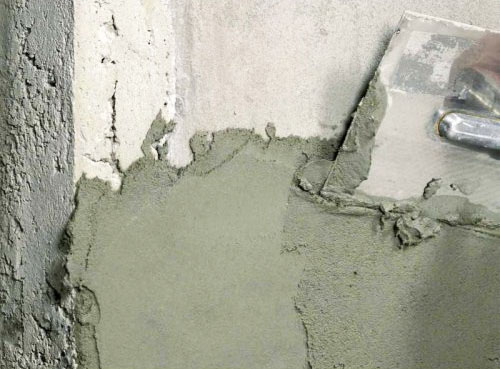

Technology
To get high-quality coating of cement-sandy mortar, follow the work as follows:
- Clean the wall.
- Moisten the base with water.
Important! In this form, do not use the primer.
- Mix the solution.
Important! Make a mortar from cement and sand in the same proportions as with the previous plaster. If the new mixture will have more cement, it will start to destroy the old solution. If the cement is less - the plaster simply swaps with time.
- Discharge the solution on the wall with force.
- With sharp movements with the help of a trowel, throw out all cracks.

Important! The emission of the solution to the craftsman - the point is not so difficult, as it seems. If you missed a little - just remove the extra cement using the ruler or wooden rail.
- Secure the reinforced mesh to the wall with the help of nails or dowels.
- After drying the coating, set the surface with a foam grater.


Conclusion
When repairing plaster it is important to be extremely attentive and organized. Compliance with all rules will provide high-quality and long service of the new surface. In the case when the surface of your dwelling is destroyed significantly, do not be lazy to completely replace the plaster, because it is better to do it well, than to redo the work of parts over time.


