In the life of every person comes the moment when you want to update the interior in the bathroom, toilet and kitchen. And this concerns not only the replacement of old furniture and the acquisition of new plumbing. We will have to replace the tile to upgrade the inner finish. You can cope with the work on the installation of ceramic tile can also be independently, the main thing is to be performed in the subtleties of the workflow, prepare the necessary materials, pick up the instrument and explore the technology of laying ceramic tiles.
Content
Learn more about Tile laying technology
This is primarily the preparation of the surface and phased implementation of all provided tasks.
So, when laying ceramic tiles, you must follow the following:
- since the thickness of the tile, though both small, but still increases the level of the floor, then there is a need to purchase an outdoor plinth. You will also have to give the attention of the door and if necessary, pose the door from below;
- since the ceramic tile itself is a durable material, it is necessary to immediately decide on the volume of work and cover the entire area of \u200b\u200bthe room. If too lazy to shoot a mounted cabinet and move the furniture, think well, and suddenly in a few years you want to make redevelopment or change the furniture? Then you will have to lay the tile anew, because exactly the same finishing material is unlikely to be found in construction stores. Exception - elevated stationary equipment;
- what you need to take into account during operation: the main thing is that the surface is carefully prepared. This applies not only to the floor, but also walls. Clean and solid surface - then you can provide the perfect clutch of the material with the wall in any room, even where it is constantly wet and damp. If you see that the plaster began to hide, it is better to consider the top layer and put a new one;
- for cladding, any surface is suitable for facing, you can even put a tile on the wooden floor, but only if the floorboards are tightly kept. If you set out the goal to put the tile on the old wooden floor, Ideally, it is desirable to remove the coverage and make a screed or at least put directly on the floor of the plywood layer;
- the horizontal of the floor is very relevant, since even the slightest bias can affect the quality of work. If the floor is uneven, then you first need to align it. This can be done with the help of glue, under the condition of a minor drop (up to 12 mm). If the difference is more, then you must first make a screed, and then take up the laying tile. It is worth considering both the acquisition of a self-leveling mixture.

Premises training tips:
- If you want to lay a tile in a small room (bathroom, toilet), then it is advisable to remove the door with the loops (if it opens inside).
- As a support for laying the tile, you can knocate a wooden bar in the doorway.
- If work is conducted in the room, from which you can go into the courtyard, then a small corridor is desirable to lay out the same tile.
- If the room is narrow and long, then it is advisable to lay a tile not in a straight line, but diagonally (angle 45 o) To the wall, then the room will visually seem more and wider.

What instruments and materials for laying tiles will need
The tool - it should not be enough. Each wizard has a set of tools, with which it can easily cope with the task.

What are the tools for laying a tile:
- cutting device for tile (cutter);
- a spatula with cloth;
- food (To smooth the edges of the cut tile);
- building level;
- wooden smooth plank to check the horizontal surface (floor);
- line for marking (can be done independently);
- planks for support;
- pencil;
- "Crossings" plastic;
- rag or sponge for wiping tiles;
- rubber spatula;
- device for grouting seams (foam sponge is suitable).

Even if you work with the thinnest tile (for walls or for laying on the floor), it is still not to do without such a tool:
- the cutter "Easy" for tiles, no more than 6 mm thick;
- professional cutter - this device will cope with the task of any complexity. Tile thickness does not matter;
- bulgarian or angular grinding machine - just what is needed to cut the tiles of any thickness. By the way, the grinder can be cut patterns and a complex circuit from the tile;
- to cut the curvilinear patterns from the tile, it will take a special saw with a thin layer of diamond crumb applied to a wire melt or any other abrasive material. This tool can be rented.

In addition, you need to prepare and protective equipment: work clothes, comfortable shoes, mask, headdress, gloves and glasses.
Let's talk about the size and thickness of the tile a little later, and now let's find out what kind of glue and the material for grouting the seam will need. As a rule, glue is a dry mix, like putty. Sold in bags. Before you begin work, you need to dissolve the powder with water and mix thoroughly. It turns out the finished glue solution. To improve the quality of the material, add different additives to the glue. Suppose you want to put the tile directly on the wooden surface, then you need to purchase a special emulsion.
As for the powder for grouting seams - on sale presents a wide range of this finishing material, you can choose the grout of a classic white shade or emphasize the bright tile with the same grout (you can 1-2 tones lighter or darker).
It is also worth paying attention to the liquid that protects the surface of the unhappy tile (if it is made of natural stone and has not passed the polishing stage). Then it is necessary to use a special fluid to create an invisible barrier on the surface.
And now we will study the characteristics of the tile. If you need to put the ceramic tile on the wall, then pay attention to the thickness of the finishing material and dimensions. The thick tile is designed for laying on the floor. Sizes and shape can be different: Standard: Square and rectangle from 150x100 mm to 300x600 mm. By the way, you can now see the tile even with the 6th corners. Do not rush to acquire this novelty, as it is not easy to cope with a complex geometry. Will have to seek help to professionals, and here it is necessary to take into account that the price of laying 1 m 2 Ceramic tiles equates to the value of the material itself. So it is better to think carefully at first, and then make a decision.

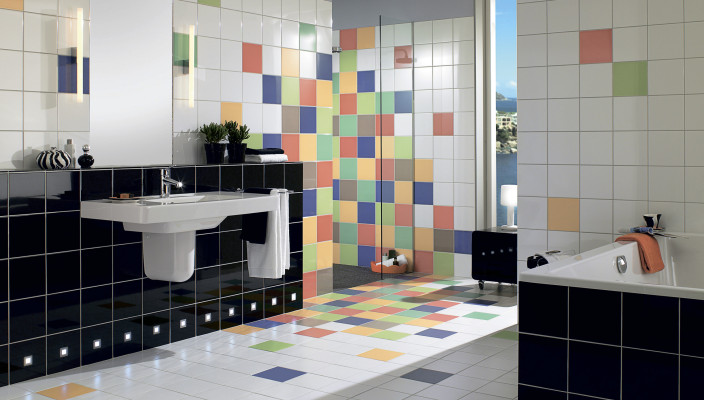
The surface of the tile, both for walls and for the floor, can be smooth, textural or matte. A wide color range of this finishing material allows you to choose a tile for every taste and embody any ideas in reality. The buyer always has the opportunity to combine several types of tile. Suppose you want to lay a light shade tile on the walls and focus on one wall. Then you can choose a material imitating marble or granite. The dimensions of such tiles can be different. Pay attention to the thickness of the product.

What else you need to know: buying tiles for laying on the floor or wall cladding, it is important to take the material with a margin, taking into account waste. Plus 5% to the total number of tiles - it is just what you need. Waste almost will not be.
We start working according to the rules
First you need to measure the walls in the room where you will lay the tile. Measure the walls in width and height, calculate the area (multiply the numbers). It will only be the size of the 1st wall. Make similar calculations with all the walls. Consider if you are going to lay a decorative profile (border along the bath), then you need to calculate the amount of material, taking into account the height of this wall.
When you choose in the construction store tile, pay attention to the tone. Do not be lazy and open each box, very often the labeling is properly correct, and the altitude of the product is not respected.
If you are going to lay a tile on the walls in the bathroom, and you are not going to change the bath itself, then you need to take care of not to damage it. Cover the bath with a dense polyethylene, folded in several layers, and even better - first put the old cotton blanket on the bottom of the bath or at least plaid, and then close the perimeter with a polyethylene film. Film the film is best for building wide scotch. Sewer and plumbing pipes, as well as a mixer, also need to be protected: Verify the old rag and put on them any protection (you can purchase special tubes in the store).
How to prepare the surface
To the cement wall lay the tile is easier than simple. If you do not have the choice of the foundation, then you can simply prepare the surface, clean the irregularities and large differences, remove dust and trash. If the wall is rough, then you need to put the tile on the portland cement, and if smooth - buy special glue.
Do not forget that this is not allowed to lay ceramic tiles, it must "breathe", especially if the walls in a room with high humidity and a non-permanent temperature regime are faced. For cladding walls and laying tiles on the floor in the bathroom and kitchen, it is necessary to leave the distance between the tile of at least 0.5 mm.

Laying of ceramic tiles do it yourself
Since the cost of laying ceramic tiles remains stable (equal to the average cost of the tile, and in special cases - specialists are requested for work a double price), then with all the works you can cope with yourself.
The surface is prepared and you can proceed to work. First you need to "aim", that is, along the wall, starting from the floor, simply lay out the tile to get a row. This method of specialists call work on "dry". One tile row is posted, it becomes clear how many tiles need to be used and there is a need to cut the tile or not. If this option does not suit, there is still an opportunity to shift the tile otherwise to avoid difficulties in work. The perfect option is to trim the first tile so that then there are no problems with the gaps. Then the rest are "lying" as needed. It's easy and customized nothing will have to.

Consider the stages of laying ceramic tiles:
- Make a note with a simple pencil in 2 places: where the first tile will be fixed and where the latter is located in one row.
- Now take a plumb (you can do yourself from the rope and weight), with the help of a plumb, apply the vertical line to get a smooth straight line - this will be located in a row tile. The plumb will need and in the case when you need to check your work in order to identify an uneven base.
- Remember that the seam on the tile should not be on the same level with the junction of the tile, it should drown a little.
- Try to put the tile on the plots. And even better, if you draw a plan for a chalk in advance on the wall and you will adhere to it. You need to start laying from the bottom row: Fix first 4-6 tiles, and then move on until you fill in the first row. This method is considered the best, because it is more convenient to control its work on the level and apply a solution or adhesive mixture on the surface.
- Every 4-6 tiles check the horizontal of the row by level or use the rights andscrap. Even if the rows "fled", the solution has not yet managed to fix the tile so quickly. In a small area, you can go back and correct the error.
- Remember the main rule: work only from the bottom up. First, the 1st row, ranging from the floor, then the 2nd and so on. This rule concerns work on laying tiles on the walls.
- When the 1st row is ready, the next thing to do is to drive nails into angular rails to tighten the durable thread between them. It is necessary in order for the next rows to be perfectly smooth without skew.
- Putting the tile on the wall, glue or solution should be applied with a spatula with cloths directly to the back surface of the tile, and then apply it to the wall.
- After that, it is necessary to carefully press the tile to the surface and ensure that glue is distributed over the entire tile area. The same work must be done with the next tile.
- To clearly withstand the distance between the tiles, insert special plastic "crosses" into the intervals. They are 2 sizes, for the thickness of the seam 2 and 4 mm. The gap is not done in order to fill this space with colored grout and make the room attractive, and in order for the tile to crack and not split, because the room is dry, it is dry, then wet, warm or cold.
- If the last tile does not fit in the row, you will have to work out for yourself a certain tactic: immediately cut off the tile and put it first, and so every row or do it at the end of the row. Cut the tile is better than a special tool - stovetur. If the experience of working with such a tool is not enough, then at first it will be difficult for you to cut off a small piece (3-5 cm width). Practice in advance on the defective tile so as not to spoil a lot of finishing material.
- If it did not work with the plottle, it is possible to use the grinder or apply 2 tools at once: first the tile cutting out a flat line and cut through a few millimeters deep into the hollows, and then bruises gently break down too much. Only then will have to clean the seam on the tile.
- Do not throw out the cut tile, it can also be used and put in those places where it will not be visible (under the bathroom, shower, under the sink and cabinets).
Methods for laying ceramic tiles
With the first way, the easiest, you have already familiarized yourself. You just need to put the tile with rows. The same rule must be observed at the floor cladding. Start laying tiles on the floor you need from the angle (long), heading towards the door. In order for the ranks to be clearly parallel and there was no offset, it is also necessary to use the level and check from time to time the horizontal laying.

When the room is small, you can take advantage of rights andscrap or perfectly smooth rack. First put the right andlo, and from above the level is littered.
The glue should be applied to the entire surface of the tile from the back side, and during the installation, stop each tile (in several places) with a special rubber hammer or spatula handle.
If you see that the tile failed and lightly below, disturbing the horizontal level, it is necessary to tear it off from the floor, put more adhesive composition and thus comprimenting it to the rest of the horizontal tiles.
Only after the completion of the work when the solution is driving, you can wipe the tile with a cloth to remove the remnants of the dry solution and passing through all the seams, filling this space. It is better to work with a narrow rubber spatula, it beats well.
As for the grout - it is not necessary to relate negligently to the choice of this, at first glance, the insignificant finishing material. If you buy a low-quality grout, giving preference to the cheapest material, then in a few weeks during operation, poor-quality material will show itself: the seams can crack and lose the initial look.

Improve the strength of the grout will help special milk with latex, it is necessary to breed it in proportions 1: 1 (1 part of the milk, 1 part of the water). It is necessary to work with this material. Try to make the solution get on the tile, as it is very difficult to wash it. Such a solution will help extend the life of the grout and your work will always be neat.
There is another way of laying tiles, both on the walls and on the floor is the creation of geometric patterns. In this way, you can achieve a unique pattern using a tile of different shades and visually expand the room.

This method is very complex and for beginners is not suitable, but if you are ready to take a chance, then you can get acquainted with the basic rules:
- we'll have to immediately buy a tilt scale or verify working with a grinder to get a perfectly smooth incision;
- The 1st row of tiles put on the bottom from the floor, only the tile you need square and it must be cut in half. In your hands you will have 2 identical triangles;
- we begin to lay the 1st row by a wide side. As a result, you must have a series of 10 and more "triangles" (the number of tiles depends on the size of the room);
- the next step is to lay the 2nd row of tiles. Do not cut anything. We put tile now not exactly, but on a sharp angle, and so until the ceiling. From the beginning of each row and at the end you need to put one triangle.
If the surface is perfectly smooth, then instead of a solution, use a special quick-up glue. Just work very carefully, as it will not be possible to correct the error. Do not forget to press tile tile to the wall / floor and tapping. Listen to this sound: more ringing means lack of glue, deaf - glue distributed evenly. Do not press the tile to the surface too much so that the glue or the solution does not get out on the seams. To distribute the solution, the tile must be slightly moved from side to the side. If the glue hit the tile, immediately wipe this place with a sponge dipped in warm water, and wipe the dryer with a rag.

We can watch ceramic tiles on this video:


