Specialists in the thermal insulation of houses agree that if there is an opportunity, it is better to warm outside. However, if there is no such possibility, you have to resort to internal wall insulation. In this case, you risk losing the useful area of \u200b\u200bthe apartment and reduce the service life of the building due to the removal of the walls. Of course, the degree of risk depends on the choice of insulation materials and installation technology. We will talk about all this in today's article.
Content
Why is it better not to insulate the walls from the inside
The main problem of the insulation of walls from the inside is that the wall itself does not cease to be exposed to external atmospheric influences: frost, moisture, wind loads. When the insulation is on the inside of the wall, the frost penetrates through it and faces the heat insulation layer, and there is a conflict of two temperatures - cold outdoor and warm home. As a result, condensate begins to form the insulation, and since he cannot evaporate anywhere, the porous material of the walls and the insulation is beginning to absorb moisture. The wall is gradually destroyed from this, and the insulation loses its protective characteristics. Ultimately, you get a cold house with weakened walls. Most of all brick walls suffer from such a position.

To avoid such deposits, you must be able to correctly select the thermal insulation material. It should be characterized by minimum vapor permeability, not be afraid of moisture, and when it is installed, there must be a minimum of docking joints (potential places of leaks and damage). Also, to prevent condensate accumulation, you should leave a small gap between the wall and the insulation so that the moisture can fire freely. Many people neglect this step, trying to press the heat insulation as close as possible to the wall and save the useful area, but it is not worth doing so. In any case, you will donate free space in any case, and 5-10 cm do not change the situation, but the house will flash for a couple of dozen years longer.
Methods of insulation and materials
Under the above requirements for the choice of insulation, the following materials are not falling at all: mineral wool in rolls, warm plaster, cork coating, drywall panels, liquid ceramics and other products that are not able to resist resistive to moisture deals. Plasterboard and warm plaster can be used for the finishing decorative finish of the warmed wall, but no more. To better navigate, remember one simple rule: if the material consists of fibers, it can absorb moisture or actively misses couples, it is not suitable for the inner insulation of the walls of the house.
The polystyrene foam in this regard is very popular, and it is used for the insulation of the walls not only inside, but also outside (facades). However, when laying polystyrene foaming, many joints and seams are formed, which accelerate the decrease in the tightness of thermal insulation.

Criteria for selector selection for walls:
- Ecology - Remember that you are going to warm the house from the inside, so all the materials used must be completely safe for health. For laying mineral wool, for example, you must wear protective gloves, respirator and glasses so that the fibers do not hurt the body. It is non-toxic, but requires careful circulation and subsequent high-quality finishes. The material should be safe not only at the time of installation, but also after a long year (not allocate toxins during aging).
- Fire safety - insulation should not easily flamm or maintain burning.
- Low thermal conductivity coefficient - the lower thermal conductivity, the better the material is kept heat or cool inside the house. The indicator is determined by the calculation of the cross section, that is, the smaller the thermal conductivity, the thinner there should be thermal insulation. Some mistakenly believe that the thickness of the insulation, the better, but in fact you risk simply overpay for more expensive material and at the same time take even more free square inside the house.
- Moisture resistance - the insulation must absorb the minimum moisture or not absorb it at all. In this regard, the winning position occupies a foam.
- Resistance to deformation and mechanical effects - the material must be durable and not curved over time due to temperature differences or natural seasonal plating walls (expansion in summer and narrowing in winter).
- Durability - the insulation must serve as much as possible (10-15 years old).
Despite the abundance of insulating materials on the market, only units fully comply with the criteria above. Below we will look at which of them are most popular in private construction and tell about the effective way to insulate walls from the inside.
Polyurethane foam for insulation of walls
The foamed polyurethane leads in the field of insulation for inner and outer walls, ceilings and even floors. Its popularity is explained by high moisture resistance, durability and rapid installation. The only drawback of the material is the features of its application - for this use a special spraying technique. The polyurethane foam itself is several components that are mixed in the sprayer capacity, after which the high pressure is applied to the warmed surface. When contacting with oxygen, the material immediately foams and frozen, giving a monolithic and seamless heat insulating layer. If you ever worked with the mounting foam, the principle of application of polyurethane foam should be understood.

In order for the polyurethane foam as it should be grabbed and formed a sufficient thickness to protect the house from the cold, it must be applied to the pre-installed formwork. It is built from wood or metal and alternately fill the sections with foam insulation. If you make a frame of wood, all items should be treated with an antiseptic, if the metal is an anti-corrosion composition. In this case, there are no seams in the insulation, but the risk of depressurization is still there - if the elements of the formwork are destroyed.
After the foam layer is frozen, it is necessary to close the vapor insulating membrane, and then close the plasterboard sheets. It is already clear that each of the layers, starting with the formwork, ending with drywall and finishing finish, occupies a lot of space, so this method is not suitable for insulation of rooms with a modest quadrature. Apply the plaster or other finishing materials right on top of the frozen polyurethane foam is impossible - first, the surface is irregular, secondly, if the finish and will hold on, it is very short.

To mount the drywall, it will also be necessary to build a frame of metal profiles, and the profile can be fixed only to adjacent walls, sex or ceiling, because the insulation will not withstand such a load. Learn more about working with plasterboard can be found in the article " Wall decoration Gypsum Carton" In this case, the dew point (the place where the cold and warm air is found) will be in the thicker of the most polyurethane foam or between it and the wall, and since the vapor permeability of the material is very low, there will be no condensate.
Polystyrene foam for walls
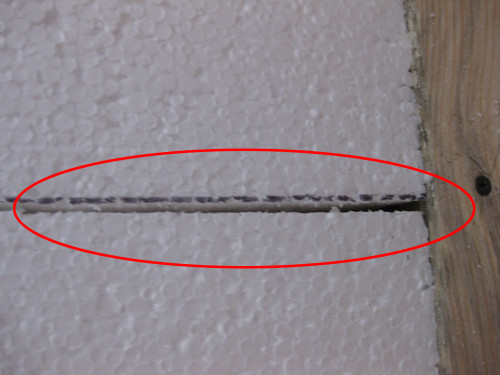
If you decide to warm the walls with ordinary polystyrene foam, which is sold in the plates, carefully examine the technology of its installation. The polystyrene foam is a close relative of ordinary foam, but in contrast it has greater density and durability. The surface of the plates is smooth and smooth, therefore, for their gluing, special mixtures are needed, designed specifically for expanded polystyrene. In this case, do not avoid joints, but you can reduce the risk of cold bridges to a minimum, if it is possible to customize the insulation sheets to each other as close as possible.

When choosing mixtures for mounting expanded polystyrene, pay attention to the instructions for their use - some are intended only for gluing, others - only to protect against ultraviolet, others are created for wood work, etc. Relieve yourself from the material from which the walls are made.
Important moment: if you worked with foam or seen how professionals are mounted, then they should have remembered that the adhesive solution on the plates are applied with small pellets. In the case of the inner insulation of the walls of the apartment, this option will not pass, because aircases will remain under the insulation - ideal condensate collections. Over time, the mold and mushrooms will be unavoidable there, which is why the wall will suffer, and the interior decoration.

To apply the adhesive composition on polystyrene foam in our case, it is evenly uniform, smearing over the entire area of \u200b\u200bthe sheet. Before applying the mixture, it is necessary to go through the surface with a needle roller, so that it is slightly shifted, thereby enhancing adhesion with glue and the wall. This step in no way is impossible to ignore, especially if you do not work with conventional foam, but with a penplex (solid and dense material with a smooth surface).
Since the plates of polystyrene foam are perfectly smooth, then for durable fixing them, the insulated wall should also be perfectly smooth. This consists of the greatest complexity - if the wall has significant differences and defects, the preliminary alignment of plaster is required. At the same time, it is necessary to use not the usual mineral (cement) mixture, and moisture-resistant compositions that sell to work with the kitchen and bathroom.

Useful advice: Polyfoam can only be glued! Use for fixation metal anchor is inappropriate, because in this way you yourself create the depressurization of the heat insulating layer. If, after insulation, you want to plaster with the wall, then in front of the installation of the reinforcing stack, the strengthen surface "T"-shaped profiles. Get them between polystyrene panels and attach to the floor and ceiling.
Mineral wool for walls
Although we said that the use of mineral wool for insulation of the walls is undesirable, it concerns only the material produced in rolls. Minvata in the stoves are of greater resistance to humidity drops, and it is much easier to work with it. For the manufacture of material, basalt rocks are used, which is often often called stone cotton.

Mineral wool insulation is resistant to high temperature, almost do not react to the impact of household chemicals. The main advantages of the material are excellent heat and sound insulation. However, it is worth a reservation - if the Ministry of Service ignores, it immediately loses its protective properties. There are plates on sale, one side of which is covered with foil material, which not only increases thermal insulation abilities, but also serves as additional protection against wetting. Such plates are most suitable for the internal warming of outer walls and ceilings, because in the literal sense reflects heat, seeking to leave the house, back.
A serious disadvantage of mineral wool is the presence of carcinogenic fractions in it. This non-ecological synthetic material, which is not the best reflected on health. Of course, in the long run, but the fact remains a fact - mineral wool highlights the health of formaldehyde.

Before mounting the mineral wool, you need to wear protective equipment: gloves, clothes with long sleeves, glasses and respirator. Nearby should not be open food, drinking, fire. If the particle of mineral wool falls on the skin, it will cause irritation and itching, so after work should be carefully removed and ventilated.
The second wall for insulation
The construction of the second wall for insulation is a common way for homes, the square of which makes it possible to sacrifice several dozen centimeters of the square without much damage. The most reliable material for the inner insulation of the walls in this case is the "native" material, that is, if the house is built of wood, then the second wall should be wooden, brick - brick, from blocks - block, etc.
For a stone house, a stone laying of the second wall should be made. This technology is pretty simple: you need to put the walls on the inner perimeter of the house by burned brick or a stone with mandatory reinforcement. The second wall should be tied to the old, and the space between them needs to be covered with sand or pour cement-sandy solution. Experts are recommended to fill in a solution, since sand will eventually be seized with time, and it is not possible to plug it.

The advantages of this method:
- You practically do not need to prepare the foundation - just to clean it a little and, if necessary, renovate.
- The problem with the point of dew disappears - no need to worry that the wall will answer.
- The walls become stronger, and the house will shoot several times longer.
Of the disadvantages, in addition to reducing the useful area for several meters, it is possible to allocate the fact that the second wall gives an additional burden on the intergenerational overlap and the foundation. Not any reason can withstand such a mass.

If you want to build a second wall in a litter, it should be wooden. This is an old tested technology, when the walls of the cut from the inside are rich in the boards, bringing them straight to the logs or bars. However, it is better to mount the second wall on the crate, and the space between it and the old wall is filled with sawdust, claying, slag or other eco-friendly insulation.
This design is homogeneous, so the dew points may not occur. The base for it is almost no need to prepare, except to treat all the wooden elements by an antiseptic and flame retardant.
Technology insulation walls
In this chapter, we will talk about the technology of insulation of inland walls with the help of popular materials. We will not consider foamed polyurethane, because it is necessary for it special equipment and the skills of handling it.
Mineral wool insulation
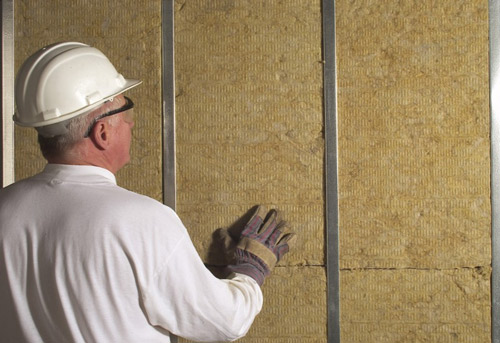
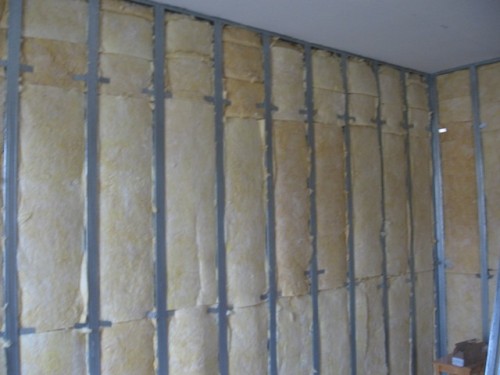
Mineral wool is cheaper than other insulation, and mount it easier. To attach mineral wool slabs, you need to create a framework. To do this, you will need rack metal profiles for drywall and brackets for them.

Installation technology:
- Install the rack profiles in a step of 50-60 cm in a strictly vertical position. Screw them to the wall 4-5 brackets (there is no longer necessary, because the minvat is not so heavy).
- Score clamps give the letter "P" so that there are peculiar horns to which you will wear mineral wool.
- Print packing with mineral wool slabs, measure the wall height and measure the required amount of material. If necessary, cut the plate, but consider that the insulation must be with a reserve so that the plates tightly restrained each other. For example, if the height of the floor to the ceiling is 2.5 m, then minvats should be allocated at least 2.6 m.
- Get mineral wool slabs on the "horns" sticking out of the wall so that it is in a vertical position. Similarly, cover the entire wall, tightly laying the plates. Notice that here you do not need to use any adhesive compositions, and the plates are held at the expense of the profile and the stop in each other.
- After laying heat insulation, install the rack profiles again, but already for mounting drywall. Alternatively, you can make a wooden crate and close the wall with siding, decorative panels, etc. However, in any case, do not remove the protective equipment until you close my mineral wool. Between the thermal insulation layer and the inner trim, do not forget to lay vaporizolation.

Insulation expanded polystyrene
Polystyrene foam, unlike mineral wool, is completely safe and does not require personal protection. The only thing that confuses many household owners is its flammability. Yes, the foam and its derivatives are lit and it is highlighted highly toxic smoke, but the ignition temperature is twice as high as the paper. At the same time, the foam allocates less heat than wood than wood, so if there is a fire in the house, then not due to the fact that the wall is sewn in the wall.
For insulation of the inner wall of the block house, extruded polystyrene foams with a thickness of up to 40 mm are used. Since this is a smooth material, it can only be glued on a flat surface, so the wall should be predetermined. For external insulation, anchor-umbrellas is used as an additional fixation, but inside the house, operational loads are not so serious, therefore only special glue is sufficient.

Useful advice: If the insulation of the walls is carried out only from the inside, leave the ventilation gap between the wall and insulation. So condensate will evaporate and can not harm the wall material.
Wall insulation technology from within polystyoltol:
- Inspect the wall for irregularities and defects. If strong drops are detected in height, align the wall with mineral plaster. Experts recommend adding hydrophobic additives to the plaster to provide additional protection of the insulation from wetting.
- After drying the plaster, cover the surface with a primer composition. It will provide better adhesion of glue, reduce its consumption and prevents the rapid absorption of moisture by the wall. When the first layer of primer dries, apply the second.
- Squeeze the wall glue and press the foam leaf to it with force.
- Do not allow gaps between panels and make sure that the glue does not filter the seams. If the gaps could not be avoided, fill them with trimming of foam, mounting foam or silicone sealant.
- If the wall has external angles, set protective perforated corners from plastic or metal on them.
- After mounting the insulation, cover it with mineral plaster and climb the reinforcing grid in it. It will strengthen the wall and create a smooth durable surface for subsequent cladding. When the first layer of plaster grabbing, and the grid will well stick, apply the second layer on top of it and spend alignment.
- Then you can proceed to decorative finish with textured plaster, wallpaper, paint, etc.

Finally, we suggest watch a learning video about the inner warming of walls with your own hands:


