
Water heating of the floor is an ideal solution that allows you to recreate a cozy, comfortable and warm home atmosphere, especially in winter. Installation of this system becomes especially relevant with the appearance of children in the house, which are constantly crawling along the floor. In addition, the warm water floor in the house will save family members from various diseases that arise due to excessive legacy of the legs. To assemble the design yourself and make the connection of warm water floor, carefully read the information below.
Content
- Pros and cons of the water heating system
- Warm water floors
- Warm floor laying methods
- Calculation of the flooring system of warm water
- Warm floor mounting stages
- Rules for the preparation of the foundation
- Assembly and connecting collector cabinet
- Water floor installation technology on concrete screed
- Polystyrene Method - Mounting Technology
- Wood wood water floors - laying rules
- Water warm floors under the tile
- Rules of operation of warm water floors
- Conclusion
Pros and cons of the water heating system
Many homeowners are trying in any ways to save costs associated with the content of the house. Water heating of the floor is very expensive, but when creating a design personally, you can significantly reduce costs.
Important! The price of water underwear directly depends on the type of base and installation technology.

Advantages
The qualitatively performed installation of warm water floor provides the following advantages:
- the hosted system does not highlight it against the background of the overall interior of the room;
- heating is uniformly throughout the floor;
- the ability to provide a warm part of the house with a minimal amount of costs;
- the temperature in the heat network is not reduced;
- the probability of leakage, and, accordingly, the emergence of an emergency is practically absent.


disadvantages
Laying of warm water floors in different rooms of their own home can also bring some difficulties at the design, formation, documentation of the scheme and operation. Disadvantages of such technology are determined by the following factors:
- the emergence of difficulties in installing the system due to the features of the geometry of the room or complex access to the centralized line of the water supply;
- difficult determination of the course of the flow, if there are malfunctions in the system;
- reducing water pressure throughout the riser when installing in houses from several floors;
- set a certain temperature of the floor surface is quite difficult;
- the need to involve a special water pump for full circulation of the coolant.

Important! Before making a warm water field with your own hands, be sure to think if you can find an alternative, since, for example, in the apartment of a high-altitude home, it will be very difficult to create such a system, and for a private house - it will become a rational solution. Be sure to take into account the fact that it is not recommended to lay a warm floor in the nursery and in the bedroom.


Warm water floors
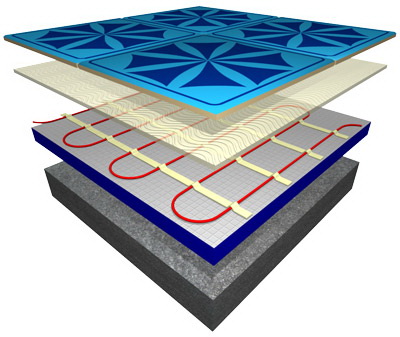
The water heating system is a design consisting of:
- metal-polymer or polymer pipes;
- fasteners;
- layer of thermal insulation;
- collectors and fittings that help connect the system to the pump and central heating network.
Important! In order to more clearly imagine what is a heating system, consider the proposed schemes of warm water floors.


Warm water floor - video
Check out the proposed video in order to more accurately imagine the entire volume of upcoming work and properly organize the process.
Warm floor laying methods
The arrangement of this system certainly requires the knowledge of the subject and possessing the mounting skills. After reading the installation methods below, you will be able to install yourself on the basis of a careful and accurate relationship in the process of performing work.
Important! Each method of laying warm water floors is suitable for specific cases. Therefore, choosing the appropriate option, correctly correlate the installation conditions and the original data of your room.


Laying in the concrete basis
This installation method implies laying the elements of the system under a concrete tie. Work will take a considerable amount of time and will be labor cost. Registration of floor decorative coating from laminate, parquet or tiles is performed solely after complete drying of the solution, which is about 28 days. Given these difficulties, the method of mounting the water system in concrete is used in the case when it is impossible to do without a base screed. 
Nonstil method
This technology involves the installation of finished substrate elements, which significantly reduces labor costs. It is worth noting a significant savings of time by lacking work with a concrete screed. The substrate is used from different materials, which allows you to choose the optimal, both in terms of the load on the surface and the combination with the main building material and the price. When installing warm water floors, this principle is permissible to use such materials:
- wooden rails;
- lumber modules;
- polystyrene.

Important! The cost of full design of the floor heating system along the flooring technology increases due to the need to purchase additional consumables, but the entire process of laying is much easier and does not require professional construction skills, since the principle of layout elements as simple as possible.


Calculation of the flooring system of warm water
Whatever installation methodology you have selected, initially require accurate system calculations for the designated room. To make a scheme and estimate correctly, pay attention to the following factors:
- surface area and type of room;
- the desired floor temperature;
- type of facing material;
- pipe diameter;
- the total number of valves and branching;
- factors affecting the loss of heat.

In order for the system to function without interruptions, you will need to install a powerful pump, when choosing which note on:
- required pressure level;
- the number of heat carrier.
Important! Naturally, the more complex line of the water supply system and the heating pipe wiring, the more powerful equipment will be required to ensure the appropriate coolant feed rate. In addition, the pump in higher productivity is, if the following factors exist:
- the room is located on the base, last or first floor;
- the walls of the room are equipped with weak heat insulation;
- the room mounted a large number of stained glass windows;
- future Flooring will be made of stone.

Warm floor mounting stages
Regardless of which type of system type you have chosen, and which technology has given preference, the whole process of work will consist of the following steps:
- Preparation of the foundation.
- Installation of the pipeline.
- Laying the remaining system elements.
- Installation of decorative flooring.


Rules for the preparation of the foundation
- Remove the old floor covering.
- Clean the surface from all kinds of garbage.
- Fill the floor with a concrete tie.
- Wait for full dry drying.
Important! Execution of the screed only in the case when the basic level of the foundation has a drop in more than 0.5 cm. Ignoring this requirement can provoke pipes and breakage of the entire system.
Assembly and connecting collector cabinet
For any warm floor system, an adjusting system will be required - a collector cabinet. 
Follow this device in the following sequence:
- Run the collector cabinet.
Important! You can buy a wardrobe for collectors in a specialized construction supermarket.
- Get into the collector system feeding pipe and return.
Important! The feed tube comes out of the boiler and carries out hot water. Returnable - Returns water that has lost heat back to the boiler for the next heating. Water circulation occurs due to the pump mounted in the system.

- Install the shutter valve on the pipes.
Important! Installation of pipe fittings in the right places will allow you to turn off the water heating system from heating in the case of repair. In addition, a warm outdoor system can be included as necessary, which will significantly save energy consumption.

- Fittings connect the pipe with the gate valve.
- Connect the collector box to the valve.
Important! On different sides of the system, insert the aircraft valve and set the tap for draining water, which will help to fill the system. It is not recommended to install a conventional plug, as it is not advisable.

- After collecting the collector cabinet system, proceed to the execution of other works, given the selected system type.


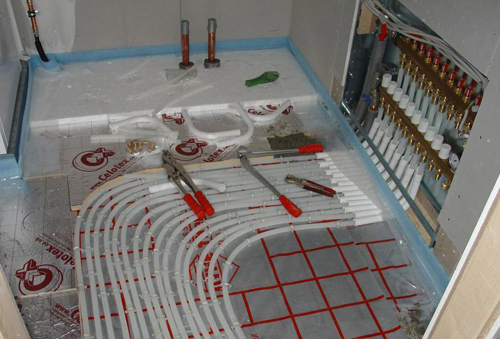
Water floor installation technology on concrete screed
This type of water system installation includes several consecutive steps:
- Installation of thermal insulation.
- Laying compensation tape.
- Installation of the reinforcement grid.
- Select the optimal laying scheme of pipes.
- Laying the pipeline.
- Connecting and testing system.
- Pour a concrete screed.


Progress:
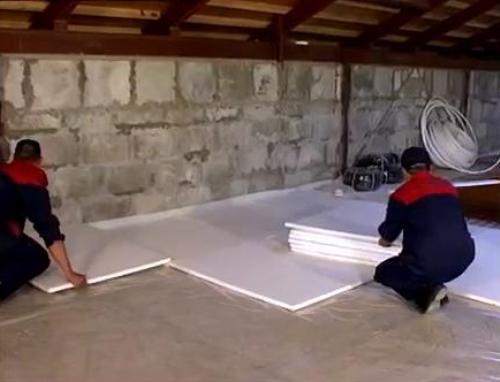
- Spend a stripping ground.
- Put the heat insulation layer.
Important! When choosing a heat-insulating material, we certainly pay attention to the thickness, the indicator of which should not exceed 0.3 cm. Also give preference to the material, the density of which is not less than 35 kg / m3. A polystyrene or penplex can be perfect as the thermal insulator.

- Around the perimeter of the room stick tape.
Important! Ribbon streamers fills the expansion that occurs when exposed to heat.
- Atop layer insulation lay thick polyethylene film.
- Lay the reinforcement on the entire floor area of \u200b\u200bthe room.
- Clamps to fix the corrugated tube grid.
Important! This action makes the design robust and protects the corrugated tube expansion joints.
- Select a scheme by which you will carry styling - a snake or a spiral.

- Please note that per 1 m2 require about 5 m pipe, wherein the stacking step is equal to 0.2 m.
Important! In areas with a large area it is advisable to lay the pipe with hospitality separate windings. spiral laying method allows to compensate and distribute the heat evenly in places where the cold tubes are combined with the hot, thereby allowing to warm up the entire floor area completely. Normal flow: 1 m2 about 5 m pipe, wherein the stacking step is equal to 0.2 m.

- Fill the water system to test the strength and integrity.
- Turn on the system.
- Eliminate defects and leakage.
Important! Ignore this process is contraindicated. Checks are carried out throughout the day, keeping the system pressure at least 4 bar. Once convinced of the stable operation of the underfloor heating, proceed to the next step.
- Pour the concrete floor solution.
Important! expose the fill level of at least 5 cm above the heating system.

- With the level set beacons on which rule correct evenness ties.
- Wait at least 28 days until the screed is dry.
Important! It is not recommended to include the water system if the screed is not dry fully.
- Start the system by gradually increasing the temperature for 3-4 days.


Polystyrene method - mounting technology
This method is ideal for the decoration of intermediate floors and rooms with ceilings with a height of less than 2m, minimizing the load on the surface.
Important! When installing the system by polystyrene ceiling height remains virtually unchanged.

Progress:
- Sand the surface of debris.
- Check the evenness of the floor on the lines with the help of a spirit level.
- Perform the laying of polystyrene plates to the base.
- Install pipes and plates from aluminum.
Important! For laying, such a number of plates is needed so that they cover at least 80% of the floor area. Under this approach, it will be possible to uniformly distribute heat during operation.

- Place the sheets of GVL.
Important! When placing the floor with a parquet board, the GWL is placed in one layer, and when finishing with other materials - in 2 layers.
- Perform the finish coating.
Important! The polystyrene method is permissible to use for the design of any type of room. But for buildings where there is no concrete coating, it is recommended to use the modular or whether the installation principle of laying.


Wood wood water floors - laying rules
For the decoration of the wooden floor, the modular design principle or wheels will be an excellent solution. 
To perform a warm water floor on the first technology, do the following:
- Place the heat insulating layer.
- In chipboard plates, make long narrow slots for pipes and plates.
- Mount the surface from the chipboard.
- Install the plates and pipes.
- Place the required amount of GVL layers.
- Place the floor with decorative finish.


If the preferences of the rush system preferred, follow the following recommendations:
- Between wooden beams to put thermal insulation of polystyrene or minvati.
- Place the boards whose thickness is not less than 28 mm.
- Leave the groove 20 mm width.
- In the grooves insert the plates of aluminum.
- In aluminum plates, fasten the pipes.
- Place 2 or 1 layer of GVL.
- Perform the finish coating.

Important! The rack method is considered an ideal solution for installing water floors on the floor above the 2nd. This is justified by the use of thin heat-insulating layers and fewer additional elements of the system, which in turn contributes to a smaller load on the overlap.


Water warm floors under the tile
Quite often, water laying is performed under the tile. As you know, the ceramic tile is an excellent thermal conductory. Therefore, preferring a tile when choosing a facing, you take a right solution. 
As with the finish of any other decorative material, the arrangement of a warm floor under the tile has its own distinctive features that are as follows:
- To get the most efficient heating system, competently select and dispense the tile on the surface.
Important! The smooth tile has a thermal conductivity of 1.5 times more than the embossed.
- When performing a screed, avoid the formation of bubbles and emptiness.
Important! Failure to comply with this rule will entail the delay and cracking of the tile.

Rules of operation of warm water floors
For the reliable and long-term health of the warm floor system, adhere to the following recommendations in the process of its operation:
- disconnect the heating system for long trips;
- periodically monitor the working pressure;
- eliminate malfunctions in a timely manner in the work of the valves and the circulation pump.


Conclusion
Despite the fact that when placing a water floor, you will need to spend a lot of time and make a lot of effort, the level of heat in the rooms and the durability of such a system will certainly be delighted. Therefore, do not rush, do all work carefully and consistently and you will not have to allocate additional financing for repairs or the reconstruction of a warm floor system, but only to enjoy comfort and comfort in your own reliable and durable house.


