The door is simple, but at the same time and not the most simple design. It is very important that she can easily open and close. At the same time, there should be no spontaneous discovery, which indicates an incorrect installation of the box. Also, the door must withstand various household loads (sharp slam, opening manifest and others). On the intricacies of installation work when installing door designs, we will describe further.
Content
Basic moments
In order to independently install the door, you should do a certain work consisting of several stages:
- To begin with, you will need to assemble a box that is the supporting of the entire design.
- After that, they are usually engaged in equipping the canvas and accessories.
- Then you need to insert as much as possible and secure the box in the doorway.
- After that, if necessary, by means of adjustment, it is neatly hung in place.
- Next, it will only be separated by the door with platbands.
Preparatory stages can be performed in any time. But the sequence of other installation work cannot be changed. At the same time, you need to know in advance how to put the door interroom in accordance with the existing construction standards.
Next, we will analyze more installation process. Some plastic and metal door blocks are already assigned, i.e. They are ready for fastening in the opening. There should be no problems with these options. As for the insufficient doors, they should be stopped on their installation. The insufficient doors look like a set of wooden bars for the box, a canvas, as well as a plank for platbands that are not yet cropped.
Preparatory work
The most painstaking and responsible process, no doubt, is the build of the box. To allow even small deviations in this matter, it can not only complicate the use of plastic interroom doors in the future, but also, perhaps, will make it necessary to purchase new ones. At this stage, maximum attention will be required. All measurements should be carried out very carefully and better check the calculations received several times.
There are several options for installing interior door with their own hands:
- Design without a threshold. This option will require the presence of such parts as a pretended and looping bar, as well as a pouring plan.
- If desired, make the door with the threshold, besides the above, you will need a bar-plank, which should be equal to the thickness of the doorway. In this case, the box will be on the form to resemble a rectangle.
To properly perform work, you need to very accurately remove the dimensions for the opening and the canvas. It will also be necessary to calculate the dimensions of the racks and perts, taking into account the necessary technical clearances. In addition, you need to cut off exactly as soon as possible and connect individual bars into a single whole. In this case, everything should be strong enough.
All measurements are desirable to perform the same tape measure. The fact is that different roulettes have a different error. Cloth and the opening should be measured along the length of the right and left side separately. One can not hope that their side mirror are equal. All deviations to be identified, it should be taken into consideration in their work.
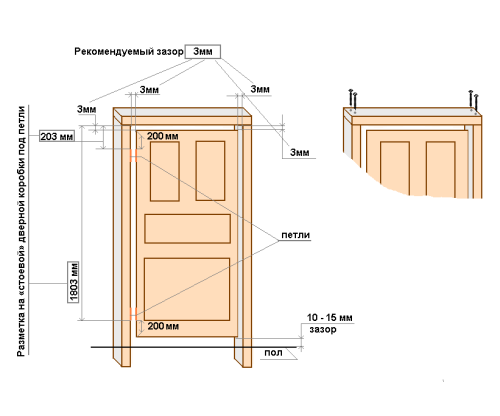
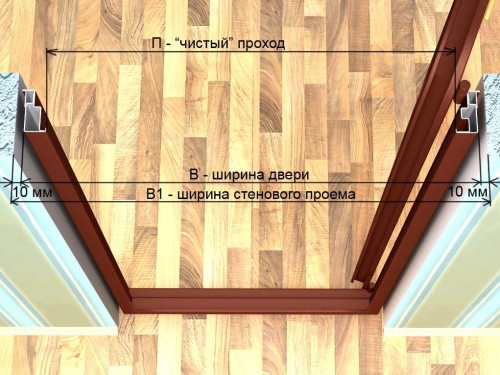
During the measurements, it is important to take into account the fact that from the outer sides of the spill vehicle, it is necessary to leave a gap of 9-11 mm, which will be filled in the future by mounting foam. The inner sides of these bars should similarly should have a gap in about 2-4 mm. If a threshold is provided in the design of interior doors, then the specified clearance must be kept throughout the perimeter. Between the floor and the bottom plane of the door without a threshold should remain a slit of a certain size. This size depends on the future flooring. So, for linoleum should be left 9 mm, for a dilated carpet 16 mm, i.e. On average, it turns out the gap should be about 11 mm. If the dimensions are lacking, it should be increased. If the opening is too big, then it is reduced. For this purpose, pieces of drywall are stuffed along the box.
How to insert interroom door
First of all, it is necessary to neatly unpack the purchased kit. The first is recommended to open only the door frame. As for the door itself, it is desirable to unpack only before use, so that it is accidentally in the process of work not to damage its appearance.
Order order:
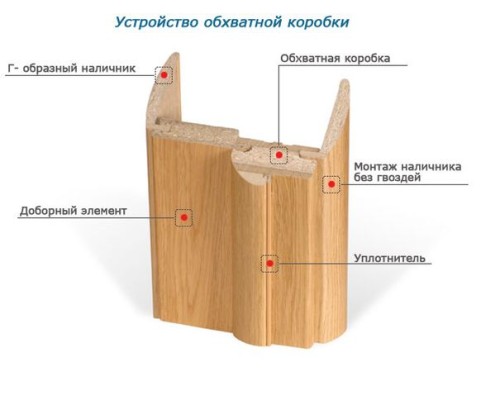
- When the door frame is unpacked, it should be collected. The door is usually completed with three basic and one additional part. The latter is the usual connecting bar from the tree, which is needed for fixing the design for a short period of time. In the ends of the box panels, namely, in special grooves there are fixed plastic inserts.
- When the above described above, parts of the box with the proper geometry are collected in the design in the form of the letter P. For fastening the connecting elements, already drove inserts are used. With the help of an ordinary hammer are clogged into the resulting holes. Align the bar is best with the ass.
- Next, we will need such tools like a drill, a short power screw and a milling head. When the box is connected, you can start working on the bottom. It uses a fixing wooden plank (it was mentioned above).
- After the width at the bottom of the box is measured, it should be fixed with a wooden plank. It is screwed into place with screws. Moreover, they should not screw them out from the edge of the plank, otherwise it is most likely just split. Then the screws will be hidden using a solution.
- Next, when installing interior doors, you need to remove all sizes, namely, the height and width of the doorway. At the same time, consider the dimensions of the threshold (if available). Its absence should be considered similarly, because in this case, the gap should be left below.
- When you determined with the desired parameters, the bottom of the door frame is cut. It is best to do with the help of end saw.
- When the door frame is ready, you can insert the door, but so far only for fitting. At the same time, it is not necessary to unpack it. We still need only handles and lock. Therefore, it is worth free from packaging.
- After the successful fitting of the interior door, you can go to the next step, namely, to the installation of the door frame. In the process of installation, the construction level is very useful. Without it, it will be problematic to put a box in place exactly.
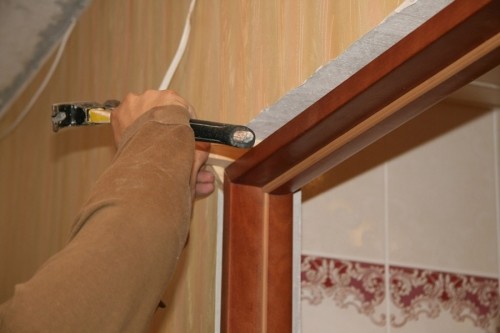
- When the box is aligned in terms of level, it can already be attached to the doorway. Since there are wooden wedges in gaps, it is allowed to use conventional screws. In other situations, a dowel will be better fit.
- In zones that will be processed with finishing material and foam, fastened under some angle. Avoid fastening the frame through the front side. Otherwise, the door will not only look bad, but also work with failures. Moreover, if the appearance somehow can be corrected, then using the design of the problem will remain.
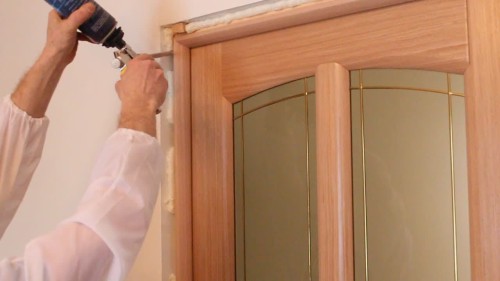
- Now the mounting foam fill the gap between the opening and the door frame. Then, with dry mixtures, there is a slope here.
- While the mounting mixture is frozen, you can begin the preparation of the door itself. In particular, you can already cut the lock, put the handle in your place and hang the door loops. Especially neat need to be with a lock. To do this, first in the desired end marks the place where it will be inserted. Then the layer of wood is neatly removed using a milling saw with a milling saw. If everything is done correctly, the surface of the front side of the lock will be on the same level with the door itself.
- To mount the working part of the castle, it will take much more wood. Therefore, in this case, you will need a drill with a suitable drill.
- Next you need to make holes for the lock. The main thing is that the drill diameter is suitable. After the lock is installed in place and fixed. Included with the door there must be all the necessary fasteners, which is suitable for the castle both in color and style. You must also sell the necessary components with the door - handles, plugs and loops.
- Then you need to install door handles. Their core is laid in a pre-made hole in the canvas. Further, the handles are fixed, and then all the necessary clamps and fasteners are clamped.
- After that, you can install on the location of the loop. Work on the side of the end here is something similar to those that we did for the castle. The contour is also planned and the material layer is removed using a mill. This is done so that the surface of the loop when attaching was on the same level with the available door canvase.
- When the door preparation is completed, you can return to the box. Here work for loops is similar to those that were performed earlier. That is, by the same scheme from the surface with a milling saw, a layer of wood is removed. The same should be done for the place where the castle includes. The hole here can be done with the help of the chisel. When the hole is ready, it should be closed with a plug, which should go bundled.
- It remains to hang the cloth on the loop and check the result of the work performed. In particular, this can be attributed to the sliding interior door.
It should be said, no matter how qualitatively the door design is performed, if its installation technology is not met, the result will be deplorable. The creative approach in this matter is quite inappropriate. If the installation of interroom doors will be complied with all the above rules, then in this case the door canvas will hang exactly, without creating problems during its operation. In addition, there will be no unpleasant creak and rustling.


