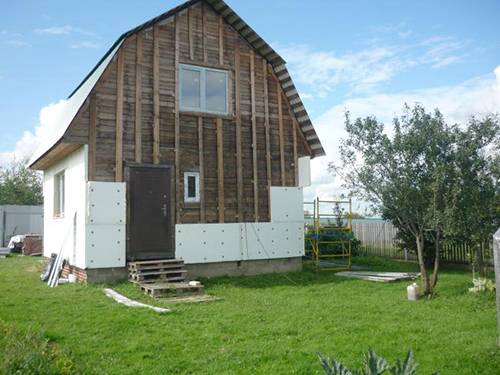
The disgraced facade of a residential building automatically becomes the cause of huge heating bills, and this difference becomes apparent immediately after insulating work. Such services are very common in all cities, but you can warm the facade of a private house and with your own hands. The most important thing is to choose the right insulation and know how to contact him.
Content
The need for insulation
Heat leaves home for two reasons: due to drafts or due to increased heat exchange walls, foundations or roofs with an external environment. And if the first problem can be eliminated by restoring the tightness of the door structures, overlap and just shutting up the slots, then to reduce the thermal conductivity of the walls will have to work hard.
The outer walls are the largest area through which heat can leave, so the construction of the house should pay special attention to their thermal insulation. If the insulation laid in the wall turned out to be not enough, then lower thermal conductivity will allow the additional insulation of the facade. Insulated outside the wall, as practice shows, cools 5 times more slowly than a laptile design. Therefore, the use of even light heating materials will save money for heating.

Choose a heater and the way for its wall mounting should depend on its design features, as well as the conditions of the external environment.
Selection of insulation
The better the facade will be insulated, the less money will have to spend on heating at home. So what material can I use for this?
First of all, it is necessary to deal with what operational characteristics should be the facade insulation:
- strength and resistance to mechanical effects;
- vapor permeability (minimum 5 times more than the wall);
- fire safety;
- environmental purity;
- minimum water absorption;
- neutral reaction to metallic fasteners;
- durability.
Despite the full validity of the above requirements, they are not met by all the materials used today for the insulation of the facades of private and apartment buildings.

The most popular insulation for facades:
- Polystyrene foam is the most popular thermal insulating material for outdoor and internal work. The reason for this was rather cheapness, rather than excellent quality. Yes, the polystyrene foam is quite durable, practically does not miss moisture and universal in use, but he has serious shortcomings. First of all, it is a fire hazard of the material. By itself, it does not burn, but quickly begins to melt and at the same time it highlights the caustic toxic smoke. From here it follows another disadvantage - non-evaluation. Despite the lowest possible polystyrene itself, insulation of them facade costs quite expensive due to the need to use additional protective layers. So as to protect the material from the fire, it should be covered with a non-combustible material, and so that random strikes do not disturb the integrity of the wall, the foam is closed with a special grid and apply a layer of facade plaster. The durability of polystyrene foam finish depends on the quality of the source material and can vary from 10 to 40 years. European scientists conducted experiments that revealed that expanded polystyrene loses its heat engineering after 10 years. By the way, the ability of foam to keep warm. This indicator also depends on the quality of raw materials, and bought cheap sheets, you should not hope that they will be well protected from the cold. Another "underwater stone" is hidden in the method of mounting polystyrene foam, when connective seams are formed between sheets - potential cold bridges. So, if you have conceived to warm the facade of the house with a foam, you should not be seduced only by its low cost - consider the costs of additional materials (fastening, mounting network, plaster, etc.).
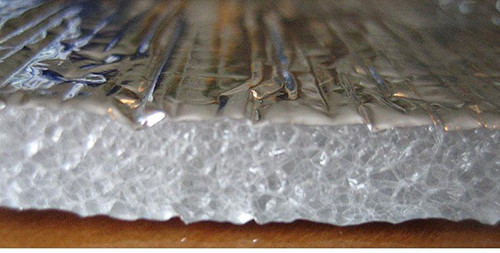
- Polyethylene foamed - this material appeared on the homework relatively recently, but immediately gained popularity. Imagine a plastic bag, only ten times the thicker than usual and in its cut are visible tiny air bubbles - this is the foamed polyethylene. It has not too good heat-stash due to low thickness (only up to 10 mm), so it is used to enhance it together with a foil foam or simply durable foil so that it reflects the heat inside the house. It has almost the same disadvantages as the polystyrene foam, but in contrast it is convenient in terms of transportation (a large volume can be twisted into a roll).
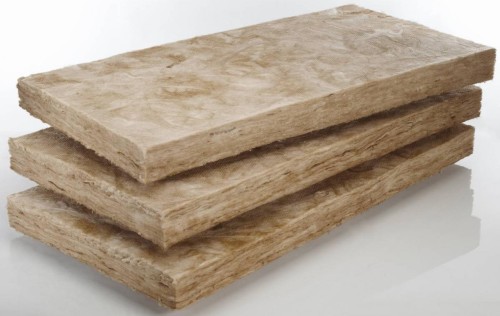
- Mineral wool is a group of insulation on a mineralized basis, which have a significant advantage over foam - non-combustibility. The most common materials are glass gamble and stone wool. The insulation of the facade of the cotton house requires careful installation and attentiveness. Over time, due to the displacement of the fibers relative to each other, the sectors are free from thermal insulation, through which heat leaves. Mineral wool has lesser thermal conductivity than polystyrene foam or foamed polyethylene, but it is afraid of moisture. If you want such a heater, it will not be protected from the cold, so when installing it is necessary to take care of the waterproofing of the wall outside and vaporizolation from the inside. Also, the material is distinguished by low mechanical strength and needs protective coating and enhancing the mounting grid. Even mineral wool basalt panels for the insulation of the facade of the house, which seem solid and durable, require a protective layer of plaster. Over time, insulation of this type is settled, forming voids. They can get rodents.
- Foam concrete and aerated concrete for insulation of the facade of the house are extremely rare, because they do not comply with the requirements for thermal insulation materials. If the wall of the house is built of these materials, it needs additional insulation, and even more - in waterproofing, since the porous structure is capable of keeping inside moisture.


If you summarize all the above information, it will be clear that none of the insulation offered by the modern market fully does not fully comply with the requirements, and therefore it has to choose the best of the available. Most prefers polystyrene foam or insulation of the facade of the house with plaster, which we will tell about in the next chapter.
Ways of insulation
There are two ways of insulation of walls: inside and outside. Internal insulation can also be different, but none of the ways will give the effect that can be achieved by the outer insulation of the facade. If the wall is insulated only from the inside, then the following happens: the cold affects an unprotected wall, it freezes everything deeper and deeper, frost comes to the insulation on the inside of the wall. As is known from the school course of physics, if the cold is sharply faced with warmth, it turns out condensate. This process is happening inside the wall and in the construction lexicon is called the "dew point". When the dew point shifts inside the wall, she begins to rapidly collapse from the inside.

To avoid such troubles, the walls are better to insulate outside. This is safer, and more efficient, and you will be sure that the plantation of mushrooms has not grown behind the insulation.
Technologies of insulation of facades of houses:
- "Wet Method" - light or heavy system;
- ventilated facades;
- well laying.
The "wet facade" is the most common method at which polystyrene foam or mineral wool plates are used. Depending on the amount of insulating layers and materials used, heavy and light facades are distinguished. Light facades are cheaper, since only insulation is insulated with a protective finishing coating. The heavy facade consists of more layers and is distinguished by a thicker outer layer of plaster. Due to this, the stability of the wall to mechanical damage increases, and the service life increases to 50 years.
There is also insulation of facades of the house with modern materials combined into a multi-layer system. Thus, with a well-masonry, the insulation layer is placed between the bearing fence and protective face trim from silicate, ceramic or clinker bricks. This allows you to reduce the burden on the foundation and provide an attractive appearance of the building. However, condensate is inevitably accumulated between the layers, if not to install the ventilation system, and these are additional spending.

Ventilated designs are deprived of such a shortage and in them for the finish finish use special protective screens from sheets or slab materials. Venting is carried out using special equipment and the presence of an air gap between the finishing finish and insulation.
How to make a "wet facade"
Since this method of insulation of the facade of the house is the most popular, consider the technology of work execution in more detail. First of all, it is necessary to carefully prepare the foundation - the surface of the wall. Check in what condition the walls are, especially if they are covered with plaster (it should be durable). If in some places the plaster has already begun to crack and fall off, then it must be knocked down.

Stages of creating a "wet facade":
- Rinse the surface with water from the hose. It is best to use high-pressure technique to knock out dirt from all the cracks. Only a carefully disturbed and skimmed surface can have good adhesion with a solution to which the insulation slabs glue. If over time the plates fall off, then either the glue fell bad, or the wall was not careful enough.
- Check that there is no irregularities on the wall. If such are discovered, it will have to align the plaster or by the adhesive solution (consumption will significantly increase). If the wall came out at a very curve and to align her plaster will be very expensive, that is, it makes sense to mount the insulation on the steel frame.
- Check in what condition the windows are located and replace them if necessary. If the window frames are not hermetic, then through the cracks in them, the water will be seated inside and damage the thermal insulation layer. If you miss any slot, then with the time of the plaster under such a "holey", the window will get a darker shade.
- If the walls are present on the wall, capable of complicating work, for example, windows plums, bugging of the roofing sweep or drainage pipes, dismantle them for a while. At the same time, the drainage gutter should be left in its place until the latter. Attach the segments of the grooves to the ends and sections of the drainboxes of the drain. In the process of work, they will divert the rainflows outside the house and will not allow the Fresh-received facade to wet.
- The method of fastening the insulation depends on the physical condition of the wall and the materials used. Thus, with the insulation of the facade of the house, the penoplex uses special glue from dry polymer mixtures, and for mineral wool materials - glue on mineral base. If you are creating the plates to a flat wall, then use the dowels optionally - you can do only with glue. However, at the corners of the house, around the perimeter of the door and window openings, it is still necessary to establish a plate dowel, since during the gusts of the wind, areas of sparse air occur in these places, and thermal insulation can simply break away from the base.
- If you attach the insulation on top of the old plaster or artistic coating, be sure to use the dowels. 1 m² should be set at least 4-5 pieces. Choose the length of fasteners in accordance with the total thickness of the insulation, plaster and other layers, plus the required level of dowel to the wall. The last factor depends on the base material. For cellular concrete, it is equal to a minimum of 5 cm, for the hollow brick - 9 cm.
- When you attached the insulation, it must be closed by a protective layer. To do this, the entire surface is deceived by glue solution and the special reinforcing fiberglass mesh is bleated in it. When buying a grid, be careful - it must be designed for outdoor work (has an increased weather resistance). The task of the grid is to protect the insulation from mechanical damage, preventing the formation of cracks and enhancing the rigidity of the base for applying the finishing plaster. Over the edges of the mesh cuts with an overlap at 10-15 cm.
- Special attention is paid to the corners of the house - use there special angular profiles in the form of fiberglass strips with plastic lining. It is also permissible to use aluminum corners, then the reinforcing grid will have to be laid on top of them.
- When laying the grid, you will definitely encounter problem places - transitions between horizontal and vertical planes, window frames, etc. To eliminate the formation of cracks in these places, put the grid by making it slots or cuts and filling the formed by the grooves by mounting foam or self-disruptive sealing tape.
- After laying the reinforcing mesh on the glue, it is necessary to leave the walls alone for 2-3 days, so that the layer as it should be grabbed. Drying time depends on weather and air humidity level. Of course, it is better to choose dry and hot day to work. After drying the reinforcing layer, you can proceed to applying the finish plaster. It is usually sold in the form of a dry mix that should be breeded with water. Do not prepare a large amount of solution at once, otherwise you risk do not have time to spend it, especially with unaccustomed. Depending on the weather and the composition of the mixture, the term of the suitability of diluted plaster is 1.5-3 hours.
- Apply the composition evenly with a wide spatula or trowel, pushing it on the entire wall plane per session. Such work requires certain skills and skills, so if it is possible, practice at invisible areas. To facilitate the work, conventionally divide the facade into several horizontal sectors, for example, for three. Then three people will simultaneously be laid down the wall, and there will be no differences between the sectors due to different drying time. If between the sites made at different times, the boundaries are traced, then to disguise, use the unplanned plaster composition, and then cover the wall of the facade paint.
Heat the walls of the house outside is not so difficult. Difficulties lie in the choice of suitable materials and method of laying. Whatever technology you take advantage of, remember the safety technique at the height and purchase the necessary protective kit.
Facades of houses: photo


