When building your own home, an important roof processing process is the creation of a crate. The level of protective properties of the future roof and the external attraction of the entire design as a whole depends on the quality of the work performed.
Content
Why do you need a doom?
To create a reliable roof yourself, familiarize yourself with the important concepts and its schematic device.
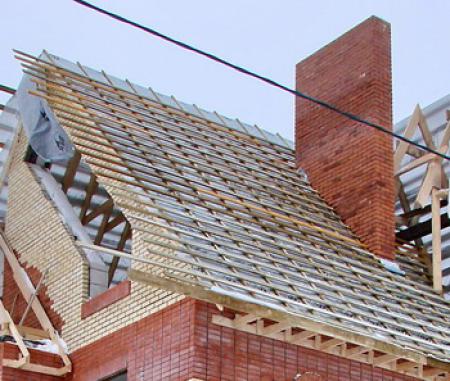
Roofing frame - rafters that perform a carrier function.
Roof inches of the house - the design of the bars and boards of various sections, which is mounted on the rafted. It contributes to the rational distribution of the load from the nondes, roofing material, snow masses. Another important value is the creation of ventilation due to the gap between the insulating material and the decorative flooring. 
Types of crates
When solving the question "How to make a roof shabby" you need to clearly imagine what it can be. Such an approach will help make the right solution and create the most appropriate design type. The main criteria of differences are the number of layers and the frequency of the installation of rails.
Types of design
- solid (gap between bars not more than 1 cm)
- weak-rareered (the size of the gaps from 3-4 cm)
- rolled, it is usual (intervals from 30 to 75 cm and above)
- two-layer
- one-layer

How to choose the desired type of crate?
Make a choice of technology, considering the type of roof and flooring. Also these criteria will affect the choice of material for the construction of the crate.
Important! Flat roof crate technology does not differ from the scope. It is much easier to perform it, especially if the angle of inclination is less than 2.5 degrees. Its cost will be cheaper at times.

How much does a doom?
In order to make the calculation of the roof shabks, use a specially created computer program for calculating the amount of necessary material. Enter the roof parameters and the consumables that you know, after which the calculation will be automatically executed.
Important! Roof Parameters Take not only those displayed in the diagram. Measure the real indicators, - often they do not coincide. Also note the placement and width of the drain - its parameters affect the roof length, that is, respectively, and on the total area.

Instruments
Prepare the following tools for performing the work:
- screwdriver
- circular Saw
- roulette
- pencil
- hammer
- level.


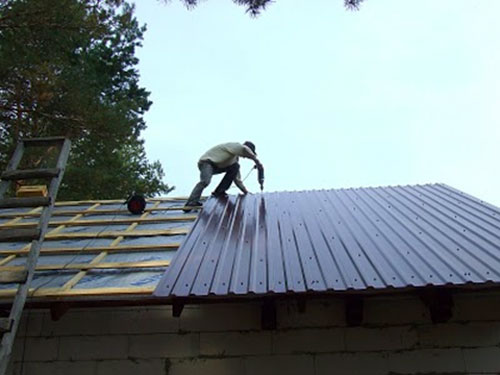
Installation of roof crates under metal tile
If you preferred metal tile as roofing material, pay attention to the following nuances during the creation of the crate:
- Wood varieties take no lower second, without bitch and other defects.
- All boards check for calibration care, the accuracy of length parameters. Otherwise, it will not be possible to make a dense fit of the main material of roofing flooring.
- Apply a continuous installation technology of the roof of a metal tile.
- Frame gasket Perform a single-layer or two-layer, depending on the personal requirements for the strength of the roof.
- The installation step is set by the wave step. Standard dimensions (30, 35, 40 cm) may vary when the roof is designing more complex designs.


Consumables
- bars with a cross section of 30-40 mm
- boards with a cross section of 20-25 mm more (to install the bottom beam)
- brucks section 20-30 mm
- anti-condensate film
- galvanized hardware (screws, nails)
- antiseptic for wood.
Important! Regardless of the design type, use only the wood of the proper degree of drying.


Montaja technology
- Treat in advance all the bars with an antiseptic, it will help to avoid further destruction due to rotting or damage from insect attacks.
- Local horizontal overgrowths in the rafters anti-condensate film.

- Observe the interval of the admission of 15 cm.
- Start from the bottom edge of the roof.

Important! Do not pull the film.
- Secure it along the rafted bar with a cross section of 2-3 cm.
- Install the bottom planks of the larger bars.
- Install the remaining beams, observing the accuracy of the step.

- The last 2-3 boards are located on the back to create a skate of the desired form.
- Fastening Perform nails and screws on both sides.

Important! The length of hardware is determined by the timing of timber. To reliably fasten the length of nails and screws, must exceed it 3 times.

Video
The video will help to clearly understand the process of creating a crate under metal tile.
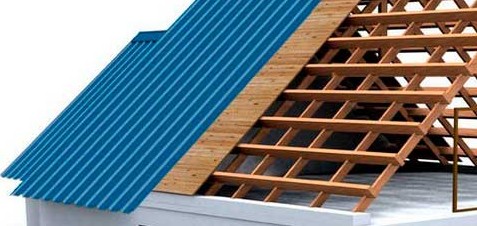
Roof dryer
Among the distinguishing features of the professional flooring as roofing material, we highlight the possibility of its installation even on the roofs with a slight bias. At the same time, performing the roof shawloves with their own hands, followed by the installation of sheet material, clearly follow the conditions of technology. This will ensure the duration and reliability of operation. 
Select technology based on the roof slope angle:
- up to 15 degrees, with the subsequent use of the brand C20's professional sheet, it is recommended to create a solid
- over 15 degrees, with the use of sheets of type C35, C44 or above, install a rarefied crate in increments of 30-35 and 65 cm, respectively.


Important! It is advisable to use a two-layer design to create a reliable and durable support for a profile sheet.
Expendable materials
- bars cross section 50x50 mm
- bars cross section 30x100 mm
- several boards with a section of 15-20 mm
- antiseptic for wood
- nails and self-tapping screws selected with the thickness of the beams
- waterproofing and thermal insulation material.


Sequence of work
- Treat all boards with an antiseptic solution.
- Wait until dry.
- Route the waterproof film in the direction from the edge of the roof to the ridge stripes overlap.
- Secure with staples staple gun to the rafters.
- Install kontrobreshetku rafters using beams 50x50 mm.
- Fasten with nails and screws.
- Set the bar with a large cross section horizontally along the eaves.

- Check the evenness of the line.
- Secure.

Important! Between the first two beams make the gap a little bit more, given the degree of stress.
- Assemble all subsequent boards section 30h100, maintaining gaps of 40-50 cm.

Important! Around chimneys, pipes, ventilation and fire holes make continuous roof batten to give the necessary rigidity.
- Near the ridge 2-3 last board set up against a double layer of boards.

Lathing a soft roof
The main requirement to the sheathing under the soft tile - smoothness and density, to preserve the integrity of future coverage during installation.
Material needed for
- edged calibrated planed board width of 14 cm
- plywood sheets
- roofing films
- bars for fastening the film
- hardware roofing purpose.
Sequencing
- Nail the lower horizontal batten board.
- Lay the film in a direction from the eaves to the ridge overlapping.
- Fasten it with nails and small bars.
- Assemble all the other bracket with an interval of 30 cm.
- At each end of the board set with rounded ends.
- Check the evenness of the surface level.
- Secure the top batten boards, plywood sheets.

- Check the surface smoothness.

Crate under the slate roof
If the roofing material you choose a slate, the basic rules of creation of crates will be similar to the above technologies. But, there are some distinctive nuances. 
The material used
- Bars: 75x75 mm - for a normal profile 68h120 mm - for corrugated
- nails for roofing
- waterproofing film
- solution for additional protection of wood.
Technology
Apply slightly sparse installation method for a flat slate and dilute with large spacing between bars for corrugated.
- Install the insulation film in accordance with the rules described above.
- Install the bars starting from the lower edge of the roof.
- Align the first beam along the cornice line, clearly observing the horizontal.
- Subsequent boards set 50 cm increments for the usual slate profile and 80 cm - for the wavy.
Important! Even bars should be thicker or arranged 3 cm above odd. Such a principle will help to prevent the curvature of slate sheets.
-
Secure all the bars with roofing nails.
Important! The support of each slate sheet should have to the edges and the middle, that is, the load is distributed in three places.

How to make a roof crate under rolled material?
In this case, use exceptionally solid installation technology or, if you need to install a double layer, only the bottom will be rejected. 
Consumables
- screwplates: Thickness - from 200-250 mm, width 100-150 mm
- bounded boards with rounded edges
- antiseptic for material processing
- nails
- anti-condensate film
- the roof strip is 30 cm wide.
Mounting sequence
The preparatory process is no different from creating a crate for other types of roofs - make waterproofing and process wood.
- Secure the steel strip intended for the design of the roof, along the entire length of the skate.
- Mount a solid crate, ranging from the eaves, placing the joints of the boards in a checker order.
Important! Be sure to check the lifting densities of the boards to each other.
- At the end of the roof, mount the boards with rounded edges to prevent the damage of soft flooring and create the ability to conveniently convert the soft material.
- Secure the nails, hacking the hat into the thickness of the wood.
- Check out the absence of bugs and protruding nails at the end of the installation, if any - correct.
- Check the strength of the design created, the indicator will be the lack of deflection under a person.
When laying a double layer of crates for an outer layer, use the racks with a thickness of 5-7 cm. Installation in this case, follow 45 degrees.
Video
Below the applied video process creation process will help better assimilate the technology.
Conclusion
Of the above-described installation process for different types of roof, we can conclude that the basic principles of technology are similar, the difference is the nuances that are particularly important. Therefore, it is not surprising that the price of the roof shave price will vary in accordance with the complex of selected materials.
Despite the seeming simplicity of the construction process when creating a crate, pay special attention to the accuracy of the parameters of the materials used and the observance of the stages of technology. Only when these conditions are met, the lamp will become a reliable solid foundation for roofing and provide long-term operation.


