The fallen snow always gives pleasure both adults and children. However, often at the most inopportune moment it can cause many problems. Especially if the snow dropped at night fell asleep or pass to the garage. In such a situation, without snow removal shovel, it's just not to do. Well, if she was at hand. But if the snowfall found surprise, the problem becomes serious. It can be solved in two ways: buy a shovel in the store or make it yourself.
Content
The first way seems easier, but at the most inactive moment on sale they may not be, because those who want to remove the snow on their plot today can be a lot. Then one outlet remains - make it yourself. How to make a shovel to clean the snow with your own hands - further in the article.
Types of snow removal shovel

You can call the shovel with a high-tech tool with a large stretch, because it consists of only two parts: a scoop and a stalk. Several types of snow removal shovers are allocated mainly by material from which they are made.
- Shovels made of steel. The most familiar and conservative type of products. To the positive parties, such a shovel can be safely attributed its price. It costs it much lower than aluminum and plastic, which makes it more accessible to the consumer. It is also worth noting its reliability. In comparison with plastic models, which often break on the surface of asphalt or due to stones, steel shovels serve quite a long time. In addition, they can be removed and wet snow, under the weight of which plastic snow removal shovels often break. From the disadvantages it should be noted the high weight of the product, which requires effort when working with it, as well as a tendency to corrosion in case of damage to the paintwork.
- Aluminum shovels. More technological type of product. They are distinguished by ease, strength and lack of inclination to corrosion. However, the price of such snow removal shovels is too high in comparison with steel and plastic.
- Plastic shovels for snow. Appeared on the market relatively recently. Inexpensive, light tool that, however, cannot boast of its strength. It is often broken under the weight of wet snow.
- Plywood shovels. The cheapest and short-lived tool. Usually such products are made personally.
For the manufacture of the cutter use steel, wood or aluminum. The most popular are the last two.
Also, snow removal shovels are distinguished by the width of the scoop: from small models of a width of only 300 mm to the shovel-engine, the width of which reaches 1 m. With this tool, large areas from snow can be easily removed. To facilitate the task, the shovel engine has a double handle. Some models are installed wheels. This allows it to use it in the summer as a wheelbarrow.
Making a wooden shovel for snow with their own hands

Consider in more detail how to make a shovel for snow from the tree with your own hands. Alone to make a snow removal shovel is completely simple. In the presence of the necessary materials and tools, it may take no more than an hour. For such work, special materials are not needed. It is suitable for all that is at the moment there is at hand. The easiest version of the snow removal shovel is plywood. A piece of plywood 700x500 mm is guaranteed to eat in each farm. Even if, no, this material is cheap, and it will not buy much difficulty.
So, for the manufacture of snow removal shovels for snow, you will need it:
- A piece of plywood with a thickness of at least 6 mm and the size of 700x500 mm. Phaneur does not use thinner, as it may not withstand the load and break. Thirdly, on the contrary, will increase the weight of the product, making it not entirely convenient to use.
- Cut the board with a thickness of 25-30 mm at least 650 mm long. It is necessary to form the rear wall of the shovel. The width of the board must be 80 mm.
- Cutlets from shovel or other agricultural tools. If it is not, it can be made independently from a bar with a cross section of 25x25 mm. The length of the timber must be at least 2 m.
- Nails, wood screws.
- Electrolovik, electric bellating, chisel, hammer, file.

Procedure for work:
- The first thing is made a stalk shovel for snow. To do this, it is necessary to take the bar and with the help of the electrolake to clean it from burrs. Otherwise, it will be uncomfortable with bare hands with such a shovel. After that, the corners of the bar are spinning the same tool. You can make a polygon from it. The more faces, the more convenient with the shovel will work.
- After completing all the cuttings operations, you can operate with several layers of varnish to prevent corrosion process.
- Next, you can proceed to the manufacture of the rear wall of the shovel. For this segment of the board, it is also necessary to sand up to a smooth surface. It is possible to do this with the help of an electronics or, in case of its absence, with the help of sandpaper.
- Then the bottom end of the board is cut as an arc. The width in the middle of the board must be 80 mm, along the edges - 50 mm. An ideal accuracy in building such a parabola is not required, but it is better that the figure turns out to be symmetrical. Rear wall cuts cut with an electrolovka. To resize more accurate, it is better to use a canvas with a medium-sized teeth. After the billet is cut down, the place of the cut is processed using sandpaper.
- To attach a cutlery in the rear wall of the shovels produced propyl. Its width must be equal to the size of the cutting. For ease of use, the shovels of the cutlets must be attached to it at an angle. To form an angle, propyl makes different depths from different sides. The depth on the back should be less than with frontal. The most optimal will be the difference in 5 mm, it will provide a convenient stall position for work.
- Next, the work surface of the shovel is cut from plywood. This is done with the help of an electric bike.
- After that, Phaneur must be attached to the bottom end of the rear wall. It is done with the help of nails or screws. The latter in terms of reliability is much better. Under the screw screw, it is necessary to install the washers so that with the load do not split the plywood. When attaching plywood, it must be gently bent to form a scoop. Then, in one approach, you can remove more snow.
- After the shovel of the shovel is made, it's time for installing a cutting. The stalk is attached, both to the back wall and to the plywood scoop. So that he lay down to the scoop by a larger surface, its end is cut at an angle. After that, the cuttings are attached to the scoop and the rear wall.
- In order for the plywood that the plywood does not crack, the holes are first drilled in it, and then screws are screwed. When installing a cutter, you must ensure that it is strictly in the center of the scoop. Otherwise, the shovel will constantly "be cloning" in one direction, which is not very convenient.

Snow shovel already has a finished look, but to increase its service life, it is necessary to make some measures to enhance the design:
- First of all, it concerns the working end of the scoop. Plywood is a multilayer material whose layers are glued together with each other. When using it under normal conditions, this material serves quite a long time. But when cleaning snow, the end of plywood is experiencing high mechanical loads that in addition to the effects of moisture leads to its separation. In order to avoid this, the end must be strengthened with the metal. Make it is quite simple. A strip of fine stainless steel is taken (if there is no, the galvanized) is suitable) a length of equal scoop width. With the help of the Cyanka from it there is an angle.
- Then, the end of the shovel is put on the lower shelf and with the help of the Cyanka, the corner is bent. He is fixed to the end with the help of self-tapping screws.
- Then it is necessary to strengthen the rear wall and the place of the joint of the cutting and scoop. On the back side. It is also done from sheet metal.
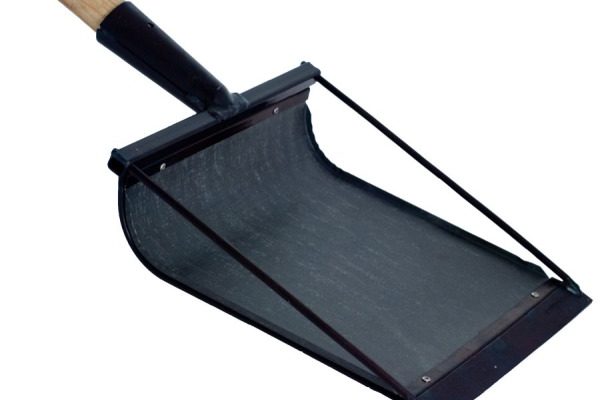
Making a snow blowing shovel with their own hands made of metal

The following model of snow removal shovel has better performance. Its design is similar to a shovel-engine. For its manufacture, you will need:
- Pipe aluminum diameter 1/2 "or 3/4" 1,3 or 1.5 meters long. From it will be made double handle.
- Galvanized metal sheet with a thickness of 1.5 or 2 mm.
Procedure for work:
- The first thing is manufactured by the scoop. To do this, one of the edges of the steel sheet bends at right angles. You can get it up using a coloring and anvil from a corner or channel.
- Then from the aluminum tube is manufactured by the P-shaped handle. For this, the pipe must be carefully hooked.
- Aluminum pipes during bending are often bursting, therefore, there should be no big effort when working with them. For a tool more convenient to work, the scoop should be located at a small angle to the handle. For this, its ends, which will be attached to the scoop, bend under a certain angle.
- To secure the scoop to the shovel handle for the cleaning of snow, its curved ends need to be discharged. After that, the handle from the pipe is attached to the scoop with bolts. To do this, through parts are drilled through holes, and they are connected by several bolts with nuts.
- For the manufacture of handles, you can use the steel pipe. It will be harder, but much stronger. You can combine such a handle with a metal scoop using a welding semiautoma.
Shovel for snow shuschik do it yourself: drawings, photo


