Inbound gates to the territory of private home ownership are not only a business card of the owner. The convenience of their use depends on the proper selection of the design and professional installation. We will tell about how to make a rollback gate with their own hands - further in the article.
Content
- Types of retractable gate
- Principle of operation and device of console rollback gates
- Arrangement of the foundation and pillars of a rollback gate
- Assembling the sash of the retractable gate with your own hands on the drawing
- Installation of fittings and sweeping gate sash with your own hands
- Retractable gate with your own hands: photo
- Retractable gates do it yourself: video
Types of retractable gate
Now there are several main models of the entrance gate:
- Swing. Consist of two sash, which swallow inward or outward placement of the territory. A rather popular view of the gate that is used in conditions of limited space, which is their indisputable advantage. However, the swollen gate is quite difficult to automate.
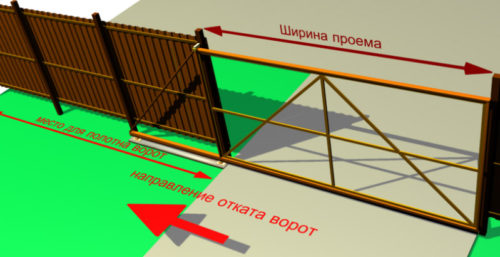
- Skump. The most common type of automatic gate. It has simplicity of design and its durability. The only disadvantage of such a gate is the need for space along the fence to roll back the sash.
Retractable or retractable gates are three types:
- Suspended. In such a design, the gate sash hangs on the beam and rolls back with the help of rollers that are suspended on this beam. The disadvantage of such a gate is the impossibility of travel under the beam of the overall transport.
- Reference. The supporting gates are based on the rail installed in the opening, which slides the sash. The presence of such a rail in the opening is not entirely convenient, which is one of the main drawbacks of such a design. However, the sash of such gates do not have limitations by weight, so they can be well reinforced. In suspended models and, especially in console, such restrictions are present.
- Console. The most popular current view of the sliding gate. Differ from the above lack of structural elements in the opening. Thanks to this, the passage of transport is no limited. Console rollback gates have a fairly simple design, which can be collected independently. They are perfectly automated, which allows you to make them use more convenient. The disadvantage of such a gate can be called limit on the weight of the sash. However, if there is no task to turn the house into an impregnable fort, the cantilever design will be the most optimal.
Principle of operation and device of console rollback gates
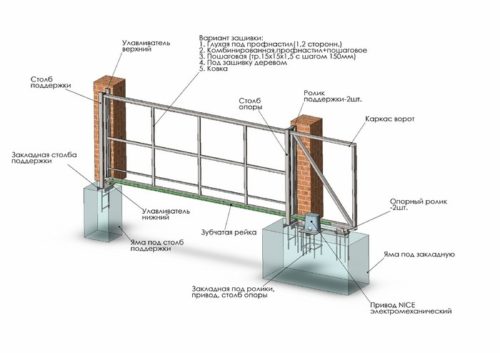
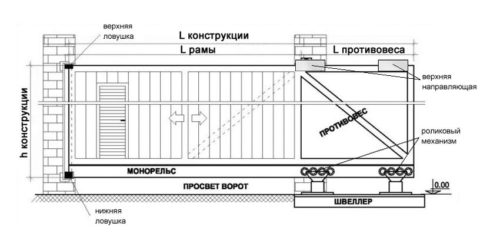
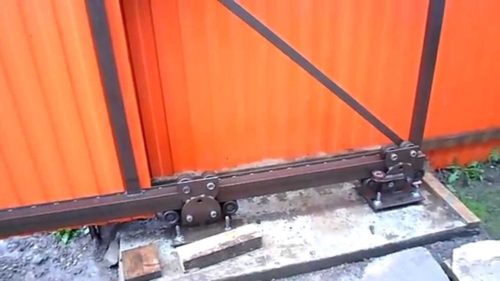
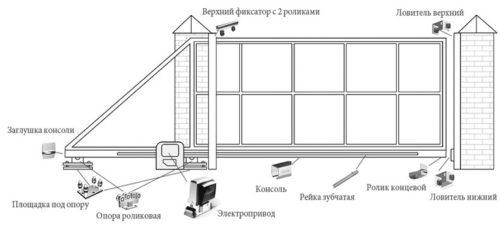
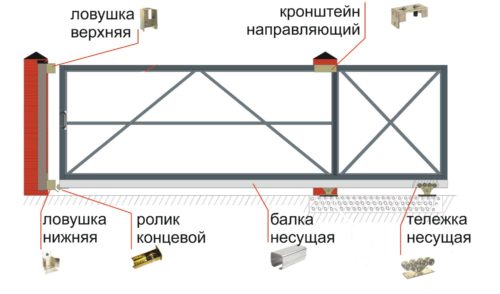
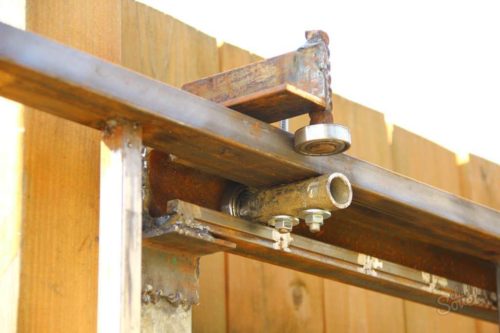
The principle of the console rollback gate is pretty simple. The sash relies on the inter-beam, which is installed along the fence. A pair of roller supports are installed on the beam, which will slide the guide, welded to the sash. So that the latter does not fall, a supporting roller is installed on one of the support pillars, and on the other there are two catchers. Thanks to this design, part of the sash, which overlaps the passage through the gate, does not relieve anything, but simply put forward due to the hidden part.
The design of the retractable gate made by their own hands consists of several parts:
- Sash. Performed in the form of welded metal structures from a profiled tube, stitched by a professional flooring. This reduces the weight of the design and pressure on the main structural elements.
- Fundament of the sliding gate. It is a beam on which rolleropors are installed.
- Accessories. It includes: end and upper rollers, lower and upper catchers, roller supports.
Accessories for a retractable gate is sold in sets. When purchasing it, you need to pay close attention to the quality of products. Low quality of rollers or guide can subsequently play the evil joke. This is especially true of roller supports. In the case of a poor product, the gate will quickly stop open normally, and the detail destruction will lead to their encoffin. Roller supports must be made of high-quality stainless steel and compromises here can not be. It is also necessary to pay attention to the quality of bearings. The same applies to the guide. It should not have the slightest curvature, traces of destruction and cracks, with a thickness of steel not less than 3 mm.
Arrangement of the foundation and pillars of a rollback gate
Before starting work, it is better to make a digital gate scheme with their own hands, which will take into account all their parameters:
- height, width of the opening,
- pillar dimensions,
- location of structural elements.
Under the specific parameters of the company's retractable gate that sell fittings can pick up the most optimal kit.
When choosing the width of travel, it is necessary to take into account the dimensions of the streets with which they will have to travel. The already the street, the wider there should be a passage. Otherwise, parking, especially in ice, will be very uncomfortable.
First of all, when taking a gate, it is necessary to build support pillars. Poles, as a rule, erected from bricks.
It will take:
- Cement and sand for making concrete.
- Armature and knitting wire for the reinforcement of the foundation.
- Brick.
- Profile pipe.
- Profile metal to install mortgages.
Procedure for work:
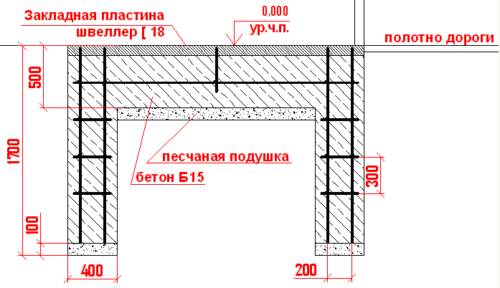
- To install the columns, the pit is digging a depth of at least 70 cm. This is the average ground friction index for our latitudes. If the trench is less depth, when freezing and movement of the soil, the pillar can deviate from the vertical level. Even a few millimeters of deviations are enough to make it difficult to move the movement of the gate.
- After the trench is dug, a layer of gravel and sand is poured onto the bottom, and then they are tamped. Next, it is set to the reinforcing construction from the reinforcement and the profile tube. The latter is needed in order to make the necessary wiring for the automation of the gate.
- Next, the formwork is installed and concrete is poured. Concrete is made from cement-sand mix in proportions 1: 3.
- After the concrete is dry, a layer of waterproofing is placed on the surface of the foundation and brickwork begins. In places where nachets will be installed on the pillar, mortgages are mounted. They are made from the corner to which a piece of reinforcement is welded. This reinforcement is welded to the profile pipe, after which it is laid by brick.
- Next, the basis for the installation of roller supports is mounted. To do this, along the foundation of the fence, a trench of a width of at least 0.5 m and a depth of at least 1 m. The bottom of the trench is swept away with sand and rubble, after which it is thoroughly tamped.
- A formwork is installed in the trench and the reinforcing design, on the top of which the channel is welded. Pre-filling of concrete, the design must be aligned by level. After that, you can pour concrete.
Assembling the sash of the retractable gate with your own hands on the drawing
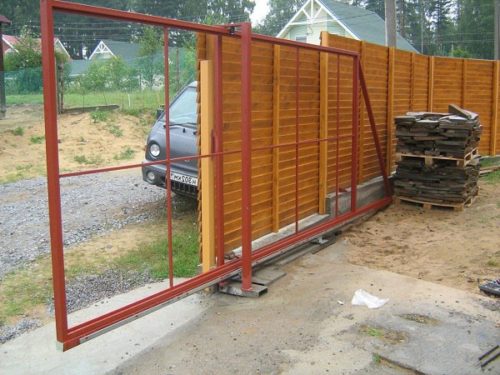
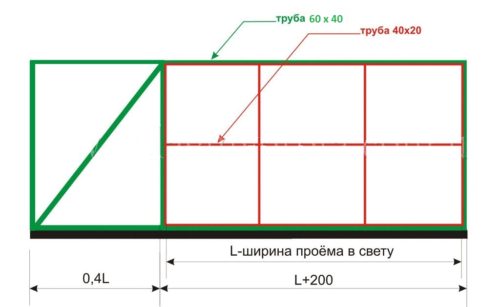
The sash consists of a frame of a profile tube, covered by a professional flooring. The frame is performed in the form of a trapezium. It saves material significantly. The upper part of the trapezium should be equal to the distance between the columns, the lower - twice as much. A diagonal beam is installed between them. So that the sash looked beautifully, make two frames, internal and external. It is to the inner frame attacks a professional flooring.
The order of work at this stage is the following:
- For welding of the inner frame, a profile pipe with a cross section of 40x60 mm is used, and for internal 20x30 mm. Pipes are cut in accordance with the drawing of the sash. In the places of welding, the end of the pipe is cut at an angle of 45 °. After completing the cutting of the metal on the measuring lengths, you can start the assembly assembly.
- The guide is installed on a flat surface, on top of it laid the lower tube of the frame and tap. The distance between the patches should not exceed 600 mm, their length is at least 20 mm.
- After the lower pipe is welded to the guide, install vertical pipes. The first is welded, the distance between vertical frame racks is equal to the width of the opening plus 10%.
- Then the vertical racks are connected to the upper crossbar. After that, the diagonal tube is installed.
- Having finished the external frame, you can start inner. It is done only in the part of the sash that will be fused by a professional flooring. The inner frame of the perimeter with the installation of the transverse tube is boiled to enhance the design.
- After the inner frame is welded, the welding seams are cleaned, and the design is ground and painted. The last stroke will be the installation of sheets of professional flooring. They are attached to the self-tapping screw or rivets. After that, the sash is ready to install.
Installation of fittings and sweeping gate sash with your own hands
This operation is considered the most difficult and most important. From the correct installation of the sash and accessories, it depends on how efficiently they will work.
The order of work at this stage is the following:
- The first thing on the poles are set by nachets from the profile pipe. They are welded to the mortgage installed in the posts. On the nickname, which is installed in the near post, is made cutout. The top roller will be installed here.
- The next step is the sash is mounted on roller supports and the latter grabbed to the chapeller. At the same time, the top roller is installed. After that, the gate is rolled several times. They should walk freely. If this fails to achieve, the carriages of the rolleropor cut off from the channel and adjust their position until the sash will walk normally. After reaching the desired result, the carriage is finally welded.
- On the distant nickname, the lower and upper catchers are installed. The lower catcher is mounted so that the end roller, which is installed on the sash, drove on it, lifting the design a bit up. The upper catcher must be firmly retained.
Over time, you can install a gate gateway automation with your own hands.


