Each owner of a country house or its own area is sooner or later thinking about the construction of a bath. Some are guided by thoughts about comfort and pleasant leisure, others intend to use a bath for medicinal purposes. Be that as it may, the bath without a stove-heater cannot exist. This is a kind of "heart" of the construction, and it can be done selfishly even without the experience of the cook. In this article we will talk about how to make a stone in the bath.
Content
What is Kamenka?
In the real Russian bath there are always steam. It is he who provides a rapid extension of the skin, removes and washes off everything too much. Hot steam is delicately and effectively affects not only the body, but also on the respiratory system, warming the body from the inside. To obtain a sufficient number of steam, it is necessary to build a special design furnace in the bath - Kamenka.

There is an erroneous assumption that the Kamenka is a furnace built of stone for which water should be splashing to get steam. In fact, it turns out that the whole secret in the furnace device - stones are located inside it in a special place, which are very warm and evaporate water.
Varieties of Kamenok
Previously, the Kamenka was built of clay, and over time began to use more practical and durable material - burned brick. With the development of industry and technologies, others have tried to use other temperature stroke materials, including metal. Metal chambers usually handicraft production. The main advantage of their advantage is in compactness and low weight. From this "pours" the fact that under the metal heater does not need to lay a separate foundation, unlike a brick analogue (we will tell about just below). Accordingly, the cost of the design itself and the complexity of work is reduced. You will only need to purchase a stove and put it in any convenient place.
Requirements for the installation of the heater in the bath sometimes make pretty contradictory and too overestimated. For example, recently it is believed that the furnace should occupy as much space as possible and at the same time quickly warm the room, economically spend fuel and cost inexpensively. Unfortunately, it is impossible to make that one furnace heated the entire bath, including the pair, and also heated the water for the shower. Of all the requirements, you will have to choose the most important, and in the case of a heater, it is a high-quality passing pair and generation of a large amount of water vapor. In some cases, the size of the stoves play the value, or its weight, or the type of fuel. Depending on this, choose the type of construction.

The electric heater for the bath, for example, does not require space to store fuel, but consumes quite a lot of electricity that with constantly growing rates is not very profitable. Gas players for baths and saunas are greater popularity - these are compact and "clean" devices, relatives of ordinary water boilers. But with their own hands, the unprofessional construct such devices will not be able, so we will stop at solid fuel chambers and consider the advantages and disadvantages of metal and brick models.
Advantages and Disadvantages of Kamenka
The brick chamber is considered traditional, and many continue to use it even after working with a metal version. What is better to say with complete confidence it is impossible, because each owner is free to choose a furnace in accordance with individual needs and habits. It remains only to objectively assess the positive and negative points.
Since metal furnaces are in great demand, consider them in the first place. The main advantages are compactness, which means that such a stove will fit even in a small box. The weight is also small - usually it varies from 50 to 100 kg. The metal heats up very quickly and also quickly gives the heat into the room, so the heater is enough for 40-60 minutes. So that it should warm and begin to evaporate water. Some models are multifunction and can not only give pairs, but also warm beverages, water, etc. Finally, the variety of designs and shapes allows you to pick up a chamber in a bath with any interior.

Unfortunately, there are disadvantages from metal furnaces. So, the most obvious is the increased fire hazard - the metal body of the furnace is heavily warmed up, so it can provoke a water-cutting, furniture or burn. In addition, the metal quickly cools, which affects the cost of fuel and overall furnace productivity. Such structures are preferable to use in small rooms with an area of \u200b\u200bno more than 25 m².
However, most knowledgeable people in the bathrooms prefer to build brick stones for a bath. This is explained by the fact that the brick gives a smooth and uniform heating of the room, while the furnace is suitable even for large rooms. Such a heater holds heat for a long time and can cool for several hours, continuing to warm air. The brick oven is completely fireproof, reliable and durable. However, at the same time it weighs a lot, so requires bookmarking your own foundation. Places the furnace also takes a lot. To melt such a design, you need to wait 3-5 h, but all efforts will pay off in full. An important role is played by high-quality cleaning after use - the efficiency of the protood and the service life of the furnace depends on it. In the next chapter, we will tell you how to build just such a stone for the bath with your own hands.

How to build Kamenka
Before embarking on the construction of the stove-heater, it is necessary to calculate the appropriate size of the container for heated water. This parameter depends on the approximate number of people visiting the bath - per person account for an average of 10 liters of water.
Experts recommend using an open container for water heating. At the same time there will be a slight evaporation, but you can add the desired amount of water at any time if someone is not enough. In addition, you can immediately after use or as needed to easily clean the capacity from the inside from the limescale and scale. In winter, after bath procedures from the tank, it will be possible to remove all the water without a residue so that it does not freeze and damage the system.

A metal boiler can be used as such a container. Such products are sold in specialized stores (solid fuel boilers, all for furnaces, etc.). If there is a welding experience and the desire to save, you can cook the capacity of any sizes yourself.
Foundation for Kamenka
Since we will build a heavy brick stale, it will be needed to lay a personal foundation. As a rule, only the stove itself weighs more than 500 kg, so it should have a strong and reliable base. It should also be taken into account that the bath is a rather wet room, and not every foundation will withstand a constantly high level of humidity and temperature differences in addition.

How to make the foundation of the playground for the bath:
- Make marking on the ground in accordance with the size of the foundation (the size of the base must exceed the size of the furnace itself to the Pollipich).
- Drop the pit in accordance with the marking depth of 50-100 cm.
- Make sure that the foundation of the furnace does not stand in bulk with the foundation of the bath, otherwise because of the soil movement they will be drowning on each other and mutually interfering. The permissible distance between the foundations is from 5 cm. After construction, these gaps should be filled with river sand.
- Align and carefully confuse the bottom of the pit.
- Under the brick stone, it will be great for both concrete and bootobatic foundation. If the bath stands on a dry ground, you can prepare a lime-cement solution, mixing the haired lime with cement in a ratio of 6: 1 and adding river sand depending on the grade of cement and lime fat. To make a purely lime solution, mix lime with sand 1: 2, purely cement - cement with sand 1: 3.
- The bottom of the pit Cover is 10 cm layer of sand, 10 cm layer of rubbank, align and confuse.
- For greater reliability, bed waterproofing film, capturing the walls.
- Fill the solution into the pit, align and leave until it is frozen for a week.
- After the specified time, prepare a liquid cement solution and pour it on the surface of the foundation for alignment. Check the horizontal surface with water level.
Laying Kamenka
Fully the foundation will dry only after 12-14 days, and only then you can start laying up bricks. There are many chapel schemes for a bath, called coaches. In the manual, it is described below how to make the most simple chamber, without having professional skills.


Instructions for the construction of a playground for a bath:
- Between the masonry and foundation, it is necessary to arrange a waterproofing gasket. To do this, you can use the cheapest ruberoid. Each the surface of the foundation in 2 layers. In the length, the runneroid should be so that the cloth shared outside the foundation by 5 cm on each side. If one band is not enough to close the entire surface into width, put two cuts with an overlap at 15-20 cm. The second layer is placed perpendicular to the first. For reliability, you can smoke the layers with bitumen mastic, but you can completely do without it, because in our case the first layer of masonry will be from a solid brick and gives waterproofing well.
- Kamenka for the Russian bath can be built only from high-quality baked red bricks. Useful information on this topic can be found in the article "Types of bricks and their application". The fuel and lining is better lay out of the refractory and heat-resistant brick.
- Before laying the brick to the place, hold it in cold water 2-3 minutes so that it is saturated with liquid. Otherwise, the porous structure of the brick will elect a moisture from a masonry solution, and it will lose strength.
- To prepare a masonry solution, mix the red clay with sand in a 1: 1 ratio. If the clay came across fatty, take more sand. In the article "How to prepare masonry mortars" You will find a lot of useful information.
- The art of masonry furnace is to create the finest and absolutely hermetic seams. This is necessary in order to eliminate the slightest possibility of penetration of carbon monoxide and combustion products inside the room. Slide the solution across the entire width of the brick with a full layer, trying to get the most subtle seam. For this, the solution itself should be homogeneous and viscous, made of sainted sand and high-quality clay. The seam thickness should be no more than 3 mm.
- To make it easier to work and improve the accuracy of masonry, make two guides from a metal rod with a diameter of 3 mm (seam thickness). Before laying a brick, placing guides on both sides. When you press the brick to the bars, get a perfectly smooth seam and you can pull the guides. When laying the next brick, fill the remaining emptiness in the previous one. Excess the solution must be immediately removed, especially from the inner surface, otherwise they will subsequently fall off and interfere with the full operation of the furnace.
- If you are engaged in masonry wood chain for a bath for the first time, each row is better to lay on a dry without a solution, see whether everything is in order, remember the sequence of actions, and then do it all the same, but with a solution. Upon completion of each row, check the evenness of all angles!
- Do not forget to dress bricks in each row. This means that the seams between the bricks of the lower row should not coincide with the tops of the top, and be shifted to the Pollipich.
Important moment: in no case do not use heat-resistant and ordinary bricks in one row. Because of the different heat capacity, they will "conflict" and the masonry collapses ahead of time. As a result, cracked are formed, and carbon monoxide will be penetrated into the room.
Using a visual friend, it is quite simple to lay out all the masonry tiers. As for metal fittings - dampers, lattices, loops - they must be installed simultaneously with the masonry as the ovens "growth". The perimeter flaps on the perimeter is better to wrap asbestos winding so that it compensates for the expansion of the metal when heated and did not allow to appear cracks.
Floating Kamenka
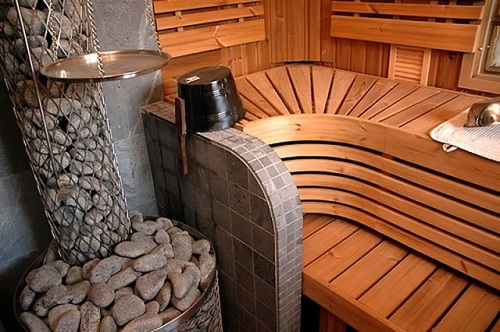
The backfill is called precisely those special stones, because of which the stove for the bath and got its name - Kamenka. Material for filling must quickly and well warm up and also quickly give off its warmth, while not destroying from temperature and humidity differences. Not every breed will cope with such exploitation, except for materials born in such extreme conditions. Minerals of volcanic origin It is impossible to suit this work better for this work: basalt, Andesit and granite. It is also permissible to use siliceous non-tank breeds that can be found along the shores of fresh reservoirs.

Stone sizes also matter - the diameter of each stone should be at least 10 cm. First, the largest copies are put in the oven, and on top of the lace. Experienced bunchwear put minerals to cast-iron pigs to get more heat.
Fasting must be sought once a year, removing and replacing the cracking stones. It is recommended to immediately make a small stock material so that every year does not look for suitable stones. If it did not manage to get granite or river pebbles, you can use a bit of ceramics or porcelain.
Before construction, thoroughly consider and depicting a playground drawing for a bath, which takes into account all the details, ranging from the layers of the foundation and the drainage pillow, ending with the outer finish and stones for filling. In this case, you will clearly know the sequence of your actions and keep yourself from rapid decisions.


