
Everyone knows that the floor in the house should be equal, but this condition is observed much less frequently than we think. The curvature of the surface is often so small that it manifests itself only in the case of laying a new floor covering with increased assembly requirements, such as a laminate. To correct geometry of floors using various technologies and materials, but the most popular is the use of plywood sheets. This is a simple and fast way to create a perfectly smooth coating over any subfloor. In this article you will learn all about the floor leveling using plywood.
Content
Aligning the wooden floor
If you have to work with a wooden house, the alignment of the floor with plywood is the most simple and low-end solution. Such a process is called the dry screed and is used not only for the timber bases, but in apartment buildings with concrete floors. Method gained popularity due to its simplicity and speed, after dry screed almost no dirt, and the floor can be directly cover finishing material and used for other purposes. In the case of wet or semi-dry screed have to wait for the drying of the solution.
There are several floors leveling technologies, and the choice of any of them depends on the degree of surface deviation from the required construction norms. So, if there is a floor drops at a height of 2 mm on an area of \u200b\u200b1 m², you can do without alignment at all, even if you are going to lay linoleum sensitive to such things. In this case, it will be enough to cover the surface with a sealant on an acrylic basis or putty from PVA and wood chips.
If the differences are already 5 mm, the plywood plates can be attached directly to the wooden floor of the boards. When drops, more than 10 mm, but less than 80 mm needed point or tape supports by setting them in terms of level. Simply put, you need to make a crate from a bar on which the plywood sheets put.
There are such cases when to align a strongly peashed wooden floor plywood without complications does not work. Then rational and more practical will fully disassemble the design and reinstall the draft floor from new sawn timber. Below we will look at all technology alignment of the floor plywood with their own hands.
Floor alignment without lag
Alignment without arranging Lag is suitable for small base height differences - up to 5 mm. Before starting laying plywood, it is necessary to give it to be seen in the room where the repair is repaired, at least two days. This will allow the material to adapt to the level of humidity and temperature in the room, as a result of which it will work easier with it. If you align the floors in a regularly heated room, put the plywood on the edge and leave for a couple of days. If the room does not heal, sprinkle the plywood with warm water and leave for a day.

An important point: all wooden structural elements, as well as the materials of the dry screed, must be treated in advance by antiseptic solution.
Alignment of the floor plywood without lag is considered to be the easiest and fast way to get a flat surface. You do not need to mount the support bar, because with its task, distributed bulges of twisted wooden floorings are perfectly coped. In addition to plywood for such a job, you can use GVL or CSP plate.
If the floor is deformed by the waves, it does not make sense with the help of sheets of sheets. Over time, this material will give a shrinkage and copies all the deformation borders of the draft floor. If you work with a boardwalk, whose floorings are in width of up to 20 cm and twisted less than the same one, you need a plywood with a thickness of 10 mm. For wider floorings, plywood is needed, from 18 to 20 mm.

Wooden floor alignment instructions plywood:
- On the entire perimeter of the leveling platform, install the bins to form an indentation from the walls of 3 cm.
- Place the sheets of plywood required thickness, leaving depreciation gaps between them from 3 to 8 mm. These gaps will close by themselves as a result of laboratory lumber due to humidity differences in the room.
- If you are placing the Faneur into several rows, the slabs of the second row are so that the joints between them coincide with the joints of the slabs of the lower row. They should be shifted relative to each other half or at least one third of the width of the plate (the allowable minimum is a quarter of the sheet). Avoid crushing intersections of 4 docking seams in one place.
- Attach the Phaneur to the "ridges" flooring from the boards at the set points with a maximum height, trying to dispersed the fastening evenly in accordance with the distances between the disclapses. The holes under the fasteners should be drilled in advance, using the first drill with a diameter equal to the diameter of the self-pressing, and then wider - with the diameter of the screw screw, so that the fastener can be drunk flush with the stove.
- Dowel must be located around the perimeter of sheets is not closer than 2 cm from the edges.
Useful advice: Plywood sheet has one side smooth polished, the other is rough. If you are planning after aligning the floor with laminate or tiled, lay the steamer with a rough side outside - so adhesion with glue for cladding will be better. In other cases, it is possible to mount sheets with a smooth side, drowing the hats of self-tapping screws in the surface and sticking them with a sealant.
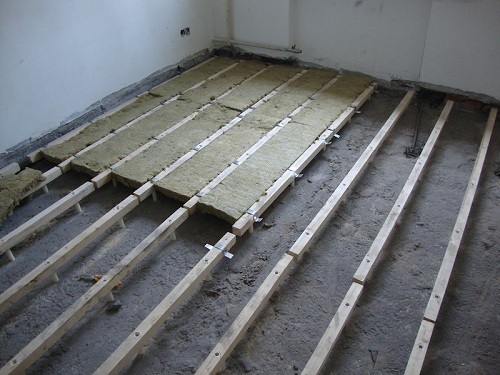
Leveling floor with tape supports
This laying technology assumes the installation of the crate of longitudinal and transverse components placed in a single horizontal plane. Longitudinal lags should be positioned at some distance from the walls to leave a place for deformation skills (3 cm enough). The distance between the lags depends on the size of the plywood used - usually 40-50 cm. For example, if the side of the plywood sheet is 152.5 cm, the distance between the lags and the crossbar will be 48-50 cm. For sheets of 122 cm. The distance should be reduced to 37 -40 cm.

How to align the floor plywood with belt supports:
- Make a plywood fitting, laying it on the floor without fasteners. Observe the principle of dressing of seams, as in the previous instruction (so that the joints between the sheets do not coincide).
- Outline the abis of sheets to designate the guides for the subsequent markup of the location of the longitudinal elements.
- Number each sheet so that after mounting the crates to lay them in exactly the same order.
- In accordance with the markup, put on the floor of the lag. First place the items along the walls, then intermediate. It is best to make lags from a bar with a square cross section of 40-60 mm. If there is no need to lift the floor too high, the lags can be made from the second-grade boards or sliced \u200b\u200bplywood.
- Install the transverse elements at a distance corresponding to the size of plywood sheets. Attach them to lags using screws and metal corners.
- Play longitudinal and transverse elements vertically in one plane using a building level. If any of the elements need to be lifted to the desired level, in no case do not get wooden or metal wedges under it (requirements are described in SNiP 3.04.01-87), and make a submissions from the sand, put only tol or runner. Most builders are withdrawn in one plane with point supports.
- Then attach the entire crate to the wooden floor with metal corners of galvanized steel and dowels. The length of the dowels should be 3 times the thickness of the lag.
- Lay the Phaneur according to the numbering and secure it with self-draws.
- The remaining emptiness between lags fill in thermal insulating material (mineral wool or foam) or a mixture of PVA and wood sawdust. If you use such a mixture, apply it in 2-3 layers and leave for a couple of days until it is frozen.
There is also an alignment technique on mini lags. It is applicable for surfaces with a slope or with serious drops of up to 80 mm. To do this, create a one-piece reference system under the plywood from the rails and wooden lining. This work is quite difficult and can not cope with her without professional skills and accurate engineering calculations. Since it is hardly possible to align the floor in the way, we can hardly succeed, we will look at more acceptable options.
Floor alignment with point supports
Floor correction in this way implies the installation of several supports from the tree, OSB plates or plywood. The thickness of the support-support should be such to compensate for the difference between the thickness of the plywood installed and the current level. Ultimately, the entire system resembles something like a grid that replaces the belt crate described above. It is less reliable and durable than the belt support, and therefore the case must be put with a smaller step, so that conditional square cells with a side of about 30 cm for plywood with a thickness of less than 14 mm and 45 mm - for thicker sheets.

Useful advice: among other things, we should not forget about the need to ventilate the underground. After completion and installation of plinths in the plywood, you need to make ventilation holes in advance indicated points. These holes can be closed with a decorative ventilation grille.
Alignment of concrete floor
Alignment of concrete floors with plywood occurs on lags. For this, experts recommend using Phaneur from Birch, since it is unlike Fiberboard and DSP is completely safe from an ecological point of view. The optimal thickness of the sheets is 10-12 mm. At the same time, the quality of plywood should not necessarily be the highest, you can take products of the most recent class, especially if it is planned to cover the floor with lining.
Important: To work in any room you always need to use moisture resistant material. The price of alignment of the floor plywood will be slightly higher, but the amount will pay for a comfortable and long exploitation.

Before starting the installation of supports and laying of plywood, explore the draft floor (concrete tie) for defects: cracks, chips, bulges. When working with a screed, it is necessary to determine the level of its humidity, because if it is too high, Plywood will suffer from it. To do this, the floor should be covered with a plastic film and see whether condensate will appear under it. With a positive result, the screed must be carefully dried.
Sequencing:
- Clean the concrete screed from garbage and dust.
- Cover the surface of the primer to kill dust and increase the insulating characteristics of the surface.
- Shipping floor with waterproofing material. It can be a conventional rubberoid or a polyethylene with a thickness of 200 microns. Place the sections of the Material Material for 15-20 cm, entering the walls. Stretch cuts among themselves with a scotch, also glue the material to the walls (after mounting the plywood excess will need to trim).
- Otherwise, the work is similar to the arrangement of a wooden crate of longitudinal and transverse elements, which is described in detail above. At first, put the bars and lags along the walls, then do the intermediate elements, withsting the distance between them in accordance with the dimensions of the plywood sheets.
- Display lags in a single horizontal.
- At this point, the concrete floor can be insulated, placing in cells formed by lags and crossings, thermal insulation material. To do this, you can use clayzit, vermiculite, basalt cotton wool or foam.
- Make funny plywood sheets, laying them on the floor without fastening. Having determined the optimal option of location, numb each sheet and make the final installation, drowing the screws of the screws in the surface. Hold the installation step 15-20 cm.
- Do not forget to leave small deformation gaps between sheets of 5-10 mm. If this is not done, the new gender will soon be possible to go by waves. Between the walls and plywood, you also need to leave the gaps, only a little more - in 2-3 cm.
- After installing plywood, cut the waterproofing lining protruding around the perimeter and install the plinth.
- If necessary, stick the surface and proceed to laying the finish coating.

Finally, we suggest watching a video on the alignment of the floor plywood:


