Repair of the ceiling and walls are the most common building events that are held within a residential building. It must be said that today there are practically no restrictions for repairs. A few years ago, the hosts did not risk themselves to produce some changes in the dwelling, but every year more and more useful materials appear on the Internet, and in construction stores it is fairly easy to find building materials and fixtures necessary for repair.
Content
If you speak directly about the repair of walls and the ceiling, then here we will need only confidence, as well as the study of a number of useful materials. Even people with minimal experience without any problems conduct numerous construction events. It should also be understood that there are simply no risks in this case. It should only be done with quality restoration of surfaces, and then no problems will arise.
In this article we will talk about how to properly repair the ceiling and walls within the home, as well as analyze the main problems that beginners often face, and experienced builders.

Main features of repair activities
Within a long period of operation, the dwelling gradually comes to a state when it is simply necessary to produce a large-scale repair, and in these construction activities, the walls and ceiling are unambiguously included, which, first of all, need to align high quality, and after that, to produce the process of refining surfaces.
Separately, I would like to note that for such events, several free hands will be required. Alone is not recommended to carry out the repair, since it is impossible to exclude enough unexpected situations, in which one can only create difficulties. Of course, repairs are also financial spending, which, obviously, will not be able to avoid with any scenaries. However, if serious errors are allowed, you have to spend extra money. A particularly serious problem becomes in the event that we are dealing with a large construction scale.
If the apartment in which the repair of ceilings and walls is carried out in the newly erected house, then the repair will not be so difficult, since modern building materials were unambiguously used in construction, and do not forget about it. If the house has been built for half a century ago, the repair activities may be really difficult.
If the volume of repair turns out to be significantly larger than what was planned, it is better to trust this process to professionals. Of course, in this case, we definitely spend a lot of money, however, you can be sure that the construction process is characterized by the high quality of the work carried out, as well as durability.
Cleaning of walls
The very first and main stage of work is cleaning the walls. Only after this process can be made full repair. For this case, we will need protective equipment, including glasses, respirator, as well as closed clothes and gloves.
- Most often on the walls there is a layer of wallpaper (and sometimes several layers), from which you need to get rid of. To do this, you can use an abrasive grid that is attached on a long bar. It is worth saying that with similar works it is better not to use a drill with a special brush, since various irregularities can form on the wall surface.
- If there is plaster plaster on the surface, then it is also necessary to remove it. If this is not done, then after some time she will make himself felt. At best, new wallpapers will be flawed, and the plaster itself is collapsed.
- Often, together with the plaster stacked and the chain grid. It is used for strength, but such a metal base can create a lot of problems. First of all, we are talking about the fact that the grid can become a source of rust, which will appear on new wallpaper (or on another coating). It is impossible to allow this, so it is desirable to lay a new mesh later, which will definitely not rust in the near future. The same situation is also with metal beacons, the rust of which can again spoil all the repairs produced.
- Quite often on the wall surfaces there are large irregularities, and if they have a depth of more than 3 mm, a passage should be carried out.
In order to produce the most efficient cleaning of surfaces, you need to richly moisten the walls with water. You can simply spray them tightly. In this state of the wall, you need to withstand during the day, after which you can begin full-fledged building events. Thus, the necessary layers must be removed using a wide metal spatula. In the event that some parts of the finish remained on the surface, you can apply a drill with a cord brush. Experts recommend cleaning the walls in such a way as we ultimately seen a brickwork or concrete surface of the structure. It is with such a situation that we can be confident that the restoration of the walls and the ceiling will be as smooth as possible.
As for the ceiling, here, as in the case of the walls, it is necessary to remove all finishing layers (if any). If we are dealing with wallpaper, they should also be removed using a spatula, pre-moisturizing the surface. Often, the surface of the ceiling has only a thin layer of blissing, with this situation, you can not carry out large-scale repair work, but if we plan to make the wallpaper sticking (or something more large), it is better to still remove the entire finish.

Dry surface
For a long period, the surface will remain wet, however, the situation can be quickly changed enough. To do this, use a construction hairdryer, which easily removes moisture residues. At the same time, it is necessary to apply the primer of deep penetration. If everything is done correctly, then within a few hours you can continue the majority of repair activities.
Also, do not forget that there are small intervals between concrete slabs, which makes sense to fill in the mounting foam. It is necessary to do it carefully, as to correct the numerous flaws of the surface later will be extremely difficult.
Use of plaster
It is not a secret that it is the plaster is the main component for creating a smooth wall. Thus, from this construction resource and the main part of the restoration of surfaces begins.
- First you need to install beacons on the walls. Plaster beacons are installed vertically. As for the step, it should be slightly less than the width of the spatula used. It should also be borne in mind that in each corner should be installed a separate lighthouse.
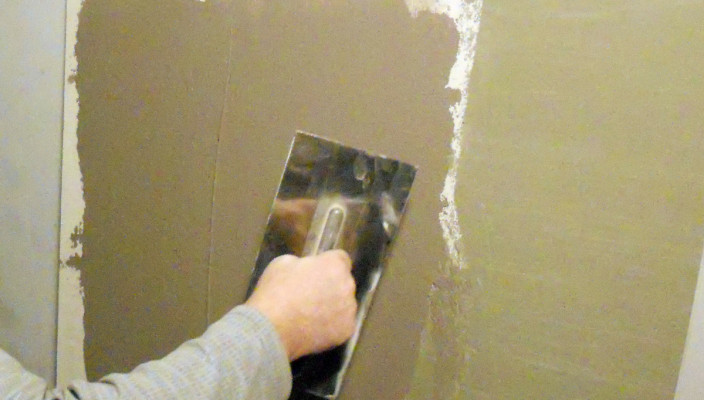
- Now the time has come primary plaster. For this case, the starting plaster is often used, which is produced on a cement basis. With the help of the instruction, it is mixed with small portions. Ultimately, the mixture is applied from the bottom up and smoothes under beacons with the help of a metal spatula. The layer of starting plaster should be thin (more detailed information is better to learn from the documentation for the building material).
- Separately, I would like to note the process of putting the corners. To do this, it is best to use an angular spatula. It has a triangle shape, and thus is the best solution for the repair process. Even a person without experience will repair the repair in such a way that the angles will be perfectly even.
- Next, the process of applying white plaster, which is finishing in this process. It should be noted that this shuttering is made on the basis of the gypsum, so the surface of the walls will be snow-white. Most often, the layer of this plaster should not exceed 1 mm. In the event that a thicker layer is created, it will gradually begin to peel. If there is a need for a thicker finish surface, you can simply apply several layers of plaster, but in this case you need to wait until the last layer is dry before starting to the next one. However, again, specialists warn that multi-layer plaster is far from being so durable and reliable as one-layer.

Creating a crate
If you have conceived to bind the surface, or at least make the installation of the hypercathone, without a full-fledged crate does not work out.
Today, metal profiles (U and C) are increasingly used to create crates, but wood elements still use considerable demand. In the case of wood, we have the opportunity to save a significant amount of money, but it is impossible to be sure that the wooden fence will have excellent durability.
It should be remembered that the pebble has indisputable advantages. First of all, we are talking about that in the cells that are available at the crates, it is possible to lay thermal insulation material. You can also combine and set the sound isolation. Many owners use free space of cable labeling, cables and other important communications. Some people manage to carry out the installation of pipes, and they are completely visible for the crate.
Most often, the doomle is attached to the surface of the wall with the help of self-samples or dowels. As for the step between the elements of the crate, it all depends directly from the size of the sheets of plasterboard, which will be used further and on the insulation dimensions (if applied).
It is necessary to designate the places where the sockets or some other objects will be. If you do not care about it in advance, then after installing the sheets of plasterboard it will be very difficult to change something.
Testing wall
Immediately after installing the crates, you can start installing plasterboard sheets. For mounting, it is often used by screws 35 mm. Screwing occurs with a screwdriver.
It should be borne in mind that in some sections of the surface, it will take a cutting of plasterboard, and it is advisable to use a construction knife. A small cut of the surface is produced, after which you can do the donom of the material.
Ultimately, the finish finish is applied to the surface of the plasterboard, which removes all minor irregularities of the material, and also makes the surface of the presentable.
Already on top of the drywall, you can lay the tile or other material. The surface, after all the above events, becomes the most even as possible.

Leveling ceiling
Separately, I would like to note the process of equalizing the ceiling. Most often, the surface leveling process is similar to what we have in the case of walls. Despite the fact that the horizontal surface is easier to process than the vertical one, alone, repair the ceiling will not work.
- To begin with a thorough primer with the help of a strengthening composition. In addition, the application of the mixture "concrete contact" does not interfere, which in the best way interacts with the ceiling surface. You can pre-use the sandblasting machine, which will create the necessary roughness on the surface.
- Next, you can install a metal mesh, which when applied plaster makes the surface of the durable. The grid should be steel, and the grid cells best use small.
- Now it's time to install beacons. In this case, it is necessary to use the construction level and every 300 mm apply gypsum marks. It is necessary to do everything neatly, as mistakes here are a common phenomenon.
- We prepare a gypsum, limestone or cement solution. Next, splashing a small amount of material on the ceiling, then you need to wait until the mixture is strengthened. After that, several primer layers are created, which should form a smooth surface of the ceiling. Lighthouses are cleaned, and at the very end is applied a cross-hard layer, which should create a smooth surface.


