Storeroom in an apartment or house performs a very important feature. It stores products, tools, things, etc. In small-scale apartments in the conditions of lack of area, the storage room can serve as an additional workplace, a computer room or other purposes. In some rooms, the pantry is not provided for by the project. But it does not matter, it can always be made with your own hands. Quite often set storage rooms in the basements of apartment buildings. Next, we will look at the option how to build a storage room with the least costly way.
Content
Choosing a placement location

The first thing to develop a design of the pantry needs to be addressed that you will be stored in it. It depends on the place of its installation, sizes, finishing. For the construction of the storage room, the corridor is best suited. In this part of the apartment or house, as a rule, there are no heating devices and access direct sunlight. Therefore, it is most suitable for the arrangement of the storeroom. In addition, building a storage room in the corridor, you do not bring a "sacrificing" a living area, which, as always, it seems a little.
Another good place for this utility room can be a kitchen. The most suitable accommodation option will be a niche in the wall, which then simply close the door. Thus, it can be saved on the construction of walls and partitions.
The small area of \u200b\u200bthe pantry will not be a problem, if we carefully think about it. Properly constructed racks can accommodate a large number of things, product reserves or tools that use from time to time.
Making storage room

So, in our apartment in the corridor there is a niche of 1 m x 1.5 m. This is a great place to install the storage room in the panel house. All we need is to close the opening in a niche door and a garpence of drywall.
First of all measuring the distance between the walls of the niche. Based on this data, choose the width of the door. Doors, as a rule, are sold standard. Their dimensions are 90,80,70 and 60 cm. The most optimal version of the door width for this room is 60 cm. When choosing doors do not forget to add to its width of the box boards. Usually they make 3 cm thick. That is, if the width of the opening is 1 m, then the door can be bought any width.
Please note that when installing a narrow door, you will need to fill the distance between the box and the wall of the mounting foam. And the longer it will be the distance, the greater the consumption of the material. The width of the door box should correspond to the size of the wall. The box is better to buy simpler, but necessarily wooden. Please note that the racks were solid (not glued), smooth and without bitch.
For mounting the wall above the door, we will need a metal galvanized profile 100 mm wide, fast installation dowels, metal screws (so-called "seeds"), tapered screws for drywall.
Cut from the profile side racks that will be attached to the walls. Their length should be equal:
- The height of the ceiling is the height of the door together with the gap below - the thickness of the box.
Procedure for installation work:
- Cut racks secure to the wall with a dowel. Remember, the metal structure is mounted at a distance from the edge of the wall on the thickness cabarton thickness so that after its installation the wall turned out to be smooth.
- After the first rack fastened, Freed. We associate their crossbar, which insert into the profile racks, fasten them with self-draws. Then fix to the wall of the dowels.
- After that, we set the lower crossbar and secure it to the bottom of the racks. We connect the lower and upper crossbar with one more resistant in the middle. This will give the structure of stiffness.
- Then collect the door frame. Measure the length of the side racks and cut them off according to the die out. Then put the door to a flat surface and apply the side racks of the box to its ends. Between the door and racks you need to put pieces of thin fiberboard. In this case, you will withstand the minimum clearance, which will allow the doors to close, even if it fell out of moisture.
- When the box is adjusted, we collect it with the help of wood screws. In order that when installing a rack part of the box, the box did not go to the sides, secure them with a wooden plank. When the box is installed, this bar can be removed.
- We produce installation door box. I exhibit it in terms of lateral walls and with the help of wooden wedges align it in all planes. After that, drills in it and wall of the hole and fix the box with the help of anchors.
- Clauses between the door frame and the wall fill in the mounting foam. From above, it is attached to the crossbar of the profile design.
- When the foam dries, cut out in a box of deepening under the loop. Install the door. After its fit to continue repair, it is better to remove the box.
- Next, it is closed by plasterboard profile design. To do this, it is better to choose wall plasterboard. Cut two pieces of material and with the help of screws screw to the design.
- Next, the plasterboard is put off and separate the rest of the corridor as lined.
Now our storage room acquired general outlines: we buried it from the rest of the area, installed the door. Since this room will not have access to the light, it is necessary to install a lighting device in it. Turn on the light, thanks to the limit switch, it will be when opening the door. It is very convenient, because you are unlikely to be lighting with closed doors. It will be advisable to install a LED lamp. The fact is that the permanent opening and closing of the door can cause frequent blows of incandescent lamps that are not very likely to like short periods of work. And they consume electricity they are much more than LED.
Finishing storage room

When the lighting is already installed, go to the trim. Storeroom is never in sight of visitors, so it is not worth paying great attention to her finish. As a rule, for the facing of this technical premises, materials that remained from the repair of the apartment are used. The most effective option can be finishing the walls of the pantry with ceramic tiles. From her positive sides it is worth highlighting the fact that it is easily clean, and in the storage room there will be a large number of pollution sources. Also tile perfectly keeps the temperature, which is very important when storing food. Among the disadvantages can be noted its cost and relative complexity in the installation. The simplest finishing option will be plaster with subsequent blending wallpaper.
The floor of this room can be put on tiles or cover with linoleum. It is not recommended to put the floor with wooden boards, as they may turn them from moisture. In addition, if you store conservation, then due to the possible damage to the containers, the contents can pour out to the floor, which will cause its deformation. With a floor of the tile or linoleum, this will not happen.
How to equip storage room. Stellazhi

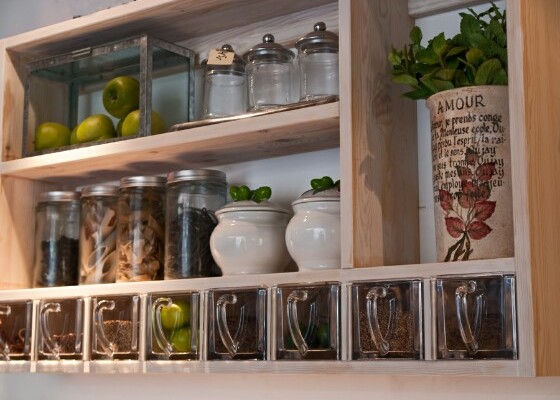
Go to the most important - racks. It is from their successful configuration that the ease of use of this room depends. First of all, take a pencil, a sheet of paper and make the location scheme that you will be stored in the storage room. It is from this that the size of racks will depend. For preservation, it is recommended to build a narrow rack so that the banks stood in one row. Height should be a little more the container you plan to store there.
Installing racks in the pantry with your own hands in two ways:
- Make a frame of wooden bars to which boards are installed. This method is cheated, and such racks can be easily made with their own hands. For this, the so-called stairs are mounted on the walls. They are made from the bar of 50 x 50 mm. To do this, put four bar and place the places of installation of the crossbar. Then in the place of attachment of the crossbar drink half the thickness of the bar. Thereby make the "Castle". Such a fastening will be most reliable and can withstand a fairly large weight. Then the design is attached to the walls with a dowel. Boards or sheets of thick plywood are put on the crossbar, depending on the weight of items on the rack. The disadvantage of such structures is their bulkiness.
- Make metal brackets from a metal corner to install the shelves. The bracket is made as follows. In the middle of one of the shelves, the grinder cut out a rectangular isceived triangle, and bend the corner at right angles. Then with the help of welding weganize the joint. Such a bracket can withstand quite high weight, while not occupying a lot of space. The disadvantage of this method is quite high cost of materials and works.
Before laying boards on the shelves, they must be processed. For this, Olife and Enamel fits perfectly.
Alternatively, you can order ready-made racks that are sold in construction stores. However, then you can forget about individual requirements and suitable sizes.
Ventilation. Storeroom without ventilation can cause increased moisture inside, which is very bad for the door and wooden racks. If you can get to the ventilation mines, simply do the hole in the wall and set the exhaust fan there. At the same time, the door in the storage room should have a decorative ventilation grille or a technological lower gap for air circulation.
How to make a storage room under the stairs

In large houses, the problems of the deficiency area are usually not. However, it is always good to use additional space with the benefit. Therefore, the storage device under the stairs leading to the top floor will be quite useful.
The space under the staircase can be cut down plywood, and the entrance to do with the help of sliding doors. In the storage room under the staircase, you can not only store things, but also to equip a small workplace. The only disadvantage of such a storeroom often becomes that moisture, which accumulates there, can spoil the wooden staircase.
Storeroom: Photo.


