Initially, the laminate served to create a durable, beautiful and durable floor, but quite recently it began to use it for cladding walls. The reasons for this set, ranging from the operational characteristics of the material and its superiority over the classic wall decoration, ending with high aesthetics and originality. In this article, we will look at the specifics of the installation of laminate on the walls and tell me how to make the interior with the help of this material.
Content
Product specifications
Laminate appeared in the domestic market relatively recently, but instantly established itself as one of the best options for flooring. It is easier for him to take care than for the carpet, it does not appear traces from furniture, like on linoleum, it is stronger and durable of any parquet.
Some time passed, all the floors were laminate, and the thought was born - if the laminate was successfully replaced by the usual coverage on the floor, why not do the same with the walls? Logical assumption turned into an original designer solution, and today the decoration of walls with laminate is the last trend.

Not so long ago, there were panels from MDF in fashion, but their cost was forced to think even the most prosperous homeowners. Laminate creates the same effect of respectability and style, but at the same time it is an order of magnitude cheaper.
Advantages of laminate for walls:
- environmentally friendly material;
- durability (service life of at least 10 years);
- does not accumulate dust, does not absorb smells;
- savings on the interior decoration (about cosmetic repair can be forgotten for many years);
- originality - a variety of colors and textures will allow you to easily create a unique interior;
- easy installation - lining the wall with laminate sometimes easier than sticking wallpaper.
The intolerance of humidity can be attributed to the disadvantages of the material - wet, the laminate swells and cracks. For this reason, it is not recommended to use bathroom and kitchen finish. Also, the laminate does not tolerate the temperature differences - he will swell on the heat and unwind, and the cold cold will lead to cracks. So if you have conceived to install it on the loggia or balcony, it will not be the best solution.

The last drawback is rather controversial - the high cost of the material. Of course, if you compare with traditional ways to finish - wallpaper, plaster, paint, wooden clapboard. However, if we consider it in comparison with the MDF panels, the laminate laying on the wall will not seem so expensive.
Types of laminate for walls
There are several varieties of laminate depending on the fastening method, prices, thicknesses, etc. When choosing panels should be repeated not only from the value of the material, but pay special attention to the method of fastening - with some varieties a newcomer will be quite difficult to cope with unusual.
Types of laminate by the method of fastening:
- Adhesive - elements are not equipped with locks and are connected to each other by gluing. The panel wall is also attached to construction silicone glue or liquid nails. This kind of laminate is albeit easily, but it will be quite difficult to dismantle this cladding, especially if you want to keep the panels safe.
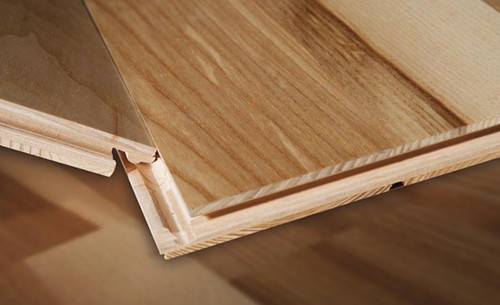
- Bulk - elements are equipped with tongue locks that form minimal joints between the panels. In the installation process, the laminate is fixed in a slide groove with small nails or kleimers on a pre-installed cladder. This option can be used not only for walls, but also for floors and ceiling.
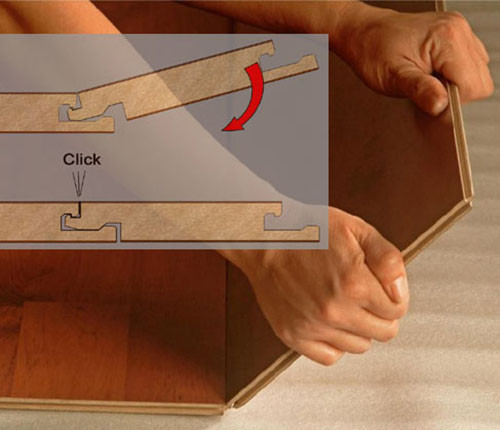
- Clearing - the name happened from the word "click". It is a laminate with a special fastening system, similar to a tongue, but more comfortable and perfect. In the process of installation, the panel put to the already installed strip at an angle of 20 °, docking the locks of the locks and snap the mount. Such a coating also needs a crate. For additional fixing, builders often sample panels.


When you were determined with the type of fastening and chose your favorite material color, it remains to be dealt with. Laminate is one of those rare cases when the price actually corresponds to quality and on the contrary, so it is necessary to save on it very carefully.
For floor cladding, laminate 33 or 34 grade is used, since it has increased abrasion resistance. The walls will not be subject to similar effects, so you can save and acquire lower classes - from 21 to 31.
Tips for choosing
You can buy inexpensive and beautiful laminate on the wall, but it should be soberly regarding all possible factors for the material. For example, for the children's room it is better not to use it - the child can paint a beautiful smooth finish, and it will be very difficult to wash it. If there are animals in the house, for example, a cat who likes to periodically mark its territory, from laminate on the walls, too, it is better to refuse either to bond only the upper part of the surface.

What should be considered when choosing a laminate:
- The intensity of loads - if animals capable of scratching the wall live in the house, give preference to inexpensive models.
- The appearance of the panels must match the overall style of the interior and find "support" in the colors or texture located in the items located. Do not choose a dark panel for a small room or too morning ornaments.
- If you want to buy adhesive laminate, keep in mind that the wall surface should be perfectly smooth, otherwise the panel will not hold on it. With big drops, it is wiser to establish a crate than spending money to align.
Mounting specificity
To stripped the walls with laminate, you will need various tools depending on the method of fastening the panels. If you work with adhesive laminate, you can do only with your own hands, but for other types you will need special devices. One of them is a boss. This is a special tool that is required to bore panels. If you beat them with a hammer, there is a big risk of damaging the integrity of the sidewall and get the crosses of the slits between the elements. The bobbish evenly distributes the strength of the blow and saves the panel of the whole.

Also for work you will need a hook to tighten the last elements when installing in the corners.

The spacer wedges are needed to withstand an indent to the perimeter of the room. Basically, they are used when laying a laminate to the floor, but hooks come in handy and when finishing the walls. Since the laminate is afraid of moisture, it must be laid with an indentation from the angles and the surface of the floor by 15-20 mm. The material is rather heavy, so if we put the spacer wedges below, they simply slip out, so before laying the floor you need to put a thin rail, and the wedges use on the sides.
Useful advice: When laying adhesive laminate, the lower rail is better wrapped with a polyethylene film so that it can be easily pulled out after the glue is frozen.

Prepare a hammer, a construction level, a square, a roulette, a simple pencil and a hacksaw (better electrolovik).
Fastening laminate
In this paragraph, we will consider the features of the attachment of laminated panels, and let's start, perhaps, from the most common and inexpensive species - adhesive. As we have already spoken, glue laminate can only be installed on perfectly smooth and smooth walls. In modern apartments, not to mention the houses of the Soviet buildings, only dreaming about the smooth walls. Alternatively, you can strip their plasterboard or plywood, but for this you will have to make a crate, then install the plates (sheets). It is much easier to make a crate and immediately attach a pinch or click laminate on it.
Another thing, if you want to insulate the walls from the inside and complete the work of a beautiful finish. Then you can attach the insulation, close it with crate, plasterboard and proceed to gluing the laminate. The adhesive fastening of the laminate on the wall is the simplest, and even a teenager can easily cope with this work.

If the wall has minor differences of several millimeters, they can be eliminated by grinding or with plaster. Check the smoothness of the wall can be in one simple way. You will need a rake, the length of which corresponds to the height of the wall without a plinth. Accordingly, the plinth must be removed before working (the same applies to the doors and windows). Attach the rail to the wall and lead vertically along the surface, noting all the protrusions and depressions with a simple pencil.
Location panels
How to fix the laminate on the wall - horizontally, vertically or diagonally? To answer this question, it is necessary to repel not so much from the design ideas and personal preferences, how much from the complexity of the installation. In principle, any of these methods of laying will be implemented, another thing - whether you can fix the panels in the right position without special skills.
At first glance, the installation of laminated bands seems simple and rapid, but not so simple. As you already understood, it is necessary to leave small gaps in the corners, at the floor and under the ceiling - for this use spacer wedges. The gaps subsequently need to close the plinths that are attached to the walls of the dowels. To install a dowel, you will need drill to drill a hole in the panel itself and the wall. Plinths should be installed in 170 cm increments or more often, even if you are facing the wall with solid stripes. Such an additional fastening is simply necessary because the panels are kept by the locks in one direction. If they do not hold their plinths, the facing simply fall off from the wall under their own weight or will be "accordion".

Experts are recommended to lay the "comb" laminate to increase the strength of the cladding - cutting up half the number of bands and attach in a certain way. Suppose you have 10 solid laminate bands. You cut 5 of them in the pressure, then start laying with a whole strip, attach two halves on it, then again kiss and so on. As a result, short pair bands distribute the load on the fasteners more evenly, and an interesting pattern is obtained.
Laying diagonally looks very original, especially if two colors were used. But to attach laminate on the wall with your own hands in this way - independently without professional skills, it is simply unreal, so we will look at the horizontal installation of the panels.
Installation instructions
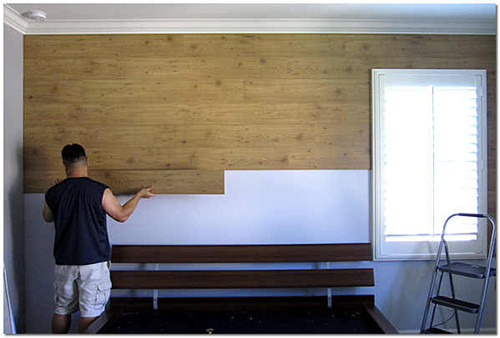
Fix the laminate on the wall should be started from the left corner opposite to the entrance to the room, continuing clockwise. Then to dock the subsequent elements will be more convenient. If you are left-hand, do everything exactly on the contrary - start from the right corner and move counterclockwise.
Progress:
- Calculate the required amount of laminate. It is very easy to do with a familiar from the school of the Formula of the Square - the height of the walls multiply the width. Experts recommend adding 10% to the resulting number to have enough for the fitting of the material and remains in case of point repairs.
- Prepare the wall surface in accordance with the requirements of the selected type of panels. For adhesive laminate, the wall should be cleaned from the old coating and dedust. In the case of clicking and tongue laminate, you will need to make a crate. For this use wooden rails or metal profiles. Take the rails width from 20 to 40 mm and attach to the wall by self-draws in a step of 30-40 cm. The rails must be installed perpendicular to the future laminate bands, that is, if you lay the panels horizontally, the crate should be fixed at an angle of 90 ° to the floor , and vice versa.
By the way, more and more manufacturers of laminated panels offer their fastening systems, delivering them with the material. - Determine the "starting point" (in the far corner). Regardless of whether you cover the wall completely or only from the ceiling to the middle, you always need to start on top. Only if you plan to bind the lower half of the wall, you should start from the floor. Memore from the ceiling (floor) 15-20 mm - this gap will then be closed by a plinth.
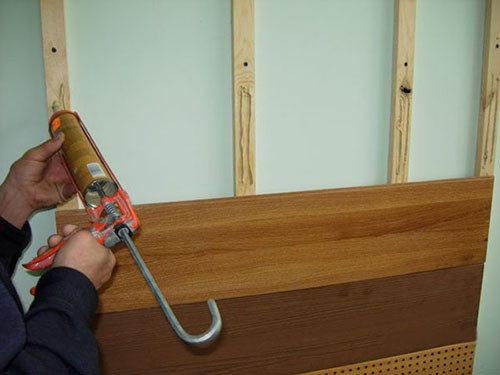
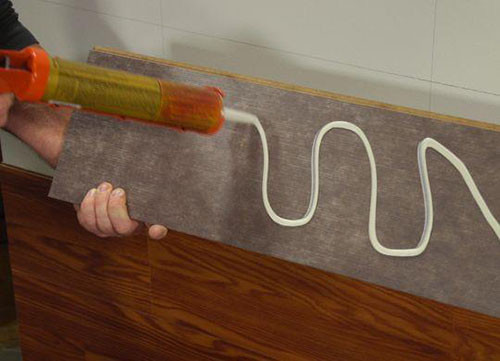
- If you use adhesive laminate, apply glue to the back of the panel and press the wall with force. Hold up for about a minute so that the glue "grab" and continue the installation.
The laminate crate is attached by whimmers (special brackets) or nails. To enhance fixation, such panels can also be sized. - When all panels are installed, attach the plinths at the corners, at the floor and the ceiling - they will give the facing the completed view. Video on the installation of laminate on the walls will allow you to better understand the specifics of this work:


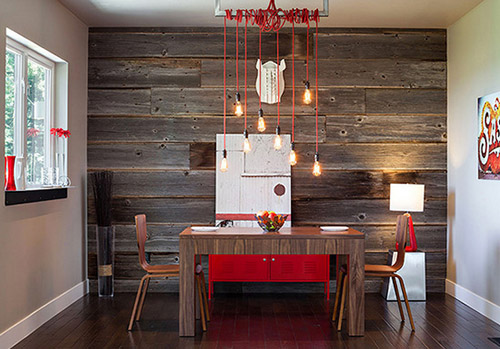
Laminate on the wall: photo
Finally, we suggest you look at the original laminate on the walls in the interior. Different colors, textures and laying methods allow you to create unique images and emphasize the advantages of the premises.


