
The arrangement of the roof of the house consists of several consecutive processes. The initial work on the creation of a frame is distinguished by a large volume than the final stages of design - the installation of drainage, snowplows, protrusions binder. At the same time, it is these roofing elements that protect the facade of the building from destruction.
Content
- Why do you need a stitching of the raids?
- How to make a bunch of roof protrusions yourself?
- Types of preparatory work
- How to choose a material?
- Selection of the flow technology
- Preparation of Stropil
- Preparation of walls
- Selecting the type of ventilation
- Tools and materials
- Technology binder protrusions
- Conclusion
Why do you need a stitching of the raids?
The stitching of the oops of the roof is performed not only for creating protection, but also for the purpose of decorative design of the building. 
The advantages that this method gives the roof design:
- completeness of the appearance of the design
- regulation of the heat insulation level indoors
- obstacle to the constant impact of atmospheric precipitation on all external building design elements
- regulation of a favorable microclimate indoor.
Important! It is recommended to hebify all the available skes of the roof, regardless of the type of roof design, the angle of inclination and the size of the protrusions.

How to make a bunch of roof protrusions yourself?
The process of direct swing binder is extremely simple and accessible to fulfill its own. But in order to create a truly proper level of protection, preparatory work will be required in the process of creating a roof frame. Therefore, if you decide to complete the foil of the roofs with your own hands, we assume to fulfill all the necessary work responsibly. 
Sequence processes
All types of work can be divided into two stages:
- Preparatory processes
- Installation of the protective layer of the protrusion.


Types of preparatory work
The pre-work process is sufficiently long and includes several concepts of various focus.
We highlight the main groups:
- Selection of material.
- Selecting the technology of the binder.
- Select the type of ventilation.
- Preparation of walls.
- Preparation of rafters.
- Preparing tools.
How to choose a material?
Often the main criterion of choice becomes the material used to create roofing flooring. The price of the cover of the roof overflows directly depends on the type of material and the size of the roof. In addition, the strength characteristics and duration of life are taken into account.
Lining
The lip cover of the lines of the roof is the most popular option for design from sawn timber. It is used for the arrangement of ledges of the houses from the tree, and when using other materials. 
In the process of choosing the lining, be sure to pay attention to the following details:
- Wood quality. Be sure to check all the boards for the presence of defects in the form of bitch, cracks - this material is not suitable.
Important! It is better to acquire "Ecstanding Cold", it is made with a thorough process of rejection of an unsuitable material and exposed to a proper drying.
- Humidity. The standard indicator should vary in the range of 30-40%. Check the level by a special device - moisture meter, which is usually present from sellers of sawn timber.
Important! Since the process of operation will occur in the conditions of an external environment, to set up at least a month on the street all the wood bars. It lines the level of humidity of the boards to the most optimal and will help prevent their deformation.
- Wood breed. Stop your choice on more durable views with a high resistance to rotting. An excellent option will be larch, spruce. More economical, but with good indicators - pine.
- Dimensions of boards. Give preference to sawn timber, the thickness of which is at least 15 mm, the length is adjusted to the outlet length.
Important! Considering the need for slats, the length of which varies standard from 5 to 25 cm, consider the purchase option of short plates of the corresponding parameters. This approach often saves.

Proflist
Sheet profile material will be an excellent option with increased speed strength requirements. Most often, for this purpose, corrugated steel sheets are used, galvanized or polymers treated. 
When choosing this material, pay attention to:
- Surface quality. It should be smooth, smooth, without defects in the form of chips, scratches.
- Color matching. The shade of all sheets of one tonality of color should not have explicit differences.
- Wave height. Waves of the material will provide the necessary ventilation, but quite enough will be a small difference. Large waves are not suitable for decaying the overlooks of the roof of the roof of the roof, they will contribute to the constant getting of atmospheric sediments inside, causing the destruction of the framework of the frame.
- Ease. His attention is paid to professional flooring, thickness from 0.55 to 0.8 mm. Sheets with large parameters will have respectively and greater weight, which will deliver inconvenience when installing and create an additional load on the frame elements of the roof.
- Length sheet. This indicator may vary up to 6m, which allows you to select the desired length and install not from small panels, but a larger element corresponding to the length of the span of the sink.


Important! When choosing a professional flooring, consider that the cutting material will have to produce independently, which will require additional costs of time and special equipment.
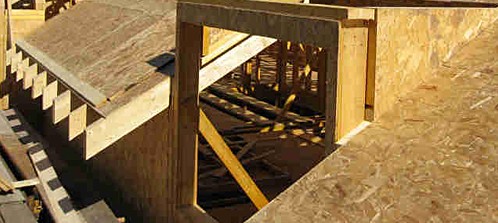
OSP and plywood
This type of sawn timber is financially very affordable, and in addition, it has high strength characteristics. Such advantages make it in demand when choosing a material for the decoration of the roof. 
Important! Consider, in the process of the production of chip sawdwood for connecting layers, manufacturers can use formaldehyde glue, which subsequently leads to the evaporation of harmful compounds.
What to pay attention to?
- Type of wood. Choose sheets of coniferous rocks, they have the greatest resistance to any effects of the external environment. Their main advantage is moisture resistance.
- Plate quality. Pay attention to the lack of material defects in the form of bundles, chips, other damage and deformation of the form.
- Brand When choosing plywood, use only FSF brand, it is it designed for exploiting outdoors.
- Material thickness. To perform work on the arrangement of the roof, plates are most often used with a thickness of 9-10 mm. These parameters ensure the reliability of the design.
Important! As with the use of professional flooring, in the case of the selection of this material for the design of the protrusions, it is necessary to perform independent cutting parts of the desired parameters, which, in principle, is easily fulfilled.

Sofita
Sophytes will lay out in a separate group. This is a ready-made set of necessary parts for designing protrusions from different materials: metal, plastic, copper and even wood. 
Such material is very convenient, as the preparation and installation is extremely simple.
Main selection criteria:
- Dimensions. It is impossible to provide any recommendations for parameters. Make a choice yourself, according to the width of the sink and the length of the span of one side of your roof.
- Color palette. The current market provides a fairly wide range of sophisticated shades. This will allow you to make the right choice more suitable in stylistic terms, based on the principles of the color ratio of all structural elements.

- Perforation. The type of perforation depends on the place of installation of sofits. Solid panels can be applied to form a fondon sweep.
 Partially perforated are suitable for binder cornices, fully perforated parts of the Sofita set are used to design any type of protrusions.
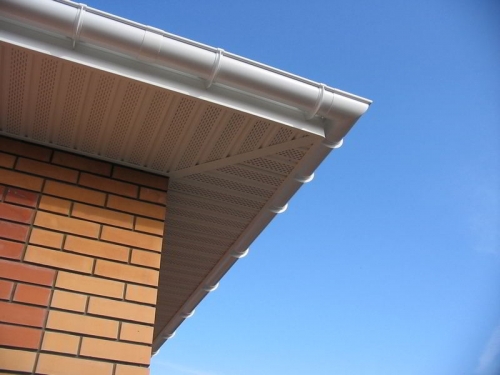


Selection of the flow technology
Distinguish two main technology options:
- on rafalines
- creating a horizontal box directly under the protrusion.
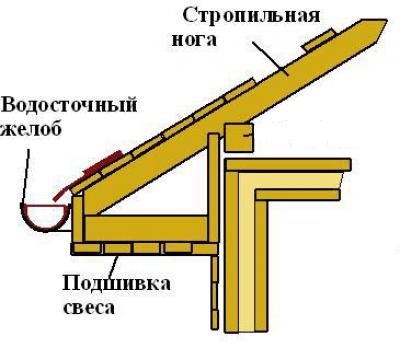


The main criterion of choice is the angle of inclination of the roof. For a gentle roofing, the first option is used, and for the holmova or with the presence of a steep slide - the second. Carefully view the circuits and photos of the cover of the roof overns in order to more clearly imagine the process of designing protrusions. 
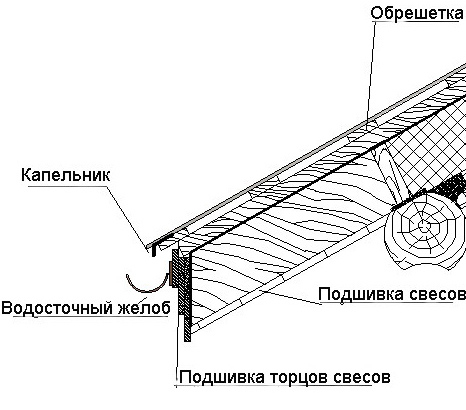
Preparation of Stropil
Depending on the selected method of the future design of the protrusion in the process of cutting wood and mounting a frame, prepare rafters.
To do this, do the following:
- Plan a length of the rafter by 30-50 cm more.
- Form when installing the protrusion corresponding to the selected size in paragraph 1.
- When cutting material, process the ends rafter accordingly:
- scroll vertically - to cover protrusions on rafters
- two cuts - vertically and horizontally - when creating a box.
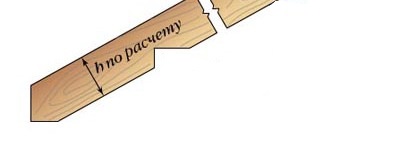
Important! If you decide to increase the width of the sink before installing - lengthen the rafters with additional bars - "koblok".


- Align the sink line.
Preparation of walls
The prerequisite for arranging the projections of the roof is the presence of insulated walls. The fundamental difference in pre-finishing is the absence after the binder of the gaps, which will pass moisture and air. If you perform the insulation of the walls after - regardless of the type of material, it will not be possible to achieve the desired result due to the availability of free space. 
Selecting the type of ventilation
The prerequisite in the design of the protrusions is to create a ventilated space under the casing material. This is necessary in order to prevent moisture accumulation and the subsequent rotting of the main carrier elements of the roof design. The choice of technology depends largely on the type of material.
Distinguish two ways:
- Creating gaps between switches.
- Installation of ventilation grids in the panel at equal intervals (this method is greater popular).


Important! When choosing SOFITS, this issue is solved much faster and easier, as there are models with already ready perforated, as mentioned above.
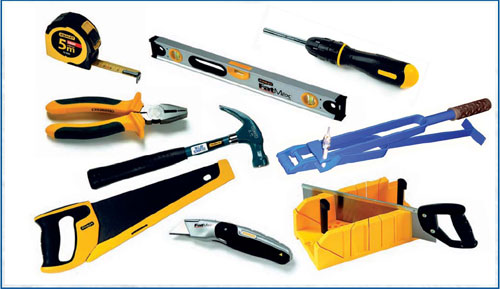
Tools and materials
Prepare all tools by checking with the following list:
- material for binder
- saw
- drill
- bulgarian
- hammer
- screwdriver
- level
- ladder
- measuring device
- fasteners: screws, nails, selflessness
- antiseptic solutions for processing of the hearing material
- cord
- paint, suitable type of material.

Technology binder protrusions
Installation in the rafali
Sequencing:
- Make the material cutting in accordance with the parameters of the protrusion.
- Treat all elements by antiseptic solution to increase the protective properties of the material.
- With the planned staining of the details of the binder - do the following before installing.
- Check out the surface of the surface of the rafter.
- Align them with additional boards by installing the brass.

- Fasten with nails or screws.
- Mount the extreme planks from the ends clearly along the sink line.
- Fasten with methms corresponding to the type of material.
- Tension cord.
- Install all subsequent elements of the binder, focusing on the line on the cord.

- To withstand the gaps between the panels of 5-10 mm, taking into account the stretching of the material under the influence of weather conditions.


Creating a hearing box
Sequencing:
- Perform cutting and pre-treatment of material with antiseptics and paint solutions.
- Install and secure the board at the bottom line of the rafter.
- To the wall, fasten the timber for 1 cm above the front board.
- Mount the sequentially all the elements of the binder, connecting one end with a ram attached to the wall, and the other with the board installed on the line lines.

- Alternate the panels with ventilation grids at an equal interval or leave a gap between the fusion fragments at least 2 cm.

- Fastening with screws, corners, profile plates.


Important! When installing long boards, make at least 3 mounts to prevent deformation.
- To design the corners, install the details on both sides of the rafter or mount the plafhmy.
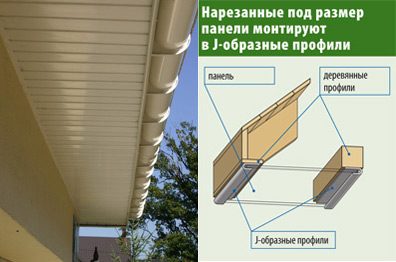
Mounting technology Sofitov
The process of installation of sofits is very simple, but, nevertheless, carefully examine the instruction pre-instruction to ensure the creation of a reliable coating.
Sequencing:
- Prepare the material by cutting in accordance with the width of the sink.
Important! If the protrusion width exceeds 45 cm - install in the middle horizontally an additional bar.

- Make the markup of the fastening line on the wall.
- In order to ensure the smooth attachment and strength of the structure - attach the board along the length of the speaker on the wall.
- To the rafters, also attach rapid bars along the horizontal line to which the sofite panels will be fastened.
Important! For the installation of softees of rafters in the process of preparatory work, cut vertically and horizontally.
- On the board attached to the wall, set the F or J profile.

- Connecting machines.
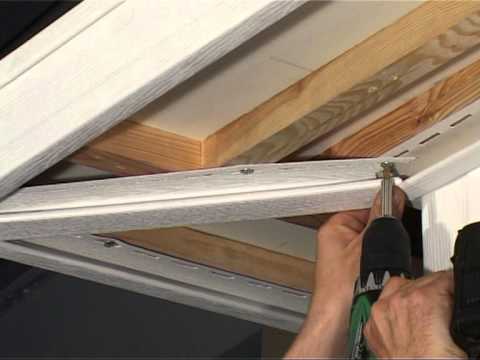
- Insert alternately panels in the profile on the wall.
- Find the opposite side to the substropsy bar or secure another j (f) -panel.


Important! If there is an additional plank in the middle with a large width of the sink, perform an additional fastening, connecting the ram with sofita screws.
- After installing the sofit panels, set the L-profile overline, closing the edges of the panels and rafters.


Video
View the video of the sinks of the sleeves of the roof sofita to more clearly understand the entire process.
Conclusion
Regardless of the selected material and technology, comply with the rules of installation. This will provide an appropriate level of strength of the structure and an attractive view of not only the roof, but also the whole building as a whole.


