Spring is not only the time of renewal of nature, but also a hot rustic field work, which begins, as a rule, from extinguishing seeds into the ground. The occupation is quite painstaking and complicated in physical terms, as it forces a long time to be in an uncomfortable posture, bent, which causes back pain. But today there is a way to solve this problem, and the name to him is a smooth seeder.
Content
- What does a manual seeder and its main tasks look like
- What you need for the manufacture of the simplest hand seeder do it yourself
- Mastery the simplest seeder of 10 steps
- Principle of operation, advantages and disadvantages of using the simplest hand seeder
- Technology manufacturing universal mechanical seeder
- How the mechanical universal seeder works, its advantages
- Seeder do it yourself. Video
What does a manual seeder and its main tasks look like

Of course, there is nothing easier than buying a seeder in a specialized store, but much more economical make it at home yourself. Moreover, what to do is not so difficult. The seeder in agriculture must comply with several basic requirements:
- it should evenly suck seeds in rows and beds;
- severe seeds seed should be made at a certain depth of soil;
- thanks to the use of the seeder, the rectinity of the series and the specified aisle are reserved.
The scheme of the seeder is quite simple, although it can be varied by some details and additions made on the basis of personal needs. It consists of a homemade seeder from the tank for seeds planted on a long handle. Very often, it is complemented by a small metal device, resembling a chopper, allowing to fall asleep earth. The seeders are single-row and multi-row, calculated on sitting on several smooth beds. In this case, several seed tanks use. More complex and intricate models consist of a box for seeds, a tagged shaft, brushes for the preservation of seeds from damage and deformation and adjustment of sowing, handles, wheels and couch. However, their device is quite complicated and not to make it at home. Let's look at how to make a seeder, on the example of the simplest, single-row manual seeder and a more complex mechanism designed for different categories of seeds.
What you need for the manufacture of the simplest hand seeder do it yourself

For the manufacture of a seeder with their own hands, it is best to prepare in advance and have the following materials at hand:
- plastic seed reservoir, or a common flat plastic jar, for example, from under fish or mussels. The use of the plastic jar is convenient because of its transparency, which allows you to see and control the presence and number of seeds inside, and because of its ease;
- a bolt that will perform the feature of the axis on which our jar with seeds will rotate in the process of movement in the garden;
- the trim of a plastic pipe, in length, corresponding to the depth of the can;
- trimming a metal tube, a diameter of a little less plastic;
- two washers for fixing the jar;
- metal cans from under canned food (or part of it) for the manufacture of a door covering the window for filling inside the jar of the required amount of seeds;
- a piece of aluminum wire;
- wooden handle convenient for you length;
- a piece of metal for the manufacture of improvised chip, or couch.
Mastery the simplest seeder of 10 steps

Our product is quite simple. However, in order to avoid unnecessary difficulties in the process, we will try to describe all the work on the manufacture of a manual seeder with your own hands.
- Memind on our plastic jar and celebrate the center. Directly in the center carefully drill through the through hole. The stability and performance of the entire device depends on the accuracy at this stage of the assembly.
- Remove the lid. We take the side from the end-to-end one more small hole of the triangular shape required to frink inside the seeds.
- In order for the seed drill in the process of the seeder, the seeds are not poured, an improvised valve is cut out of a metal tin can, the size of a little greater than our opening hole for seeds. It will perform the role of the lid.
- We fix our valve with the help of aluminum wire so that it is possible to open and close the seed backing window, rotating the valve there and here.
- In the center of the banks put the cutting of a plastic drainage pipe. This will prevent the seed rash while working, on the one hand, and on the other, it will not give the bank to shrink inward when tightening the bolt.
- Insert our cutting pipe into the plastic tube. Now we have made a kind of bearing, thanks to which the jar of the tank will be able to rotate freely when moving forward.
- Now in the metal pipe you can insert a long bolt and tighten it with a nut, pre-locating on both ends the jar of two washers. This will provide our seeder to rotate freely when driving.
- With the side of the bank we make a pencil label at a distance of approximately 3 cm from each other. Pre-split nails make holes. When choosing a nail, it is important to take into account the size of the seeds, which is calculated by our seeder. With small holes, large seeds will be stuck, and with large holes too small seeds will wake up. This main part of the work remains behind.
- Handle cheroids. We drill a hole for the bolt at the end of the wooden handle selected wooden handle. Now we are screwing it with our improvised seeder.
- It remains to take care of the backfilling of land seeds after seeding them into the ground. This will allow you to further automate the sowing work and reduce physical exertion on the garden. To do this, cut a piece from a piece of metal, in shape resembling a church. Bend it a little to him can rake the earth. Then I fix our chopper on the handle a little above the bank.
All, manual single row seeder is ready for use in agricultural work.
Principle of operation, advantages and disadvantages of using the simplest hand seeder

The principle of operation of the hand seeder is very simple. We make a ripper in the ground a furrow, as with the usual seeding of seeds. Then insert our seeder into this furrow and start moving forward. The seeder rotates, at an equal distance of living seeds. And the fixture in the form of a chopper immediately falls asleep sowing ground, eliminating the gardener from this part of the work too. As you can see, there is advantages from such automation of the process. First, the seeder with their own hands saves strength and time to sitting in large areas. Secondly, it saves also seeds. A reservoir made from plastic bank allows you to see and monitor the presence of seeds in the tank and their number. Without a doubt, this is a very useful invention, adapted for manufacture and use in almost every farm. The undoubted advantage is ease of manufacture and use, as well as the availability of consumables. However, there is a significant disadvantage - this seeder is designed only for one size of the seed, which makes it unsuitable for sowing all the others. Therefore, in order to be high quality and fast, and most importantly, economically, falling on the garden, you have to make several such seeders with different diameters of the holes on the side of the product. But a more complex model of a seeder model successfully performs this condition. Therefore, consider another model of the seeder.
Technology manufacturing universal mechanical seeder

The complex process of creating a universal mechanical seeder can also be divided into several steps, stopping in detail each of them:
- For the manufacture of the main working mechanism - the sowing shaft - it will take an aluminum tube with a diameter of 28 mm. It dries three rows of holes of different diameters. Each row corresponds to the diameter of certain seeds. 1 row has in diameter of 4.5 mm and consists of 8 holes. It is intended for sowing parsley, carrots, salad, sorrel and similar cultures. 2 row contains 16 cells of 5.5 mm, designed to extend to the ground of the bow. 3 rows are 5 holes with a diameter of 8.2 mm used to land larger seeds, such as peas, dining beds, for example. To select row sowing shaft is moved horizontally relative to the seed hopper.
- Go to the manufacture of a tank for seeds. To do this, we use a galvanized steel sheet with a thickness of 0.5 mm. This is a box of 80 for 70 mm and a height of 40 mm. The lower part of it, intended for transmitting seeds into the sowing shaft, is made in the form of a truncated trapezium with a small opening from below. All junctions of the seed bunker are carefully sealed. Next, the bunker is attached to the frame frame with two M5 bolts and the screw M6, which is also a mold for a brush. The brush is located at the bottom of the bunker. With it, it is regulated by the density of sowing. It is done by moving the brush up or down in relation to the sowing shaft.
- For better visibility and control over the number of seeds in the bunker, the cover is performed from the plexiglass. It is intended to protect seeds from scattering or blowing. The cover is attached to the front of the hopper by means of a furniture loop (both on the doors), and is equipped with an eccentric snatch for fixing in a closed state.
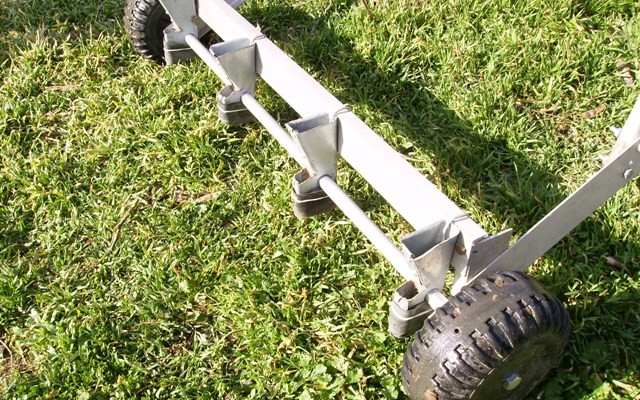
- Frame of the seeders perform from sheet steel 2.5 mm thick. Its size is 78 by 85 mm. The length of the side parts is 90 mm, and in front and rear is equal to the length of the seed bunker, that is, 40 mm. In the lower side parts, holes with a diameter of 28.05 mm for bearings are dried, in which the sowing shaft is inserted. A bracket for the handle of our seeder is welded to the front of the frame.
- In the manufacture of a coulter, a sheet of stainless steel is 0.8 mm thick. The couch is attached to the frame with two bolts M5. Its length is 90 mm. The couch will bend down the center to formed a kind of yellow, which does not allow the seeds to fly out when disembarking, and occupy a strictly defined place in a row on the garden.
- Another component of the homemade seeder is definitely wheels. Take ready-made trap wheels. The axis is also served by our rotating sowing shaft.
Here, in general, that's all. Mechanical universal seeder with their own hands is ready. It remains only more details to consider the principle of its work.
How the mechanical universal seeder works, its advantages

We make longitudinal furrows on the soil, defining them the place for future beds. Configure the seeder by choosing and fixing the row on the sowing shaft and moving the brush. I fall asleep into the bunker seeds and close the lid by fixing it with a snatch. Then we put the seeder with both wheels on the furrows and begin the forward movement forward. This allows the soul to evenly lake the land to the desired landing depth. You can adjust the depth of seeding seed into the ground, by turning the handle of the seeder up or down. The most optimal depth of planting 2.5-3 mm is achieved when the transparent lid of the bunker is in parallel to the ground. As we see, all the basic requirements for a homemade seeder and listed at the beginning of the article are performed. The advantages of the universal mechanical seeder are simplicity in operation, greater coverage of work due to several rows on the sowing shaft, economy in relation to seeds and time on their sowing. The disadvantage is a rather complicated assembly mechanism available not to everyone.
It becomes clear that the first examined version of the seeder is more rational to use everything on small gardens or country areas. For more significant areas of crops, the advantage should be given, of course, the mechanical universal seeder. Moreover, such a type of seeder will be successfully replaced by several simplest homemade devices. But, despite the disadvantages of both options, it is clear that the seeder is an excellent device that allows you to make a heavy work of the garden is much easier and more efficient, and the garden in the garden is perfectly straight and evenly cleared, which will make it easier for the further works of the agricultural worker on weeding and harvesting.


