A disc electric saw or, as it is also called - circular saw, is an indispensable tool for those who do or plan to engage in woodworking works. Currently, a wide range of models saw under different circle diameter, with a different frequency of rotation of the shaft and the power of the electric motor. One of the main advantages of manual disc electronized is its mobility. If necessary, it can be transported to any place of work, which is very important when providing professional repair services. However, in the case of a large volume of the material being processed, the mobility of the hand saw turns into its main disadvantage. To produce a lot of operations, keeping in your hands is not quite light and working tool - the pleasure is not pleasant.
Content
For large volumes, it is advisable to install the disk saw on the table. Thanks to this, it will be fixed, and the master will be much more convenient to work with two hands. On a flat surface of the table, you can more accurately produce board, sheet of plywood, while not using additional efforts. The table for circular saw can be made with their own hands. Minimum time and stand for the saw will be ready. The advantage of the design of the table is that the saw if necessary, it is easy to remove and apply as manual. How to make the table with your own hands for a circular saw - further in the article.
Design design options for circular saw

With the seeming complexity, make a table for circular with their own hands, will not be much difficulty. In industrial conditions, the workbench for circular saws is made of metal. Such tables are quite strong and can withstand the workpiece of any size. However, for the manufacture of such a table, welding skills are required and the presence of appropriate equipment. That is why most often at home such products are made of wood. The size of the circular table depends on the purposes of its use and the size of the room in which it will use. In order to dismiss the sheet of plywood without any problems, the table should be large, if such works are not planned to do with the mini-table.
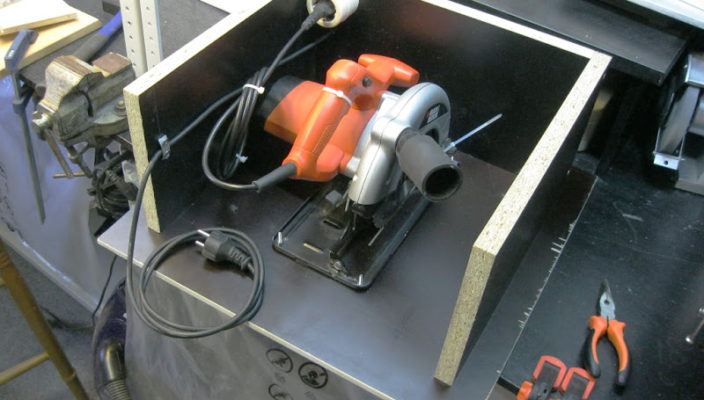
Some masters make not a skeleton table of wood with their own hands, and a small box, inside which a manual electric saw is placed. The advantage of this option is that all driving and electrical parts are hidden in it. Of the flaws, it is possible not to be noted too high product reliability.
The most popular table for manual circular saw is wooden workbench. To its advantages include the following:
- Easy design. The table can be fully assembled with your own hands in one day at the minimum time spent.
- Cheap Materials. Segments of timber, boards and a piece of plywood can be found in any farm, and if not - inexpensive to buy in any store building materials.
- Ease of use. Unlike steel welded structures, the wooden table can be disassembled and left on storage. For cutting a large number of one-type parts, as well as the cut at a given angle on the surface of the table, the guides are installed.
Washing table for circular saw with your own hands

The initial stage of manufacturing will be the diagram of the table with their own hands. Naturally, it is not necessary to make it in detail on Watman with all the requirements of guests, but a schematic pattern will help determine the amount of material required for work, and evaluate the operational characteristics of the future product.
After the drawings are ready for the tables with their own hands, you can begin preparation of the material. For the manufacture of a simple table for the circulation saw will need:
- Plywood sheet for tabletop manufacture. For these purposes, laminated plywood will be the best option. By its grinding surface, the blank will be better sliding. Yes, and the service life of laminated plywood is much longer than the usual, though it costs it more expensive. When using a conventional material, it will be necessary to open it with several layers of varnish. The material thickness must be at least 20 mm.
- The board is stranded, 50 mm thick and 100 mm wide for the manufacture of rigid ribs.
- Bar 50x50 mm for the manufacture of legs of the table.
- Fasteners: bolts, nuts, washers, self-tapping screws, waders.
- Power tools: Drill, screwdriver, Mill, Electric circular saw, Electrolovik.
- Materials: carpentry glue, varnish.
- Clamps, ruler, square, pencil.

Procedure for work:
- The first stage of work will be the preparation of countertops. From the sheet of plywood, the workpiece of the required sizes is pushed. Its dimensions depend on the workpiece of the workpiece and the area of \u200b\u200bthe room, where work will be carried out mainly. Naturally, the larger the surface area of \u200b\u200bthe table, the more convenient it works on it, however, too cumbersome table can be a hindrance in work.
- After the markup of the sheet of plywood, the tabletop is cut with an electric bike. The edges of the finished countertops are processed by a mill (chamfering).
- Now you can make marking on the installation of the saw. One of the parameters of the circular hand saw is the height of the cut. As a rule, it is 50-70 mm. It is such a workpiece that she can cut over one pass. However, this height is indicated taking into account the distance from the tool soles. When fastening it to the table, the cut height will decrease on the thickness of the table top, and this in turn is minus 20 mm. This fact will seriously reduce the productivity of the tool. That this does not happen, on the reverse side of the tabletop within the borders of the saws make a recess with a thickness of 10 mm, forming a landing place. You can simply apply it to the sole to the surface and encounters it with a pencil. True, for this you will have to remove the disk.
- After the boundaries are defined, you can make a sample with a mill. Having finished the process, you can attach a saw to the landing place and check the correctness of the landing. If there are any deviations, the landing site needs to be finalized. Next, on the holes in the sole, it is necessary to outline the places for the installation of fastening bolts.
- Then, in the position of the passage of the disc, the saws is made through the groove, and with a drill - through holes for the installation of bolts. From the back of the hole, the holes are drilled under the diameter of the head of the fastening bolts, so that the latter is "in Putoy". After installing the bolts, the holes can be pouring the glue, sharpen and sand. In this case, if necessary, the saw can be simply removed or put in place.
- After working with the worktop is over, you can start the installation of rigidity ribs. For the board, they are connected around the perimeter and are attached with the help of wood screws. Internal corners of the design can be enhanced with a furniture corner. Before assembling the base of the table, all the boards must be processed using a planer to achieve a perfectly smooth end. Otherwise, the countertop will be installed with distortion.
- The tabletop is attached to the frame with the help of glue and waders. Holes for the seasons are coated both in the frame and in the tabletop. Before installing the fastener, a little glue is poured into the hole. Also glue is applied to the ends of the frame in the connection places with the tabletop. After installing the latter, it is pressed against the frame using clamps and is left to completely dry the glue. While he is not completely dry, it is necessary to carefully remove his surplus.
- While the glue dries, you can proceed to the manufacture of legs. For this, 4 identical bars are cut out, which with the help of bolts are attached to the table frame. In order to damage the bolts when tightening the bolts, the washers are installed under their heads and clamp nuts. On the installation of each leg will leave 2 sets of fasteners.
After the background assembly is completed, you can install a circular saw.
Installation of the guide plate on the table on the ambulance hand

In order to be more convenient to cut the details of the same sizes, a movable guide of the plank is installed on the surface of the table top. It can be installed and fixed at a certain distance from the circular saw disk, thereby adjusting the width of the cut. As a plank, a simple aluminum corner can perform.
In order for the Planck to calmly walk on the surface of the table, two parallel grooves on the tabletop. This uses a special cutter. The grooves are chosen in such a way that the head of the bolt included in it, and the latter calmly walked in it. At the same time, the bolt should not fall out of the groove. In the guide bar, the holes under the bolts with which it will be pressed against the surface. Now to move it, you can make a nut on the bolt, and fasten, tightening it.
Electric equipment Circular
Another task that is necessary to solve will be the electrification of the circular. The fact is that, like any hand tool, the switching button is on its enclosure. When it is installed at the bottom of the table surface, the button will be out of the reach zone. You can solve this problem in two ways: quick and right. In the first case, the button is simply clamped with a plastic clamp, and the shutdown is carried out by pulling the plug from the outlet. It is not entirely convenient, as it is eliminated to turn off the tool in an emergency.
The correct way is to install on the button on-shutdown buttons, as well as a plug outlet. The voltage to the socket is supplied only when the button is turned on. When removing the circular, its plug will simply need to be removed from the rosette on the table housing. When working on electrification of the table, it is necessary to qualitatively insulate all the elements of the chain so that when working does not hit the current.
Table for circular saws do it yourself: photo


