
Currently, the market of materials for the repair of own housing is overflowed by abundance of finishing fittings. It is imperative to choose the material that meets high standards and will ideally fit your taste preferences. This rule also refers to the choice of flooring. Among the entire variety of finishing materials, the ceramic tile deserves special attention - the tile, which has long been occupied by one of the first places in popularity in consumers. She acquired his demand due to high operational and physico-technical characteristics. Laying the tile on the floor is an equally responsible process than the purchase of material, since the appearance of the interior directly depends on the quality of finishing works.
Content
- Advantages of floor tile
- Floor Cafe Choice Rules
- How to choose tiled glue?
- Promotion of the tile
- Counting of the flow of adhesive for floor ceramic tiles
- Facing sequence
- Materials and tools
- Preparation of the surface
- Base markup for tile laying on the floor
- Laying the tile on the floor do it yourself
- Video
- Conclusion
Advantages of floor tile

Speaking about such an outdoor material like a tile, it is easy to highlight a number of advantages with which it possesses:
- high strength and wear resistance;
- the widest range of colors, patterns and patterns;
- acceptable pricing policy;
- durability of use;
- resistance to mechanical damage;
- environmental friendliness;
- compliance with fire safety standards due to the absence of a flammability;
- practicality - wash and clean the tile by any means.
Important! The only one, but not particularly substantially disadvantaged outdoor tiles, highlight the complexity of the tile laying on the wooden floor. But even to master it with every homemade master.
Floor Cafe Choice Rules
So that the floor ceramic coating light up as long as possible, go to the selection process. Take into account the full feature complex, including the cost of the collection - the price of the tile laying on the floor will depend on it. 
Initially, pay attention to the class of the tile, the choice of which directly depends on the place of installation:
- Grade 2 - an ideal option for a bathroom or toilet;
- Grade 3 - It is recommended to lay in the corridor or in the kitchen;
- Grade 5 - Designed for laying on the balcony or outdoor terrace.


Other selection criteria:
- Frost resistance. This factor will certainly keep in the case of laying material on open areas or terraces.
- Water absorption. This indicator plays an important role in choosing ceramic tiles for shower, sauna, bathroom, swimming pool, where there is a high level of humidity. The smaller the absorption coefficient, the chance for a more humid premises the tile.
- Resistance to the effects of chemical warehouses. Since the tile during operation often will often have to wash and clean, then give preference to the material, with the highest level of stability.
- Slip degree. For the design of the floor in the bathroom, shower or sauna, give preference to tiles with the highest indicator so that during operation you do not slip on the wet surface and have not caused injuries.


How to choose tiled glue?
As already mentioned above, the quality of the floor covering made of the tile also depends on the glue. When buying a mixture for adhesive solution, consider the following set of criteria:
- The principle of use and type of adhesive composition. In this category, solutions are distinguished for exterior and internal works.
- Size of tile elements. Carefully read the marking on the package with the mixture, on which it should be indicated for which tile is suitable for this type of adhesive mixture.
- Stacking speed and degree of professionalism. This indicator is directly related to the component composition of glue.
- The type of foundation on which the installation of the tile is allowed - wood or concrete.
- Conditions for further operation.

Important! If you decide to make a tile laying on a warm floor, then definitely check with a consultant when buying a mixture, whether it is suitable for this purpose.

Promotion of the tile
Calculation of tiles for floor covering is a very responsible process. In advance, a certain amount of material will help to avoid re-visiting a construction store and overpayment for unnecessary surplus. 
Important! When buying a tile, add 10% to the main amount, as this is a standard material overrun due to the allowable marriage or split tile when transporting.
To determine the number of items to cover your sex, follow these actions:
- Remove the measurements of the area of \u200b\u200bthe processed room and the size of the tiles you like. For example, the size of the bathroom is 4 m2, and the width and height of the tile of 40x40 cm.
- Perform the calculation of the area of \u200b\u200bone element of the tile: 0.4 * 0.4 \u003d 0.16 m.
- Calculate the number of placing tiles: 4: 0.16 \u003d 25.

Important! If the final figure is not a whole value, then it will round it in a large side - this will be the amount of solid tiles required for the design of the room.

Counting of the flow of adhesive for floor ceramic tiles
To correctly calculate the required amount of glue, follow these steps:
- Calculate the surface area for facing.
- Consider the average solution consumption: 1.4 kg per 1 m2 with a layer thickness of 1 cm.
- Perform a mathematical action: the thickness of the layer * area of \u200b\u200bthe room * the amount of flow.
Important! When counting the amount of glue mixture, consider the quality of the prepared base, since there is a possibility of additional flow to align the surface.

Facing sequence
Before proceeding with finishing work, read the sequence of the steps that you have to follow:
- Preparation of a set of tools.
- Preparation of the base on which the installation of tiles will be installed.
- Laying the material.
- Sealing seams.


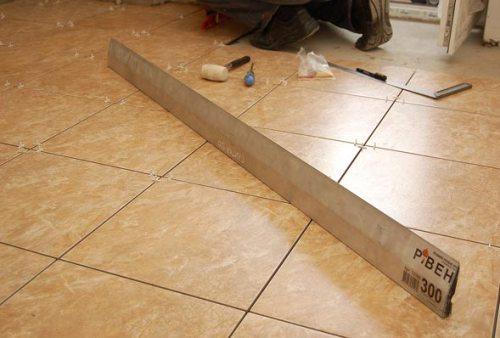
Materials and tools
The whole set of materials and tools prepare in advance so that in the process of work you have no inconvenience. This list includes:
- hammer;
- building level;
- drill or perforator with a nozzle mixer;
- rubber cizyanka;
- ruler;
- painting tape;
- seams;
- nails;
- caudena for a kneading solution;
- platecores, glass cutter or other tool for cutting tiles;
- silicone or rubber spatula;
- spatula with teeth;
- putty;
- primer;
- silicone sealant for seaming seams;
- tile glue;
- ceramic tile;
- grout for seams.


Preparation of the surface
- Eliminate the remains of the previous tile material.
- Clean the surface from dust and small garbage.
- In case of detection of the unevenness of the floor, perform the screed.
- Wait for full dry drying.

Important! Full drying of the screed directly depends on the thickness of the created layer. To determine the drying time, make a calculation based on the formula: 1 cm \u003d 7 days. Taking into account this formula is appropriate in the absence of exceeding the thickness of the layer 4 cm.


Base markup for tile laying on the floor
- Calculate the center of the room is the middle of the width and length.
- From the central point, perform marking on 4 squares.
- Starting from the center of the room, in each of the squares, make the pattern markup.

Important! This method allows you to carefully make the floor with the right arrangement of the tropped tiles along the edges.

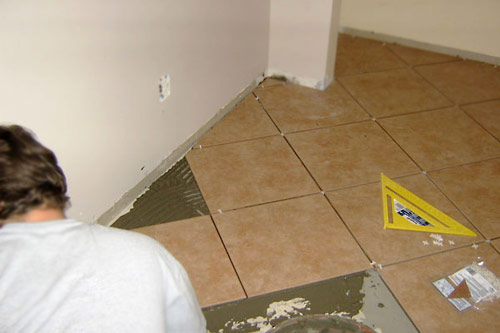
Laying the tile on the floor do it yourself
- If separate fragments of the tile have a different pattern or shade, first decompose on the floor to 2 m2 of the selected pattern.
- Mix the adhesive solution using a perforator with a nozzle-mixer.
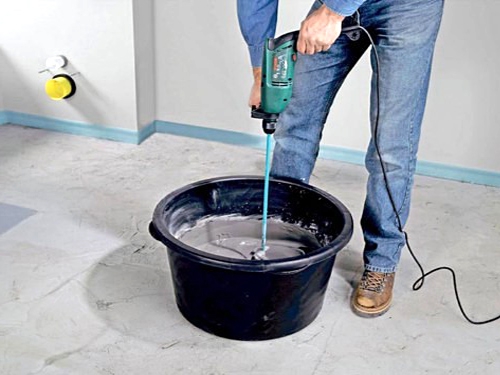
Important! Clearly observe the proportions and time of the mixing indicated in the instructions on the package.
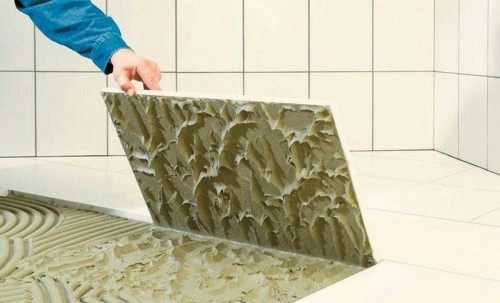
- With the help of a spatula with teeth, apply a solution to the surface of the floor or on the tile, if it allows the instruction on the use of glue.

Important! The deposit area of \u200b\u200bglue on the treated surface should be slightly larger than the size of the tile element.
- Installation Start from the center of the room.
- Place the tile, slightly flooded it into the solution.
Important! Control the power of the pressure so that the adhesive particles do not flow from under the tiles.
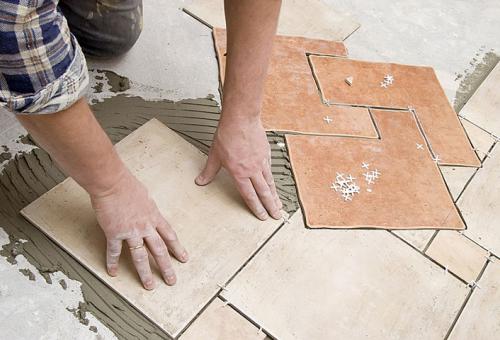
- Install crossings for seams at the edges of each tile element.

- Using the level, check the surface evenness.

- When detecting deviations, pick up the protruding elements of the rubber image.
- Installing all subsequent rows, regularly checking the quality of smoothness.
- Clean the interlocking seams from the excess glue.
Important! Wait for full dry drying.
- Remove crosses from seams.
- Cut the tile based on the size of the voids formed along the edges of the floor.
- Perform the styling of the remaining tile elements.

- Around the seams, cover the mounting tape to prevent glue from entering the tile surface.
- Sleep the rapid solution.
Important! In the premises in which a high level of humidity is assumed, for seaming seams, it is recommended to use silicone sealant, and not grout.
- All seams fill out the selected composition.

- Give a grout slightly to dry off within 20 minutes.
- Speak surface cleaning with a silicone or rubber spatula.
- Excess the culfoil mixture remove with a damp cloth.

- Remove the painting tape.
- Wait for full dry drying and polish the facing.
- Treat the tile with a special protective solution.


Video
View tile laying video to the floor to more clearly imagine the sequence of all work.
Conclusion
After fully studied the entire technology of performing tile laying on the floor, you will realize that the execution of this work is not so difficult. But that the ceramic coating lights up as long as possible, thoroughly hold all the rules and recommendations for the kneading solution and the installation of the material itself. The result will certainly surpass all your expectations, and the understanding of what you made an attractive interior with your own hands will bring additional comfort while relaxing in your own home.


