Among the various technologies of the floor, the wooden coating did not lose its relevance. The advantages of using this natural material are obvious: environmental friendliness, excellent thermal insulation and long-term operational period. Often, lags protrude as the basis for the wooden floor. Our article we will talk about how to put lags in a wooden house.
Preparation of the foundation
When installing wooden lags on a tree beams, it will not be necessary to carry out any additional work. The fastening of the material is carried out directly to the end part of the beams.
If the wooden floor device on the lags will be over a concrete base, the preparatory work is carried out in one of two ways:
- through the use of lining;
- by aligning the surface with a concrete screed or a sand pillow.

In the presence of an earth base, lagows under the wooden floor should be laid on brick columns. Preparation of the surface provides:
- failure of the sand pillow with a layer of 10-15 cm;
- fill the foundation for columns with a thickness of 0.2-0.3 m;
- roofing waterproofing material;
- masonry of brick columns;
- flooring the second layer of waterproofing.
Sometimes the reinforced concrete overlap is in the wooden house as the base of the floor. In this case, the preparatory stage involves the holding of sand and slag mixture. The base is thoroughly aligned.
Selection of material
Wooden lags should be dry and fit 2-3 varieties. The bar must have a cross section of a strictly rectangular shape. Width of lags Prak-tically twice the height.
When purchasing wooden lags, such factors are taken into account:
- room dimensions;
- the number of furniture indoors;
- type of floor covering;
- the probability of floor insulation.

The more the width of the room will be, the wider there should be lags in a wooden house. If the side of the room is 3 m, the use of a bar with a cross section of 15 * 8 cm will be the most optimal option. With a side of a room to 5 m, lags are used in size 20 * 10 cm.
When installing in a heavy furniture room, the minimum size of wooden lag should be 15 * 5 cm. For a more efficient load distribution, the lag mount can be carried out not only on the bearing elements, but also on one of the jumpers (they are placed in 1-1.5 m in checker).
The type of flooring affects the distance between the lags. Depending on the size of the board, the laying step pitch can be between 0.4 to 1 m. The most optimal is the indicator of 0.6-0.7 m.
The height of the lag is being done so that the heat-insulating material is placed between them without any problems and the ventilation gap is preserved up to 2 cm.
Mounting work
There are the following features of the device lag in a wooden house:
- the fixation of the bar is made as strong as possible (over time it should not shift);
- laying of wooden lag is carried out across the direction of sunlight;
- when performing installation work in the corridor, the lags are placed in perpendicular position to the input door;
- the timing is necessarily exposed to antiseptic processing;
- from the concrete surface of the lags are separated by waterproofing material;
- good air ventilation is ensured.

In most cases, the installation of the lag in a wooden house occurs on the ground. Let us dwell on this technology. After alignment and tamping, the Earth begin marking work.
First, the location of columns or other supports is determined to which lags will be mounted. If the base element will perform the bottom strapping bar, then the markup is carried out directly on it. When using a screened with a rubberoid, the markup is produced on the waterproofing material.
Marking is:
- conducting the lines of the folding thread (the location of the bar is determined);
- creating marks on each line (define the location of the fastening of the lag).
As a fastener for lag, the P-shaped bracket used for the installation of galvanized drywall profiles can be used. Their fixation to the floor occurs with the help of a dowel.
After the construction of the columns and cover them with sings of the runneroid, between the extreme parts of the opposite walls it is necessary to parallel the two fishing line. The correctness of their horizontal position is checked using a level. Perpendicular to the two fishing rackets are stretched by two more fishing racks, which will serve as a guide for laying lag.

The process of installing a bar is reminded by the technology of montage of lighthouses intended for fill concrete screed . The only difference is the fastening of the lag occurs with the help of brackets, and not cement mortar. It should be noted that when the device of wooden lag is immediately made an indentation from the wall in the range of 5-10 cm.
Installation of "Mayary" Lag is carried out near the walls. Immediately checks their location in the horizontal plane. Moreover, the parameters should be coincided not only with respect to the adjacent bruster, but also to the level of the base. The allowable height difference is within 1 mm per 1 m length of the lag.
Similarly, all lags are exhibited. The worst work will be the selection of lining. They will be needed for each bracket. Moreover, lining that is better to make solid can have different sizes. The specific size of each lining is determined by measuring the distance from the lower point of the lags to the surface of the draft floor.
After the manufacture of lining occurs, the final fixation of the lag, smoothly mounted in the horizontal plane. This uses the P-shaped bracket. His mustache bend up and with the help of self-tapping screws to be attached to the bruus. During the execution of this process, the lags with a small force are pressed to the floor.
If there are columns for mounting a bar, corners are applied. One side of the corner is attached to the column (dowels are used), the second to the lag (self-drawing).

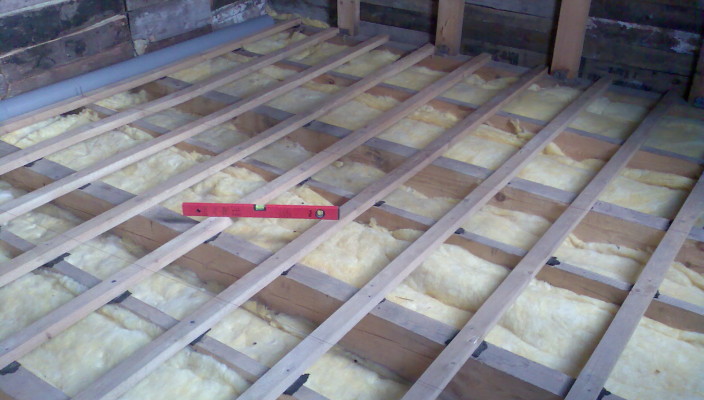
At the final stage of the installation of wooden lags, the space between them is filled with insulation. Mineral wool can be used as thermal insulation material ceramzit.
It is not recommended to use a polystyrene or foam, which make it difficult to ventilating the wooden floor. After the insulation of the floor, you can immediately begin the flooring of the finish flooring.
Useful advice
For high-quality installation, lag should adhere to a number of requirements. Here are the main of them:
- the humidity of the tree should not exceed 12%;
- it is not recommended to use the risen wood (susceptible to excessive cracking);
- it is forbidden to mount the timber to the wall;
- between the lags and the wall should not be wedges;
- in the case of cutting a bar, the docking of halves is carried out with a displacement;
- the smaller the structural elements, the lower the likelihood of the occurrence;
- when hardly fastened the lag to the floor, the soundproofing of the coating is reduced;
- when attaching a bar, only thick and long self-tapping screws are used (nails over time are shifted, which becomes the reason for loosening the lag).
Some experts offer lags not to mount at all to the floor. But this point of view is incorrect. After some time, wood will begin to marry, which will lead to an shear of the floor covering.
Video on the creation of a wooden floor on the lags:


