How to insulate the loggia with your own hands - many owners face with this question. Still in the past century in the 70-90s, on the loggia, it was customary to store everything that could ever come in handy. The habit of leaving unnecessary things for a long time "pursued" people. Now everything has changed and we want to get another small room in which you can make a cozy small room.
Content
Many people believe that the balcony and the loggia are the same thing. But these additional buildings have fundamental differences. Loggia is a slight deepening in the wall, acting outside the apartment. The room in most cases is radiant and open. Most often - it is 3 walls. A distinctive feature of the loggia from the balcony is that the balcony has only 1 wall, it is attached to it and is not protected from all sides. The loggia wins in its design - it is "drowning" into the outer wall of the structure, which greatly facilitates the work on the insulation of the loggia.
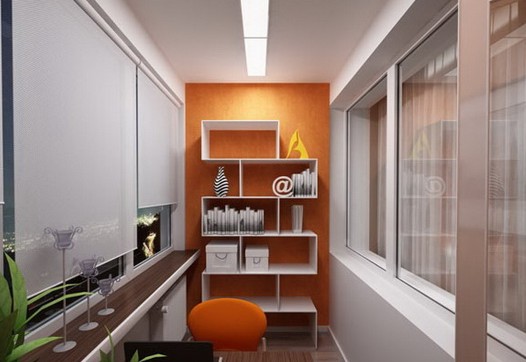
Each owner decides himself, how to deal with additional square meters of ownership. Someone uses the loggia to the storage room and the workshop, scoring it with unnecessary tools and old things (and suddenly something will be needed), and there are people who believe that additional space can be used to arrange another room. So, with the right glazing and warming of loggias, you can convert several square meters to a cozy job, rest, make a small gym, zone for children's creativity or turn a loggia in a winter garden. Depending on what the idea was born, you can make a cozy room from a small loggia, put the exercise bike, place a beautiful plants, put a small sofa or chairs, to build a folding table. No matter what you decide to make from the loggia, this part of the room must be inspired.
Loggia insulation materials
The main task of the arration of the loggia is the preservation of heat in the room, and therefore saving the family budget. To keep warm in the apartment, it is necessary to take into account not only the location of the loggia, but also what materials were used to build a house, how old he was glazed and glazed with your neighbors.
As a insulation, you can use any materials starting from popular and inexpensive, and ending with modern (for example, foamed material). Since the loggia most often has a small area, then to save the useful space, for the insulation of the loggia from the inside, it is necessary to choose light and fine materials. Work with a thin insulation (material width from 3 cm). In the event that the loggia is adjacent to the kitchen or room, then you need to choose a heater, a thickness of 3 to 5 cm.

Popular Materials for Loggia Warming:
- polystyrene foam or penurex - perfectly retains heat, and also has sound insulation characteristics. Width of the material - 5 cm, the penplex is easy to cut and lay. The material is durable, no moisture is afraid, it has an inexpensive cost;
- polyfoam is a popular insulation. The main advantage is low cost, low weight and thickness. Often, the foam is used as an alternative for the insulation of walls during the construction of houses, for the internal insulation of apartments. Of the disadvantages of foam, fragility and briefness can be distinguished. Due to the fact that the material absorbs moisture, after 5 years of operation, it can begin to deteriorate. The change of humidity and temperature affects the thermal insulation properties of foam;
- glasswater or Minvata - This material is widely used for the construction of residential buildings and insulation of premises. It has a lot of advantages, ranging from good thermal insulation properties and sound insulation and ending with durability and vapor permeability. It is also worth noting that both material are not lit, and the cost of minvati and glass gamble will be available for any family budget. In the installation, the insulation is characterized by the simplicity and ease of laying (the thickness of the layer from 20 mm to 2 cm), but despite this, during contact with the glass, you need to use special protection tools - respirator, gloves and work clothes. If you do not comply with the rules of laying the material and thoroughly clean all the holes, then when the Moisture of the Ministry of Service gets to deteriorate and lose its properties of heat conservation;

- materials with a foil layer (foam, foamizol, minvat, polystyolistrol). Popular material for insulation of ceilings, walls, balconies and loggias is also used in the construction of residential and industrial premises. On top of the insulation, there is a layer of metallized coating. The foil is a reflector of heat, when interacting with such a surface, the air will not cool. Laying an additional layer of waterproofing when the loggia is insulation and finishes will not need.
Photo of the insulation of the loggia:


Loggia insulation by penplex. Product specifications
The insulator from the foam is distinguished by a low cost, relatively low weighing and acceptable thickness. The foam itself is a short-lived and fragile material. Penoplex is a modern insulation made on the basis of foam. It does not absorb moisture and does not burn. The thickness of the extruded polystyrene is 2 cm. Withstands such thermal insulation material. Large loads.
The main advantages of the fastener:
- long service life;
- resistance to burning;
- environmentally friendly material;
- does not distinguish harmful substances;
- strength;
- does not absorb moisture;
- well keeps warm.
Make sure that the insulation does not absorb moisture so: take a small piece of the fastener and immerse it into the water container. Leave for a month. You will see that the material did not absorb water. The only thing to pay attention to this test is on the natural evaporation of water.

In addition to the above positive properties of the insulation, when choosing materials for the warming of the loggia, it is worth paying attention to the fact that the penplex is not a favorable medium for breeding fungus and other microorganisms. Even an inexpensive insulation of polystyrene foaming will be responsible to all the above requirements and have good strength. Polystone plates are able to withstand a permanent load of up to 6 tons per 1 m 2 And temporary - up to 20 tons.
When choosing this material for the insulation of the loggia, you can save space, as the Penoplex is considered one of the best insulation for balconies and loggias.
Warming of the loggia by foam. Product specifications
Penofol also refers to modern materials. The thickness of the layer is only 1 cm. The main component of the insulation is the foamed polystyrene. The material consists of 2 layers: lower - polystyrene, upper - foil. The material is environmentally friendly, does not distinguish toxins.
If you choose a foam for the insulation of the loggia, it will work on the principle of the thermos - to maintain heat and not release it out.

The material is easy to work, very flexible. So there will be no problems with its installation. Fenofole is sold in rolls, so you can take the desired amount of material without residues.
On sale you can meet several types of this insulation: the type "A", "B" and "C". They differ in the thickness and layer of coating. So, the foofol type "A" consists of the base and 1 layer of the coating of the foil. When installing, you need to position the insulation so that the foil is inside the room, then heat will be reflected in the middle of the loggia.
The type "B" has 2 layers of coating foil (on both sides). This allows you to maintain not only heat in the cold season on the loggia, but also to prevent the heating of the room during the hot season.
The type "C" has the same coating as a "a" type foam, but with an additional application of the glue layer on the involving side. The insulation is conveniently assembled, which is very important when working in hard-to-reach places. Penofol is easily pasted on the surface.
If we consider the variants of various insulation, it is worth paying attention to the advice of professionals who recommend to insulate the loggia at once with two materials - foam and penplex. Double isolation will allow you to keep the room warm and will not give the cold air to penetrate inside the loggia. In the summer, even on the south side of the loggia will be heated slowly, and in winter, on the contrary, it is quick to warm up and slowly cool.
Loggia insulation technology
According to the rules of insulation of balconies and loggias, it is necessary to adhere to the main thing - for the wall, which is called "Cold" you need to lay 2 layers of the insulation. It is stacked so that the edge of the second layer overlap the first one. It is necessary to act like this with the insulation of complex areas, put 2 layers of material on cold corners. Moreover, if you do not regret the material and at the meeting place of the cold wall with warm, make a good smell of the material (to lay a 50 cm insulation more), then your loggia will be insulated by all the rules.
The insulation of the floor on the loggia must be performed in all the rules. Because this part of the loggia is considered cold, it must be improved correctly. If your neighbors from the bottom of the loggia glazed and insulated, it still does not mean that it will always be so. After some time, new tenants may appear and they will want to repair in their own way. So it is better to hope for anyone and put on the floor 2 layers of the insulation.

It is important when the loggia is insulation competently perform glazing. To prevent moisture from entering the room, and also to keep warm, experts recommend installing metal-plastic windows. Two-chamber windows are suitable for the loggia, glass thickness - 32 mm. Simultaneously with the installation of double-glazed windows, it is necessary to establish a good expansion profile with the left and right sides, as well as at the top above the windows.
After the work is completed, joints and seams must be filled with construction foam, and it must be laid as soon as possible so that there are no holes and defects.
When the foam grabs, you can install oven outside, which will protect foam from direct sunlight and moisture.
Step-by-step instruction of loggia insulation
If you have a good strong loggia, then it does not mean that it is not necessary to carefully prepare for insulation. First of all, pay attention to the parapet (this is the fencing of the loggia). Since this part of the design protects the room from dust, noise and moisture, then before starting work, it is necessary to take away all the slots. If your parapet is a design of a metal frame and concrete, it is desirable to lay 1 layer of bricks.

Performing work on the sealing of the loggia, listen to these tips:
- If you have a metal parapet and it does not coincide with the upper overlap in the level, then it is necessary to make a laying of the side wall and parapet. Good material is a ceramic brick or foam block. From the outside, the parapet can be sewed with decorative plastic panels or siding, just this will also contribute to the preservation of heat.
- Wooden designs must be processed by antiseptics if it is not possible to replace them with modern building materials. Processing will protect the tree from rotting, destruction and reproduction of bacteria.
Materials for work:
- Heattel.
- Construction foam and cleaner.
- Material for vapor barrier (isolon or foam).
- Dowel plastic "Tarbed", nail (take with a margin).
- Fasteners (self-tapping screws, nails).
- Scotch metallized.
- Tool for handling wooden lag.
- Guides.
- Profile (galvanized) and mounting connections (crabs).
- Suspension for fastening the guide.
- Tree bars (size 50x 20, 50x 30 or 45x 20).
- Tools: Lobzik, screwdriver or screwdriver, scissors for cutting metal profile, construction level, pencil, electric jigsaw, roulette, gun for construction foam.
Loggia insulation independently:
- Let's start with the construction of the heat-insulating layer on the ceiling. To carry out the insulation of this part of the loggia, it is necessary to attach the suspensions to the ceiling, and then install the guides. The stove of polystyrene is attached to the ceiling using a dowel and for reliability, fix the mounting foam. To attach the suspensions, it is necessary to make small cuts in polystyrene foam. It is important that the middle of the dowel is durable and was able to withstand the weight of the slab. All joints need to be carefully filled with construction foam.
- The next stage is the insulation of the floor. To base, we will attach support from a pre-treated wooden bar. It is important that the support be laid in terms of, otherwise the floor will be uneven. During the installation of the supports, it is necessary to observe a certain height so that the timber and lag rise above the insulation layer at least 5 mm. You can attach lags to the supports on the tapping screws, and the resulting voids fill the insulation layer. Then you need to lay a layer of vaporizolation so that the foil is located outside. Make sure that the outer corner does not have the joints of the vapor insulating layer, then you can avoid the "Cold Bridges". To save the thermos effect, you need all the joints to smoke the sticky ribbon.
- Wall insulation. First we define the height of the expansion. For insulation of walls, plates of polystyrene foam with a selected quarter are used. Installation does not take much time, and the special design of the plate avoids the holes in the connection site. If you could not find such a material, then the usual slab can be immediately laid with seams. The first and last slab must be attached to the wall with the help of a dowel, and all the others are on top of the neighboring foam.
- From above on the layer of insulation, a vapor insulation material is stacked, the foil is located indoors. It is important to warm the outdoor wall and side, as well as to pay attention to the corners.
- After laying a layer of vaporizolation, you need to install guides to cover the walls of PVC panels. Just at this stage, you need to think about the installation of electrical storage facilities for connecting the lamps, setting the outlet and switch.
- It remains very little - to give an attractive look. We install the guides (it can be a metal profile or wooden timber).
- On the top on the crate is mounted finishing material: plasterboard or plastic panels.
- The last thing to be done is to install the windowsill from plastic (if you need them) and the threshold under the door.

If you are all done correctly, then you will have a warm and beautiful loggia. In the event that there is no possibility to pay enough attention to the warming of the loggia, it is better to invite specialists. And for those who want to independently perform work on the insulation of the loggia, we suggest this video:


