
Previously, to drill a few holes in a concrete wall, metal or trees needed a long and hard to turn a drill handle. The functionality was activated by means of the gear unit, which significantly complicated the process, taking the precious physical strength of the employee. Over time, the electric drills appeared, which in turn were replaced by screwdrivers. Most professional finishes simply throw screwdriver, or disassembled on parts if the battery stopped working. This is due to the fact that the cost of the new element is high enough, and it is easier to buy a new tool. If you decide to extend the service life of your instrument, you can spend your own screw repair battery.
Content
General characteristics of batteries for tool
Since screwdriver has no power cable, then it is much easier for them. In addition, he is quite compact and light, that is why the choice of finishing professionals most often falls on this tool. So that the mechanism is activated by working with the necessary power, it needs a good capacitive energy charge. For this, the battery was invented, which simplified the workflow, becoming an excellent substitute power cable. The power supply is a bundle of several elements ("cans"), which are placed in a protective plastic case. The case must be removed so that the battery can be set to charging.

Varieties of batteries for tool
Before you begin to identify the problem, you need to determine the type of your battery. Most modern construction tools are equipped with lithium-ion batteries. Such power supplies are the most common, but it is worth paying attention to other types of such batteries. All of them differ in the capacity of charge accumulation, besides are assembled from different materials.

The main varieties of batteries for working tools can be attributed as follows:
- Nickel cadmium. Some of the cheapest battery, since they have a small number of charge-discharge cycles. In addition, they give a completely small stress (about 1.2B), which makes it use up to ten such batteries. Plus such an acb is that they can be stored for a long time, without fear of this temperature effect. But keep in mind that you have to often put them for charging.
- Lithium-ionic. The most frequently used batteries, as they have a rather high charge charge (up to 3.6V). Thus, to maintain the performance of one screwdriver, it is sufficient to use from 4-6 elements, which significantly reduces the weight of the tool. In addition, lithium-ion batteries have a high number of charge-discharge cycles, while the level of self-discharge is low enough. The main drawback of such batteries is a high price.
- Nickel-metalgibrid. This type of batteries every year apply more and less. This is due to the fact that they have a small number of charge-discharge cycles, while it is almost like lithium-ionic, and sometimes even more expensive. In addition, they are afraid of low temperatures capable of incoring the entire battery. Repair of such sources of nutrition is quite complicated and hardships, so it is better to replace the entire block, and it is better to go to the tool with a lithium-ion type acb.

As you can see, the main criterion that allows you to choose a high-quality battery is the number of charge cycles. It is on it that the tool pricing is based. This is due to the fact that the battery is the most expensive detail of the screwdriver.
Types of faults in the batteries for the tool
Rechargeable batteries Although made of different materials, but have a similar and fairly uncomplicated type of device. Therefore, the repair of such parts is quite simple, and forces anyone who wants. Before reinforcement, it is necessary to identify a malfunction.
To do this, consider the main reasons for the performance of the operation of a tool equipped with an ACB, among which the following can be distinguished:
- Mechanical breakdowns. Most often the battery fail due to the destruction of contacts on "banks". This happens at the connection site (soldering). Also, batteries may break if the integrity of the isolation of the battery is impaired, as a result of which the closure occurs between the "banks". So it often happens when the tool falls from a high height, or moisture gets into it.
- Electrochemical breakdowns. Such a fault happens in batteries that were incorrectly exploited. This happens when the battery charging rules were violated. Often they fail if the battery is simply outdated, and lost its capacitive charge. In principle, the broken battery may be enough for a short time, but subsequently it will be repaired. Also to increase the service life, you can "dispel" the battery with a special way.

If you are assembled independently repairing a lithium or any other type of battery of your screwdriver, then be sure to start with diagnostics. First, it is necessary to identify the cause of the problem, as well as its character. The more accurate the "diagnosis", the easier it will be repaired.
Repair of the battery screwdriver do it yourself
Getting started to repair the energy carrier of your tool, it is better to immediately prepare. Sometimes, it is impractical to repair the battery, as it can take a lot of time. In addition, the result may not work as you expected. In this case, it is enough to simply choose a similar power supply from another tool or replace all "banks" into batter. Note that in the case of buying a new battery, you will have to spend good enough, since its price is almost equal to the value of the tool.

Required tool
If you want to get a good result as a result of repair work, it is better to immediately buy the entire necessary tool.

To carry out high-quality repair of the screws, use the following tool:
- ammeter 2a, two voltmeters with a rating of 2V and 15B, a milliammeter;
- ommeter, tester, soldering machine;
- dumping, passatia, scissors, molding, section knife;
- magnifier, rosin, solder, distilled water;
- tape, thermoclay, syringe;
- gloves, safety glasses.
By purchasing all of the above, you will significantly speed up the repair process, and the result will not make you wait.
How to remove the battery from the protective case
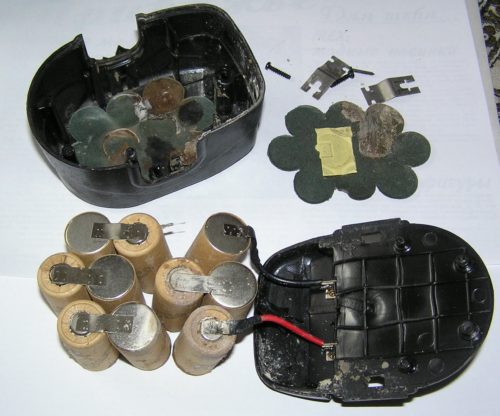
Starting the repair of the tool battery, you need to disconnect it correctly. In the event that your screwdriver is equipped with a cheap model of the AKB, then most likely enough to unscrew four screws from its body. To access "banks", you need to remove the rejected lid. Batteries are more expensive are usually placed in the steamed of several parts plastic housing, which makes a slightly of the process of seizure, but it is possible.

If you encountered a more expensive battery version, which is interfered with a solid body, then you need to do the following:
- The battery is placed on the side, after which they begin to hit the rubber casing in the junction area. Typically, the housing is made of high-quality plastic, so do not be afraid to beat strongly.
- If the connecting seam began to disperse, you need to insert a knife into it, after which it is a little pry. Do it carefully, so as not to damage the plastic connection.
- Similarly, disconnect the seams in several sections throughout the perimeter of the connection. It is better not to hurry, because you can deform or break the protective body.
- When you got access to the "cans" bundle, you need to disconnect them. For this, the terminals of the batteries are rejected, which are located at the edges. Sometimes it is difficult to do it, then it is better to disappear.
- Please note that there are two gaskets between the battery layers. They are isolated a connection between the elements. Save them if they are still suitable. In the opposite case, you need to purchase new insulating gaskets, because at the end of the repair they will still need.

To access your tool power items, act successively. You will have to remove the protective body once, therefore it is better not in a hurry, and act neatly.
Accumulator performance checking
After the "banks" are removed, you need to check the battery on the need for repair work. To determine the causes of the malfunction, you need to spend several tests that will help identify the cause of the breakage.
If you have the opportunity, then buy a special device "pendant". If not, then use an ammeter and a voltmeter that will help estimate the condition of the battery. They will show current strength and voltage at the output terminals of the battery. Based on these results, it will be concluded: "To replace the power supply, or can be repaired?".

To check the battery of the screwdriver for performance, come as follows:
- The battery is charged for 30 minutes, after which the output voltage is measured using a voltmeter.
- If you received the result in 13V, which is the norm, then the measurement needs to be continued. Do it with an interval of 30 minutes.
- If, with the next measurement, the device gives an indication in 13.5V, then you can continue the tests on.
- When the voltage ceases to rise, and stops at 14V, it means that the battery charge is completely filled.
- It happens that the test runs down until the value is obtained in 17b. This happens if the measurements are carried out on nickel-cadmium "banks". Most likely, this means that residual processes are present in the power elements ("memory effect").
- Similarly, a test on the output terminals using an ammeter. Such a check will help identify the condition of the current at the output. If during an hour the charge shows the amount in 1a and more, then most likely all the batteries are in order.

Battery performance check is a very important stage. From how accurately all the measurements will be carried out, the result of the test will depend on. After all, it is he who will determine your further actions related to the repair of the screw screws. Perform everything in stages, then you can reveal the cause of the battery breakage with high accuracy.
Repair and replacement of battery cans
If you are not lucky, the results of previous tests indicate the malfunction of the batteries, it is necessary to carry out their quality repairs. It often happens that one "bank" in the chain of the elements is faulty, as a result of which the battery loses the charge. To reveal the discharged item, you need to perform measurements on each "bank". To do this, the terminals of each element are applied to the contacts of the multimeter. Note that they should correspond to each other by polarity. If the battery does not file "signs of life", that is, does not respond even on the pulse run of 5-7V, the element replaces the new appropriate container.

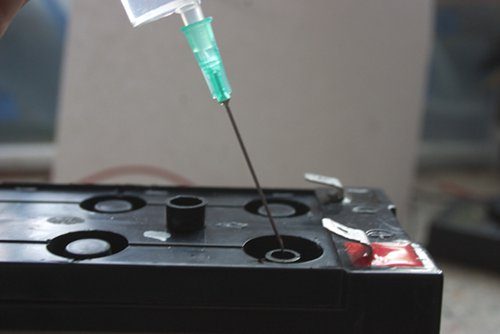
Often, the main cause of the battery breakdown is the drying "cans". Even in this case, it is not necessary to replace the elements of nutrition, just enough to "fill." To do this, go as follows:
- Turn the "Bank", which you need to "fill" so that you see the end of the minus contact. Drill it with a hole with a metal drill with a diameter of about 0.2 mm.
- Dial distilled water into the syringe. 1-1.5 cm³ will be enough.
- Similarly, fill in all defective batteries, after which let them fly away for 4 days.
- Now you need to re-tested each "bank", by analogy with testing for testing the performance that we described above.
- If the tests showed a negative result, each element must be replaced with the new one. When the battery began to give out good performance, another 0.2-0.3 cm³ of distilled water is fed, after which the hole is sealing.
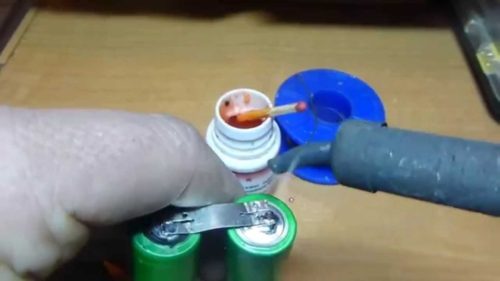
- As a result of drying, the shell of batteries is peeled. To restore it, it is enough to wind through every "bank" with a tape, after which itching all the elements together. It is possible to do this with a thermoclaus.
- Do not forget about the pads, it is better to replace them with new ones.


If you have all the above actions correctly, in accordance with their sequence, the battery can be operated for a long time. Conduct all measurements accurately, then the repair of the battery of the uninterruptible will not seem hard to you.
How to extend battery life
To increase the duration of the wireless tool, it is enough to know several rules that will retain a battery for a longer period. In case you often use such a tool, then such information will be useful for you.
To keep the battery charge for a long time, use the following tips:
- do not use a tool with such a battery at a temperature of 6-8Cº;
- do not overheat the tool;
- in the event of a drop of charge power 2 times, the battery is better replaced by a new one;
- if you use the tool often, then at least once a month spend 2-3 cycles of charging-discharge;
- battery Store in a dry place at room temperature, while pre-discharged;
- avoid dipping dust and moisture inside the battery protective block. You can wind the connecting seams with a tape or tape.

Use our recommendations to save the battery capacity for a long time. In addition, we advise when buying a tool, learn from the seller about the type of battery, as well as its content. Sometimes it is better to purchase an option to be more expensive than to continuously repair the power supply.


