Electric floor can be used for different purposes: for heating the loggia, veranda, bathroom or bath. However, it is rarely the main source of heat, most often optional. The main type of heating in the house is considered radiator or any more. However, despite this, a warm floor system today becomes quite popular. Thus, there may be cases when in the apartment for one reason or another can not be established water heating, especially for those rooms whose floors are faced with tiles. Then it is recommended to use electric floors under the tile. Due to their simplicity of their installation, such a heating system can be installed independently, even with a small experience of such work. A variety of assortment of such floors in modern construction stores will allow you to choose exactly what you need. Next, we will tell about how the installation of electric warm floor under the tile is performed.
Content
Methods of installation of electric floors under the tile

There are several methods for mounting such heating systems. The selection of this or that option depends on some room characteristics. For example, for heating in the living rooms, a bedroom and kitchen, a warm floor can be put on the tie. Pre-equip the layer of insulation and waterproofing.
If the room is not on the first floor, then the warm floor can be put under the tile on top of the screed. This option usually eliminates the need to arrange the insulating layer. Tiles and glue in this case will be enough to protect the heating element. For any of the options, it is important to find out in advance whether it is suitable for the electric warm floor under the tile.
In some cases, the warm floor can be put directly under the laminate. Especially when there is no possibility to make aispic repair. If the film coating film is stacked, then it is recommended to use a layer of foam polyethylene and foil when installed. If necessary, the waterproofing layer is equipped.
Put the electric floor under the tile will not work without the necessary equipment and material. It will be necessary to purchase not only a heap system, but also fastening, as well as connecting wires. In addition, the entire system will need such equipment as a regulator, a thermal sensor and a protective shutdown system. The installed system is grounded using a copper cable.
Calculation of material under electric floor

To calculate the required amount of materials purchased, you can use ready-made tables recommended for this directly by the manufacturers of the warm floor. In particular, it will be necessary to calculate the heat loss for each room, and on the basis of the results of these calculations, it is necessary to select a suitable step of laying the cable, its length necessary to cover the entire floor surface.
In addition, it is necessary to calculate how much floor elements need to cover the desired area. It is also necessary to calculate the length of the wire connection of the regulator. The same applies to the connection of the regulator and other elements of the warm floor system. As a result of the calculations, the cumulative power of the system is determined, which should be such that the power grid can withstand the desired load. If it turns out that the power grid will not be able to withstand the load, which will give a warm floor system, then you need to take care of the replacement of fuses to more powerful.
How to make electric warm floor under the tile
Stage of preparation

The heating system cannot be stacked as long as the base is prepared. Cable warm floor should be laid on a clean flat surface. To do this, before starting work, sex will have to put in order, in particular, to clean well, clean from the residues of the previous coating. If there are irregularities and defects, they should be eliminated. If the drops of heights on the surface are too large, it is recommended to make a screed. During the repair, quick-drying mixtures should be used. The fact is that in the case of the inflection of the cable in some places there may be a breakdown, and therefore the repair must be made in the shortest possible time.
Stage Stage

Order order:
- Before already mentioned above, it is necessary to remove the entire garbage from the surface. If there is an old floor covering, you will have to clean it. Be sure to explore the surface for the presence of defects and irregularities. If they are presented, it will have to make a rough screed. Usually make a screed with a layer thickness 40-65 mm.
- When these works are finished, you can start making a warm-alone connection scheme. To do this, there are marks on the tile, according to which the wires or heating elements will be laid. These marks are usually applied with a certain step, while observing some recommendations. In particular, from the walls should be made by an indent of about 11 cm. In addition, in places where there is a household equipment and furniture without legs in the future, the mark is also made. It is not necessary to lay a warm floor. Otherwise, due to the violation of heat transfer, the conductors will overheat, which can lead to a serious breakage.
- It is not always intelligent to stack the material straightforwardly. Therefore, sometimes to reduce the cost of electricity, it is better to cut the grid so that you can bend the track and send to the desired side. In addition, it will allow to distribute the heat only in those places where it really needs.
- When all the necessary marks are made, you can start the calculation of the material. If the flooring work is planned to be made with their own hands, then during computing, it is necessary to build on the fact that the square should have at least 140 W. The auxiliary heating systems may well work at no more than 140 W / sq. M.
- To calculate the necessary heating area, it is enough to know the dimensions of the room. From this value, the total area should be subtracted, which will occupy furniture without legs and household appliances. When the heating area is known to you, you can find out the total power of the heating element and its length. Thus, the rapid power of the heating element can be from 16 to 21 W per meter. To secure the heater on the concrete screed, the mounting tape will also be needed.
- After calculations, you can proceed to the next step - to check the old wiring. This must be done because the electric warm floor electric under the tile when working has a rather severe load on the electrical circuit. You need to calculate the cross section of the cable and determine if your wiring can withstand such loads. If it turns out that the diameter of the wires does not fit the load from the warm floor, they will need to be replaced. In this case, the protective shutdown and switch must also advise the necessary load, like the wiring.
- Next should be done with surface insulation. In particular, the first and foremost, it is necessary to make the thermal insulation of the surface under the laying of heating elements. The better the insulation will be equipped, the less heat loss will be, and, consequently, the efficiency and efficiency of the heap system itself. As a heat insulator, it is recommended to use foam.

- In order to insulate the surface, it is embarled, after which the joints are fooled by foils. For better insulation, it is important that the heat insulating material for several centimeters "overwhelmed" on the walls. When the coating is heated, its extension occurs, which must be compensated. For this purpose, a damper tape is sampled on the perimeter of the walls over the insulation. In addition, to simplify the installation of warm sex, it is advisable to put a metal grid on the insulation, which will not allow direct contact with the heater.
- Next, you will need to install temperature sensors and thermostat. These devices will allow you to manage the system. The thermostat is a mechanical or electronic regulator regulating the optimum temperature. In addition, it is possible to set the time of turning on and off.
- The temperature sensor is usually placed in the floor, and the thermostat is hanging on the wall near the outlets, making a small special groove in the wall, called snob. The sensor itself is placed in the corrugated pipe and make it from it to the place of temperature control (is usually the middle between the pair of cable turns). Through corrugations, the device is protected from damage. It remains easy access.
- The end of the corrugation that will be placed in the screed, it is best to pour a sealant. So the solution will not be able to get inside.
- When the installation of instruments is completed, it is necessary to check again some indicators of laid heaters. One of them is "resistance", the deviation of which is allowed, no more than 10% of the values \u200b\u200bspecified in the device passport. Resistance is measured using a multimeter. If as a result of the measurement received a permissible value, then you can mount the electric floor under the tile.
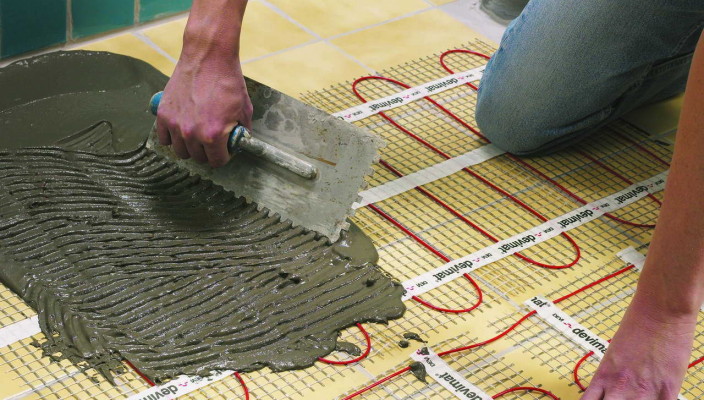
- If the cable warm floor is used, then the mounting tape will be required to install it. In addition, it is desirable to use plastic clamps to simplify the installation process. To ensure uniform heating between the turns, make sure that there is approximately the same distance between the turns around the entire floor area.
- Warm floors with heating mats are easier to lay, mainly due to the fact that it is not necessary to measure the equal distance between the turns yourself, because It was already done by manufacturers. Therefore, it is enough to spread the material and connect it to the instruments.
- After laying the heating coating, check the connection. To do this, with the help of a multimeter, resistance is measured. The resulting value should be the same as it was obtained when measured before laying.
- Now it is necessary to pour the screed layer. For the manufacture of a concrete solution, it will be necessary to mix 3 parts of sand, 6 pieces of fine rubble, 1 part of cement and 0.7 parts of water. In order for the solution to be more elastic, it is recommended to add a special plasticizer. It is important not to overdo the amount of liquid elements, otherwise cracks may appear in the screed. Some perlite and clamzite add to the solution, which can not be done, because They can disrupt heat exchange and cause overheating.
- The screed layer must have a thickness of 30-45 mm, not more. After filling the screed, you need to wait until the solution completely freezes. You usually need a couple of days to frost, but complete drying occurs only a month after the fill. While it does not happen, the electric floor bath under the tile cannot be included in the network. It should also be noted that the screed is needed only when using a heating cable. For thermomat, it will not be required and can be used immediately after laying.

The next step is laying the tiles. But it is possible to start this work only after the screed will freeze. Stop the tile on their own better only if there is experience in such work. Special glue is used for styling tiles. When mounting works are made, we can assume that the installation of the warm floor is over. As you can see, the technology of self-laying of a warm floor is not a very difficult task.


And under the linoleum lay warm floors? We want to shift in a country house, but shove or laminate to shift - invoice ...
Put, only linoleum is better thickening, semi-sensitive or industrial. Semi-commercial or commercial.