Surely you paid attention to the roofs of the houses, on the top of which the vane is installed. A similar device is a "business card" and even a part of the culture and landscape of most countries. For example, in Tallinn, Riga and Amsterdam, almost every building can be seen on the roof. Do not everyone know why it is intended. It turns out that it is not just home decoration, but also an important attribute, with which you can determine the direction and speed of air flow. That is why Fluger is a necessity, especially in those cities and countries where there is an exit to the sea.
Content
Currently, the fluugark is more installed on the roofs of houses as a decoration and a kind of business card. It can look different. In the dictionary of Dalya, it is possible to meet such a description: "Fluger is a small movable flag made of iron, which indicates the direction of the wind. Also, the windproof may also have a different form, and made from another material - tin, in the form of an arrow with a rotating tube. "
Most of the buildings of such famous cities like Rome and Stockholm are decorated with individual flora. The same can be said about the Kremlin in Moscow. The elegance and uniqueness of each weatherman makes us pay attention to small attributes of buildings. From an ordinary piece of iron you can get a unique item that will not only be decorating the cottage, a small house or a cottage, but also to talk about the individuality of the owner.
How to choose and install
The device for measuring the wind direction is small in size flag made of metal, which is fixed on the vertical axis. To determine the strength of the air flow, the fluger is installed on the rack that remains movable. In order to find out the strength of the wind, it is not necessary to install the fluger - it can be replaced with a regular propeller. But now, when this small subject has become rather decoration of the house, rather needed, the popularity of the fluger has increased. It became not only a meteorological device, but also a homely faith.
Fluger may have a different form. Popular flora in the form of cocks, ship or aircraft. Also on the roofs of houses you can find funny frogs, fabulous characters and zodiac signs. For example, the roof of the famous Petropavlovsky Cathedral in St. Petersburg protects the Herwear in the form of an angel.
You can see interesting models of Fluger in the photo:
You can purchase a finished vane and install it yourself. To do this, you need to cook everything you need:
- vane;
- compass;
- metal bracket for fastening;
- electrode with a set of metal drills;
- rivets and rivet fixture;
- several fasteners and wrench.
How to install fluger yourself:
- First you need to choose a suitable roof location. As a rule, this is the highest point - the cap on the chimney. If you want to attach the fluger on this place, then the metal thickness should be no more than 1.5 mm.
- First you need to install the bracket diagonally in the roof tube (in the cap). Metal strip, no more than 2 mm thick bend on both sides (2-3 cm), to attach the edges with rivets.
- Take a drill and make a hole in a pipe cap. It should be equal to the diameter of the "legs" of the fluger.
- If there is no thread in the rod, then it must be done independently.
- Install the terminal of the device in the prepared hole and screw the nut with the washer.
- The rod of the fluger is twisted on the principle of "in the division" so that the device remains mobile. You can check the "wind rose" by compass.
- Now you need to securely attach the rack to the dive and insert one more washer on the end of the rod, and on top of it to wind the nut.
Wheelpoon do it yourself
Purchase and install fluger is still half of the case. The main thing is that it is necessary to observe when installing a small meteorological device - so that he constantly rotate around the axis. Even if there is a small wind, the vane should be rotated anyway. To achieve this, you need to attach the bearing to the fluger.
If you have a desire to install the weather on the roof of your house, but the presented range does not satisfy you, then you should make the device yourself. It will be an excellent chance to emphasize the individuality of the house and make your own, unique weather.
You can make the device from sheet steel or copper. Today you can not break your head over the sizes of the weather, they have long been standardized. Standard fluger (upper part) has such dimensions: 400 mm in height and 800 mm in length. Naturally, if you want to install the device on a small gazebo, garage or fence, then the dimensions can be reduced.
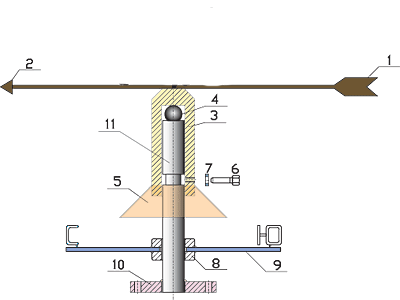
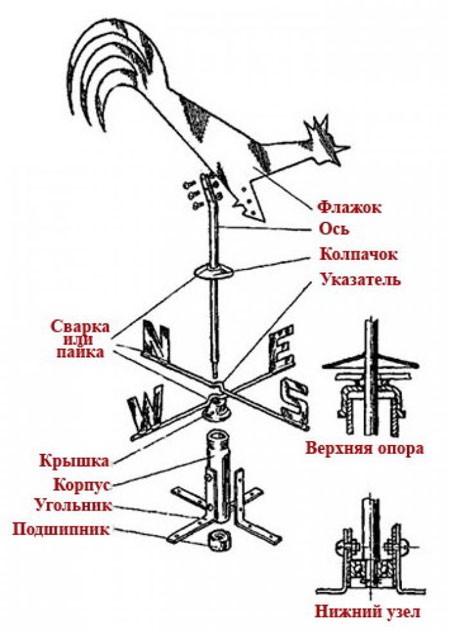
Fluger has 3 parts:
- Rack (mainly from metal).
- "Rose of winds" (4 steel rods 20 cm long, cooked crosswise. At the ends of each rod, the letters indicate the lights of the world are attached).
- Fluagark (checkbox or any other rotating part).
The fluger is made according to the drawing. It can be a ready drawing or designated drawings and descriptions.
Selection of material
Fluger can be made from different materials. Several centuries ago for the manufacture of floods used light material - wood. The most reliable and durable floods are made of metal. Metal figures will serve much longer than wooden flora. Even if you make a design of plywood, impregnated with moisture-resistant agents and layers of paint, still after several months of "services". To withstand a long time, the wind and the sediments of the vane from plywood will not be able, but from metal - will serve dozens of years.
You can make a plastic fluger. This modern material does not have a large weight, and will not be subject to corrosion, which cannot be said about metal floors. From the sheet of plastic, you can get any part, and it can be first planted on a sheet of paper, and then cut on the finished pattern. Some, small models of flugers can be made even from plastic bottles. Naturally, for the cottage it is not suitable for the cottage, but for a house at the cottage - quite.
Real floors made independently from different materials can be found extremely rare. Basically, such adaptations are more likely to decorate homes, and to cope with their direct responsibility - to show the direction of the wind can not always. You can meet massive wrought iron products made by professionals. Such vanes are a kind of business card of the owner and indicate its taste and prosperity. It is very difficult to make a wrought vane independently, so it's better to stay on simpler decorative models - from plastic, old disks or tin sheet. If you decide to make a wooden cock on a pole from plywood, then you should cover the paint figurine into several layers, and it is not necessary to connect items. Of course, you can make a fluger and from dense cardboard, but it will last no more than a month. This option is acceptable for children and adolescents, when during the summer vacation a lot of free time and you need to take yourself.
An interesting model of the fluger with a propeller:
How to make a fluger do it yourself
In order not to have any questions, how to make a fluger, you need to prepare everything you need in advance, ranging from the drawing, materials and ending with the tools and suitable place to work. It will take a standard set of carpentry and plumbing tools that are usually available for each man. If it is decided to work with the metal, then the corresponding tools are also needed. For plywood or wood, it is necessary to purchase (or rent) an electrobrice, as well as a file and sandpaper. All the necessary holes need to be drilled in advance by the electric drill. For more serious work with metal parts, you will need a Bulgarian, as well as scissors for metal.
Metal fluger:
- First you need to make a support. To do this, take a segment of a metal pipe with a length of 12 cm and a diameter of no more than 1.3 cm. At the top you need to make a thread in advance (its size corresponds to the size of the lid).
- The bearing is installed on the inside of the fluger below. It is possible to secure the vane using steel stripes that are fixed on the sides of the support. They must be consolidated so that they do not prevent the rotation of the fluger around the axis.
- How to make a floger housing. First you need to do the drawing a blank, and the top decorate with any element. IMPORTANT - if the fluger is used as a meterer, then you need to install a protective cap on the body from above.
- This work of art can only work out of your hands. Popular elements of the fluger - birds. For example, a rooster personifies prosperity in the house and protects it. Make a cockerel can be made of stainless steel sheet and secure with bolts. Good material for making a rooting - sheet steel with a thickness of no more than 1 mm or copper, the same thickness. Copper is very difficult to find, but from the sheet began to make the figure will not be a problem. The size of the cockerel for the standard weather fluger is 500 to 300 mm. First you need to print a picture on the printer and cut the paper figure. Attach the sheet to the metal and with the help of scissors to cut the desired outline. It will take a chisel and a file for work. Do not rush, this part of the work is the most painstaking and responsible. The figure can be both attached and welded to the metal pipe, then the design will be more reliable.
- When the weather is ready, it remains only to attach to the roof. To do everything correctly and not disturb the "Rose of Winds", you need to use the compass. And if after completing the installation, take a conventional wire and one end to fasten to the fluger, and fasten to 1-1.5 m in the ground, then you can get a good and cheap bullet.
How to make the original vane yourself, look at this video:


