More and more people leave the city, preferring to settle away from noisy tracks and forever smoking factories. The ability to live in an environmentally friendly zone is available to everyone, if you know how to approach the question. One of the most successful solutions is the construction of a guest house on its own plot. This will allow you to get additional living space for renting or receiving guests and relatives. Build a guest house with your own hands is not so difficult, and in this article we will tell you how to do it.
Content
How to make a project
The construction of the guest house is the optimal solution for those who often host guests have a big family or intend to rent housing for rent. It is believed that the content of such a building is inappropriate and takes too many means and strength, but only those who do not know how to competently plan construction. If you approach the choice of the project rationally and correctly select materials, it is possible to minimize the costs of a new building.
Competent planning will give the opportunity to arrange the construction on the site so as to minimize the length of communication or at all abandon the laying of the pipeline. As for heating, there is enough fireplace or stove for a small one-storey guest house. If you place a house near the bath or the main building, then you can shift some technical functions, for example, to make a boiler room there. In case of an emergency, the boiler operating on different types of fuel will become a backup source of energy for the entire site.
If you are planning to rent a house for rent only in summer and do not use it in winter, then heating can not be installed at all, thereby saving a significant amount. Building can also be used as summer kitchen. The most remarkable thing is that there are no strict rules for using such structures - you can do anything with them. Geometry, dimensions, cladding, design - all this is limited to your fantasy and financial capabilities. The video below shows a cozy guest house with a gazebo-veranda.
However, the design of the guest house must be harmonized with the exterior of the main building and fit into the existing landscape. Its square can be quite modest, for example, 40-50 m², but in this case the appropriate furniture and interior items should be selected. Fortunately, today there is a large selection of ergonomic compact furniture specifically for such cases. In a small bedroom, you can install one or double bed, which "hides" into the wall or turns into a comfortable sofa.


Instead of a spacious bath, you can put a modern shower cabin. The kitchen can also be planned in accordance with the quadrature and make a headset on an individual drawing. Little cuisine is not a sentence, but an excellent opportunity to realize creative ideas and practice in designer art.
If you still have no bath on the site, it may be reasonable to build a guest house with a bath, aligning a pleasant with useful. This will not only save building materials, but will make the holiday tenants of the house more enjoyable and comfortable. You can also attach a garage to a guest house for one or more cars, make a small veranda for evening gatherings or install children's swings.
I want to save any owner to the maximum, and this is completely not forbidden, but you just need to understand what you can save, and what is better to invest in full. So, for the construction of a guest house you can use the materials that are not very expensive, but allow the house to "breathe" and keep warmly well. Special attention should be paid to the exterior finish, especially if you plan to rent housing - the house must attract guests with their accuracy and beauty.
The project of the guest house should take into account not only its geometry and the square, but to show the final result to the furniture placed in the rooms. It is not easy, especially without relevant skills, so it makes sense to entrust the design of specialists. This is one of those cases where it is not worth saving - from the correct drawn drawing depend on the cost of construction and future maintenance of construction.
Construction technology
If you have a project of a guest house, then deal with the construction technology is easier than simple. Many self-taught masters manage to build wonderful and high-quality homes, only having studied theory on forums and sites.
Foundation of the guest house
So, first of all it is necessary to stock construction materials. Since any home begins with the foundation, you will need a lot of sand, rubble and cement. Of course, for a small house you can make the base on the screw piles, which is very common recently. But if you want to work your own self and maximize, you can pour a ribbon, monolithic or column foundation. In our case, instead of the poles, it was decided to use concrete blocks.
Useful advice: Concrete blocks need to choose the highest quality, since it depends on the reliability and durability of the entire design. When choosing, pay attention to the degree of the boundary load of the product, their frost resistance, sizes, as well as the presence in the composition of granite rubbing (blocks with crushed stone stronger).

How to make a base for a guest house:
- Make marking on the ground around the perimeter of the future building.
- Remove the fertile soil layer (DERD). Depending on the characteristics of the soil, its thickness may vary from 15 to 30 cm.
- Align the bottom of the resulting pit and thoroughly confuse him.
- After the perimeter, lay out the pegs and pull the rope between them.
- Make a small recess under the support blocks of a depth of about 30 cm (can be from 15 cm to 30 cm depending on the irregularities of the landscape). It is important that all blocks are located at one level. To check it out, put a long rail on neighboring blocks, and it is a construction level.
- At the bottom of each pit, pour a drainage pillow from a mixture of sand and crushedbon - she will divert water from concrete without giving him to collapse. The thickness of the pillow should be at least 10 cm (depending on the depth of the pit). When you make a mound, paint them with water and thoroughly confuse.
- Next, on drainage pillows, it is necessary to make reference sites that will increase the bearing capacity of the soil and will evenly distribute the load from the building. To do this, prepare the cement-sandy solution and fill it with a single-layer reinforcement of the reinforcing or road grid.
Carcass guest house
For the manufacture of the frame, a thick pine timber with a cross section is not less than 150x100 mm. Before use, be sure to treat it with an antiseptic, otherwise it will start rotting very quickly. When buying any sawn timber, pay attention to the degree of their humidity - it should not exceed 18%, otherwise the design after the assembly is deformed.

Make the lower strapping of the house, the task of which is to fix the entire box of the house on the foundation. It also serves as a support for the floor and walls. Attach the bars so that the size of the strapping was 5-7 cm less foundation - this place will then be installed and the outdoor building of the building will be attached. To fix items, use self-tapping screws and sealant adhesive. To enhance the rigidity of the strapping, it is recommended to connect the bars "in a quarter".
Useful advice: gaps will remain between the lower bars and pillars - fill in them with a gasket of polystyrene foam, after which you treat everything with an antiseptic.

To the lower strapping of the house, attach lags from a pine timber with a section of 120x100 mm by the "Quantine" method, amplifying fixation with glue and self-drawing. To make the basis for the floor, stick the bars with a thickness of approximately 3-4 cm to the bottom of the sidewall lag. Then put the cutting board on these bars, it does not attach it in any way - it will be a draft floor.
Walls of the guest house
After laying the lag and rough floor, you can start building walls. For this, an inexpensive pine timber was also used, but with a smaller cross section - 100x50 mm. Since in our case the house of one-storey, the power of such bars will be enough to withstand all insulating layers, the trim and the weight of the roof.
How to make a guest house from Bruus:
- In every corner of the future building, install the bearing frame racks, strictly aligning them vertically. For fastening, use temporary ships, placing them from the outside.
- At the frame racks, attach the top strapping, thoroughly checking the horizontal and verticality of the supporting structure.
- Focusing on the distance between the floor lags, attach the remaining intermediate frame racks.
- Secure all the elements of screws and steel corners. You can nail and nails, but such a connection is considered extremely unreliable for the construction of a frame of the house, since the tree can give a crack.
- Set the upper lags of overlappings, laying them into the grooves on the same principle as the sex lags with one single difference - the lags of the overlap is slightly longer. Length should be increased in order to continue to fix the rafting roofing system.
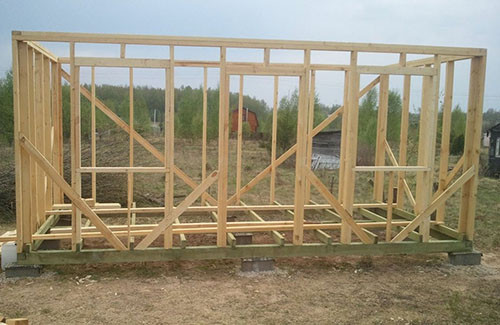
- Frame racks strengthen by dosy.

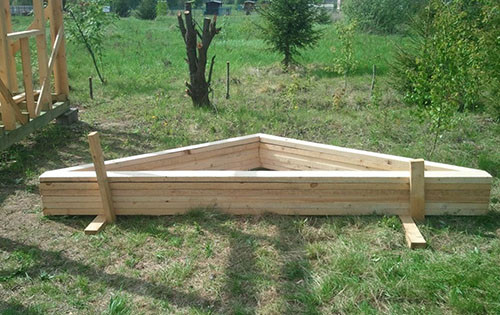
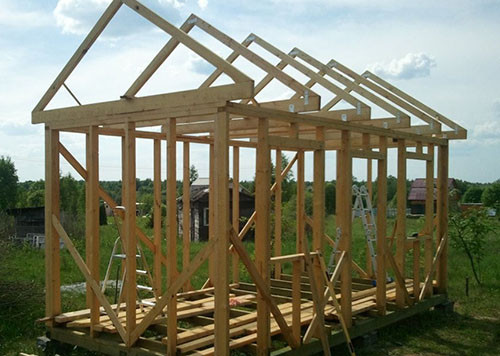
Roof of a guest house
To build a roof, you need to correctly calculate the rafting system - find out the distance between the rafters, their required power, etc. All these indicators depend on many factors: wind load in your region, slope angle, roofing material, etc. More information on this topic can be found in the article "Calculation of a rapid system: rules and examples".
Features of the construction of the roof of the guest house:
- To ensure the strength of the structure, the bar need to be stacked well on the walls of the walls.
- Overlapping so that it is issued for the perimeter of the wall at least 40 cm is a sink of a roof that will divert water flowing from the roof from the walls.
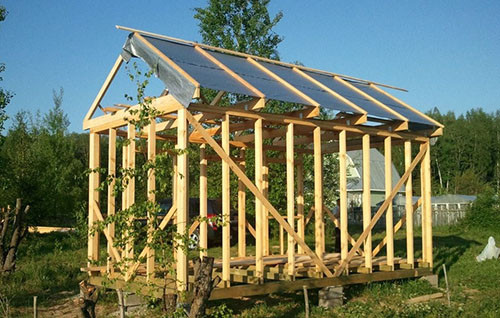
- For our house it was necessary to assemble 6 farms. For convenience, this can be done on Earth, and then take turns to raise each roof. For the manufacture of farms, the same bar was used that he went to the frame assembly, that is, with a cross section of 150x100 mm. For fixing farms, steel plates were used.
- To give additional stiffness of the design, fasten the rafted metal overlays. You can buy them either do it yourself from galvanized steel sheets.
- When all farms are fixed, you can adapt to them the crate. It can be solid or lattice. Type of crates Choose depending on the requirements for the installation of roofing material. For rolled materials, for example, a solid base is needed, and metal tile can be attached to the lattice crate.
- At the crate to attach a vaporizolation membrane - it will not pass condensate to the insulation. If you have chosen one-sided vaporizolation, then between the crate and the inside of the ceiling overlap you need to leave the ventilation gap in 2-3 cm. For a two-way membrane, the clearance is optional. For fixing vaporizolation, use the building stapler.
- Place the insulation on vaporizolation. Because we save and want to get a warm guest house, it was decided to choose an inexpensive mineral wool in rolls. It perfectly protects from the cold, however, it requires good waterproofing - if wet, cease to keep heat.
- At the insulation, attach the waterproofing film. Place the cuts of the brass 15-20 cm, gluing the seams with a wide scotch. To the wooden elements of waterproofing, nail the stapler.
- Since metal tile is chosen with roofing material, it is necessary to make a counterclaim over the waterproofing.
- For the formation of the cornice, lay the crate so that it goes out of the perimeter by 30-40 cm.


It remains only to put the finish coating. Installation technology depends on the selected material.
Warming and decoration
Walls also require reliable insulation from wind, dampness and cold. To do this, they need to be covered with wind insulation film, lay insulation and vapor barrier. In principle, this process strongly resembles the above-described work with the roof, so there should be no questions. Before trimming and insulation, install doors and windows.
For the external finishing of the facade, the brusade imitation was used, since it is not deformed, long retains the initial appearance, is not subject to rotting and damage to parasites. In addition, it is very easy to work with this material.

Useful advice: To minimize moisture inwards, attach the lining horizontally.
After cladding, it remains to install the drainage system and lighting. As for the internal work, the same mineral wool (universal insulation) was used for insulation, and it can be used for walls, so for the ceiling and gender.

Since on the floor, we have so far only with a rough flooring, it is necessary to lay a waterproofing film on it, and only then tightly put the insulation between lags. As a cheap alternative to the Minvate, you can float the clamzit - it is also a decent insulation. From above on lags, you can attach a finishing milking floor or a fane-base for carpet, laminate or tiles.

The construction of guest houses every year becomes more and more popular, but the services of developers sometimes stand unnecessarily expensive. As you can see, in this work there is nothing complicated, so it is quite possible to cope with it. The house described in this article really to build less than a month.
How to save
Finally, we suggest familiarizing yourself with the pair of useful tips. They will help you save on the construction of the house and reduce the cost of its service in the future.
How to save on a guest house:
- Warm walls outside - this is the most effective way.
- Install high-quality windows, because through the slots in the frames and openings more than 50% of heat leaves.
- Use only energy-saving light bulbs. Though they are more expensive, but quickly pay off, saving electricity to 80%.
- Be sure to install counters for all resources consumed.
- If possible, use alternative energy sources, such as solar panels or windmills.
- Install the energy-efficient modern class A + or A ++ technique.
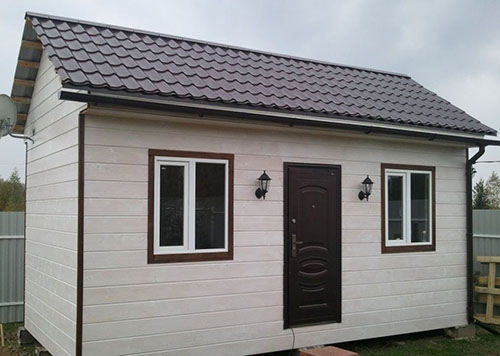
Guest house: Photo


